【Vue】【自戒】computedとmethodsの相違点
過ち
こんにちは!大ちゃんの駆け出し技術ブログです。
今回はタイトルに【自戒】とあるように同じ過ちを繰り返さないために書いている記事になります笑
何をやらかしたのかというと、Vueファイルに下記のようなコードを書いた事です。
<template>
・
・
    {{ translateGender(profile.gender) }}
・
・
</template>

<script>
・
・
    methods: {
    translateGender(gender) {
      return gender == "male" ? "男性" : "女性";
    },
    },
・
・
</script>
profile.genderはサーバー側でenumで定義していました。
# app/models/profile.rb
class Profile < ApplicationRecord
  enum gender: { male: 0, female: 1 }
それにより、プロフィールをAPIで取得する時、返却されるJSONファイルのgenderの値はmale、もしくはfemaleでした。しかし、これを男性と女性のいずれかでフロント側では表示したかったので下記のようにgenderの値がmaleの時(gender == "male")は男性を返却し、それ以外の値は女性と返却するメソッドを三項演算子を用いて定義しました。
translateGender(gender) {
  return gender == "male" ? "男性" : "女性";
},
実際こちらのコードは正しく動作し、translateGender(profile.gender)の値は男性もしくは女性と変換された形式で表示されます。
しかし、今回は以下のように処理は算出プロパティで定義すべきです。
<template>
・
・
    {{ translateGender }}
・
・
</template>

<script>
・
・
    computed: {
    translateGender() {
      return this.profile.gender == "male" ? "男性" : "女性";
    },
    },
・
・
</script>
問題点
何が今回のコードで問題だったのでしょうか。
こちらのコードの問題点は算出プロパティで定義しなかった事です。
上述したように男性か女性の値に返却するtranslateGenderメソッドはmethodsで囲ってあります。
methods: {
  translateGender(gender) {
    return gender == "male" ? "男性" : "女性";
  },
},
しかし、今回自分がこちらの実装で行いたかったことは、既存データを加工するという実装です。このような既存のデータを加工して取得する機能をVue.jsでは算出プロパティで定義することがセオリーとなっています。
これは自分が通勤電車でVue.jsのテキストを読んでいたときにそのような記載がありました。メソッドと算出プロパティの違いが記載されている該当箇所をいかに抜粋します。
算出プロパティの用途は、基本的に既存データの「加工を伴う取得」です。一方、メソッドはデータの取得に加え、操作や更新にも利用できます。・・・<省略>・・・算出プロパティでできることはメソッドでもできます。ただし、引数を伴わない単純な加工や演算なのであれば、算出プロパティを利用した方がコードの意図が明確になります。
https://wings.msn.to/index.php/-/A-03/978-4-8156-0182-9/
このように、単純なデータの加工のみでデータを更新したりしない場合は、算出プロパティで定義するべきということです。
今回の件については、それほど大きな過ちではないのではないかと思ったのですが、同じテキストで算出プロパティとメソッドの明確な違いについて述べている箇所を読んで今回は算出プロパティにするべきだったと思いました。
そこで使用されている例のコードをそのまま使用させていただきます。(テキストの例はシングルファイルコンポーネントの形式ではないですが、、、)
<div id="app">
  <form>
    <input type="button" value="クリック" v-on:click="onclick" />
  </form>
  <div>算出プロパティ:{{ randomc }}</div>
  <div>メソッド:{{ randomm() }}</div>
  <div>現在日時:{{ current }}</div>
</div>
new Vue({
  el: '#app',
  data: {
    current: new Date().toLocaleString()
  },
  computed: {
    randomc: function() {
      return Math.random();
    }
  },
  methods: {
    onclick: function() {
      this.current = new Date().toLocaleString();
    },
    randomm: function() {
      return Math.random();
    }
  }
});
randomcは算出プロパティ
computed: {
  randomc: function() {
    return Math.random();
  }
},
randomm()はメソッド
methods: {
  randomm: function() {
    return Math.random();
  }
}
どちらも同じMath.random()でランダムな乱数を返却するという処理をしています。
表示される画面は以下のようになります。上の乱数部分が算出プロパティで下の乱数部分がメソッドです。

v-on:click="onclick"によってイベントが発生するので、算出プロパティ、メソッドの値も変わることが期待されます。しかし、クリックを押すとメソッドの乱数の値は変わりますが、算出プロパティの値は変わりません。

これこそが算出プロパティとメソッドの最大の違いです。
なぜこのようなことが起きるのかというと、メソッドは実行されるたびに定義されている処理を実行するのですが、算出プロパティでは依存プロパティに変更がない場合、過去に表示した値がキャッシュされていてその値を使用します。
今回自分が修正したコードを使用して説明すると、算出プロパティで使用しているthis.profile.genderの値がdataオブジェクト側で変更されない限り、前の処理結果をそのまま返却するということです!
computed: {
  translateGender() {
    return this.profile.gender == "male" ? "男性" : "女性";
  },
},
一見算出プロパティでも表示している内容は変わりませんが、それが処理を挟まずにキャッシュから表示したものと毎回処理を評価されるものでは、明らかにコードの処理の重さが違います。
そのため、単純な既存データの返却に関しては必ず算出プロパティを使うことを肝に銘じておこうと思いました。
今回は以上です!
参考記事
【Gem】Banken
はじめに
こんにちは!大ちゃんの駆け出し技術ブログです。
2ヶ月ほど前にPunditの記事を書きましたが、今回はそれとよく似たgemのBankenについて書いていきたいと思います。
こちらのgemを作ってくださったのは日本人の方で英語のドキュメントだけでなく日本語のドキュメントも用意されています。
- 日本語のドキュメント
日本人が作った日本語ドキュメントなので本当にわかりやすく導入することができました。
まずはインストール方法を先に紹介します。ただ、これは日本語ドキュメントがありますので、日本語ドキュメントを参照していただいた方が早いと思ってます。
インストール方法
上記ドキュメントに従ってインストールします。
Gemfileに追記しbundle install
# Gemfile
gem "banken"

# ターミナル
$ bundle
Fetching banken 1.0.3
- アプリケーションコントローラでBankenを
include
# app/controllers/application_controller.rb
class ApplicationController < ActionController::Base
  include Banken
- ターミナル上でコマンドを使用してインストール
application_loyalty.rbというファイルが作成されます。
$ rails g banken:install
      create  app/loyalties/application_loyalty.rb
作成されたファイル
# app/loyalties/application_loyalty.rb
class ApplicationLoyalty
  attr_reader :user, :record

  def initialize(user, record)
    @user = user
    @record = record
  end

  def index?
    false
  end

  def show?
    false
  end

  def create?
    false
  end

  def new?
    create?
  end

  def update?
    false
  end

  def edit?
    update?
  end

  def destroy?
    false
  end
end
ここまでで基本インストールはおしまいです。
要件
今回自分がPFに使用した例を紹介します。
自分のPFではログイン後ユーザーがプロフィールを作成していない場合、まずはプロフィール新規作成画面に遷移します。ここでユーザーはプロフィール作成が終わるまで、プロフィール新規作成画からはどこのページにも遷移できないように制御したいです。
また、新規作成後はプロフィール新規作成画面に戻る事ができない仕様にしたいです。ユーザーとプロフィールのアソシエーションはhas_oneの関係(1 : 1)なので、ユーザーが1つのプロフィールを既に作成していれば、新規作成画面に遷移する必要がないからです。
# app/models/profile.rb
class Profile < ApplicationRecord
  belongs_to :user

# app/models/user.rb
class User < ApplicationRecord
    has_one :profile, dependent: :destroy
以下2つの項目を制御できるようにBankenを使用してみます。
- 基本プロフィール未作成時にプロフィール一覧に遷移できない
- プロフィール作成後はプロフィール作成画面に遷移できない
使用方法
- Loyaltyクラスの作成
制御したいアクションがあるコントローラの名前と同名のLoyaltyクラスを作成します。以下公式ドキュメントを引用。
公式ドキュメントの例
Bankenではcontrollerに一対一で紐づく同名のloyaltyクラスを作成していきます。 今回はPostsControllerに対して制御を行うのでPostsLoyaltyクラスを作成する必要があります。
> rails g banken:loyalty posts
      create  app/loyalties/posts_loyalty.rb
今回はProfilesControllerの新規作成画面での遷移(newアクション)と一覧画面への遷移(indexアクション)に対して認可制御を行います。
rails g banken:loyalty profiles
      create  app/loyalties/profiles_loyalty.rb
新しくProfilesLoyaltyクラスが作成されました。しかし、中身はクラスが定義されているだけでメソッド等のロジックは記載されていません。
# app/loyalties/profiles_loyalty.rb
class ProfilesLoyalty < ApplicationLoyalty
end
基本プロフィール未作成時にプロフィール一覧に遷移できない
まずは新規作成画面からどこの画面にも遷移できないように制御します。
- プロフィール一覧画面を表示させる
indexアクションに対してauthorize!メソッドを設置
※ 今回はAPI化を行っているため、特にこちらのコントローラに記載はしておりません。
# app/controllers/profiles_controller.rb
class ProfilesController < ApplicationController

  def index
    authorize!
  end
authorize!メソッドについてですが、実行されたアクション名に紐づいたLoyaltyクラス内のアクション名?メソッドを実行します。今回はProfilesControllerのindexアクションの中でauthorize!メソッドが実行されているので、コントローラに紐づいているProfilesLoyaltyのindex?メソッドが実行されます。
ProfilesLoyaltyのindex?に対してuser.profile.present?を記述
index?メソッドがまだ定義されていませんので定義します。?とあるようにこのLoyaltyクラス内のメソッドは真偽値を返さないといけません。そこで今回は要件に従うようににcurrent_userがプロフィールを所持しているかどうかに対してboolean値を返すようにします。
# app/loyalties/profiles_loyalty.rb
class ProfilesLoyalty < ApplicationLoyalty
  def index?
    user.profile.present?
  end
end
このメソッドの中にあるuserはどこからくるの?と思うかもしれませんが、実はこのuserはcurrent_userと同じです。Bankenの便利なところで上記のauthorize!メソッドは下記のことと同じことを実行します。
raise "not authorized" unless ProfilesLoyalty.new(current_user).index?
勝手に引数にcurrent_userを渡してくれていますね。なのでauthorize!メソッドで引数を渡さずとも、current_userは勝手に渡されており、それがindex?アクションの中でuserとして扱われています。
※ 上記のようにcurrent_userを必ず使用するため、current_userが使用できないとエラーが発生します。よって、必ずcurrent_userを使えるようにしておく必要があります。自分の場合、deviseを使用してcurrent_userを使えるようにしております。
application_controllerに例外処理を記載
上記のuser.profile.present?でfalseが返ると例外が発生します。例外をハンドリングするためにApplicationControllerにエラーハンドリングのロジックを書きます。
# app/controllers/application_controller.rb
class ApplicationController < ActionController::Base
  include Banken

  # エラーハンドリング =============
  rescue_from Banken::NotAuthorizedError, with: :user_not_authorized

  private

  def user_not_authorized(exception)
    redirect_to(request.referer || root_path)
  end
request.refererは遷移する前の元の画面のURLを取得します。プロフィール新規作成画面から遷移しようとしBankenで例外が生じると、プロフィール新規作成画面に戻るということになります。そして元の画面のURLがnilの場合はroot_pathに遷移するようにします。
ここで問題なのが、request.refererはボタンやリンクなどから元の画面のURLを取得するのですが、直接ブラウザにURLを打ち込まれて画面遷移した場合、request.refererの値はnilになってしまいます。よって、新規作成画面にいる状態でブラウザに/profilesを打ち込むと、root_pathにリダイレクトされていしまいます。しかし今回の実装の場合、プロフィール新規作成が終了するまでは他の画面に遷移する事はできないようにしたいので、root_pathにも遷移したくありません。
なのでroot_pathのアクションに対して直接ロジックを書きます。
def index
  if user_signed_in? && current_user.profile.nil?
    redirect_to new_profile_path
    end
end
ユーザーがuser_signed_in?していて尚且つプロフィールを持っていないのであれば、新規作成画面にリダイレクトします。少し冗長ですがこれで第一の要件を満たす事はできました。
プロフィール作成後はプロフィール作成画面に遷移できない
次の要件を満たすために先ほどと同じようにauthorize!メソッドを使用します。今回はnewアクションですね。
# app/controllers/profiles_controller.rb
class ProfilesController < ApplicationController

  def index
    authorize!
  end

 def new
    authorize!
 end
newアクションに対応するnew?メソッドをProfilesLoyaltyクラスに定義します。今回は新規作成済みの場合の制御となるのでuser.profile.present?とは逆のロジックを書けばいいと思います。
# app/loyalties/profiles_loyalty.rb
class ProfilesLoyalty < ApplicationLoyalty
  def index?
    user.profile.present?
  end

  def new?
      user.profile.nil?
  end
end
これで実装はできているのですが、先ほどと同じように直接ブラウザ上で新規作成画面のURLを打ち込むと、request.refererがnilになりますので、このままだとトップページにリダイレクトします。
それを制御するためには少々手荒な実装ですが、下記のように記述して解決しました。
def index
  if user_signed_in? && current_user.profile.nil?
    redirect_to new_profile_path
  elsif user_signed_in?
    redirect_to profiles_path
  end
end
user_signed_in?をさらに下に書く事で実装できました。これによりプロフィールは持っているけども、サインインしている状態のユーザーがプロフィール一覧画面にリダイレクトします。
※ user_signed_in? && current_user.profile.nil?の制御を必ず最初の条件に持っていかないとuser_signed_in?の制御が先に行われます。そのため、新規作成画面からトップページにリダイレクトした時にプロフィール一覧画面に再度また遷移し、そこでまた認可制御されるという無限ループになり画面が白くなります。
これで実装は完了です!
Punditとの違い
BankenはPunditの影響を強く受けているgemです。gemの英語ページでも下記のように説明されています。
Simple and lightweight authorization library for Rails inspired by Pundit
今回Bankenを使用し、また過去にPunditを使用したので2つのgemの違いがざっくりと見えましたので共有します。
コードの記述方法の違いを見ればわかりやすいかと思います。今回のロジックをPunditで行うと以下のようになります。以下はプロフィール一覧画面への制御です。
Punditの場合
def index
  authorize Profile
end
Bankenの場合
def index
  authorize!
end
違いとしては下記2点です。
Bankenと違う点
- authorize!ではなくauthorize(!マークがない)
- 引数がない場合クラスを引数にする(Profile)
1に関しては書き方の違いなので大した問題ではないのですが、2は大きな違いだと思います。Bankenの場合引数がなくても引数なしにauthorize!メソッドを使用できますが、Punditの場合、対応するモデルのクラス名を記述しないといけません。
こちらの理由ですが、これはPunditとBankenの紐づいている対象がモデルかコントローラかという違いになります。
Punditはコントローラ、モデル、そしてPolicyクラス(BankenのLoyalityクラスと同じ認可のメソッドが定義されるファイル)が1 : 1 : 1で結びついています。そして、authorizeメソッドは引数のインスタンス変数(@profileなど)からその変数のモデルクラスがあると推測し、そのモデルクラスに対応するPolicyクラスがあると判断します。ここがPunditとBankenの大きな違いです。
Punditの場合の認可のフローは下記のようなものです。まさにコントローラ、モデル、そしてPolicyクラスそれぞれが結びついていることがわかると思います。3つのファイルがあって初めて機能します。
def index # indexアクションを実行
  authorize @profile # 変数名からProfileクラスがあると推測
end

↓

class Profile # Profileクラスを確認
end

↓

class ProfilePolicy < ApplicationPolicy # モデルのクラスに対応するPolicyを確認
  def index? # コントローラで実行されたのはindexアクションなのでindex?メソッドを実行
    user.profile.present?
  end
end
そのため、authorizeメソッドで何も引数がない場合、Profileクラスがあると推測することができません。よって、モデルのクラス名を渡してあげることで、Punditにクラスがあると推測させる必要があるわけです。
def index # indexアクションを実行
  authorize Profile # クラス名からProfileクラスがあると推測
end
逆にBankenだとコントローラのみでしたね。モデルの有無は関係ありません。
class ProfilesController # コントローラ名からProfilesLoyaltyがあると推測
    def index # indexアクションを実行
      authorize!
    end

↓

class ProfilesLoyalty < ApplicationLoyalty # コントローラに対応するProfilesLoyaltyを確認
  def index? # コントローラで実行されたのはindexアクションなのでindex?メソッドを実行
    user.profile.present?
  end
end
もっと詳しく知りたいという方は下記のドキュメントを参照してください。
The difference between Banken and Pundit (Japanese)
本記事は以上になります。
参考記事
【Vue】moment-js
moment-jsとは
こんにちは!大ちゃんの駆け出し技術ブログです。
この記事では日付フォーマットを変換するプラグインのmoment-jsについて紹介します。自分のPF作成で使用したため忘れぬうちにアウトプットさせていただきます。
今回自分がこのプラグインを使用した理由は、railsのAPIで渡されるdatetimeの値のフォーマットを変更したいためです。
通常created_atやupdated_atなどのdatetimeカラムは保存されると以下のようなフォーマットになるかと思います。
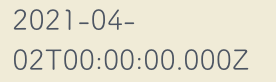
"created_at":"2019-04-21T00:00:00.000Z"
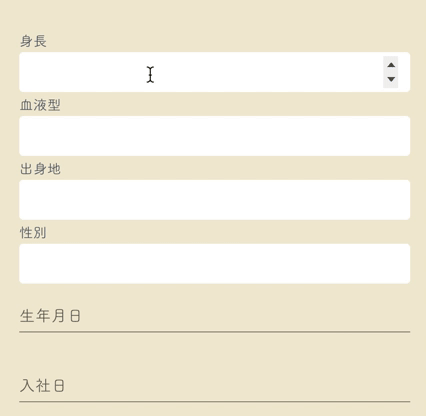
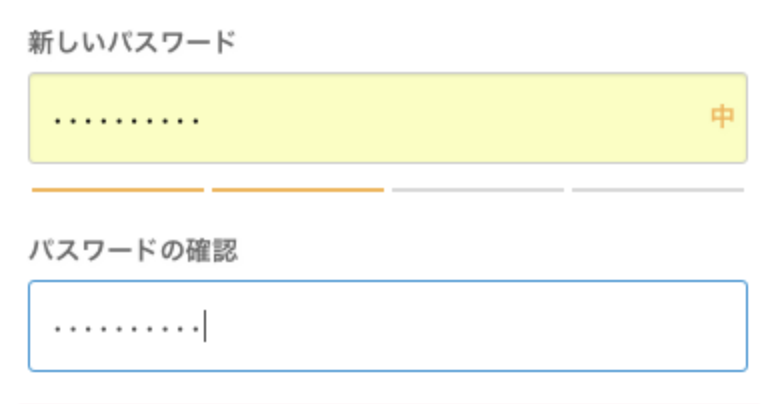
自分のPFでは誕生日と入社日というカラムをdatetimeで追加していたため、これをrailsサーバーからJSON形式で値を受け取ると同様のフォーマットで受け取っていました。これをvue.js側で表示すると、表示される画面は以下のようになります。
[該当コード]
<div>{{ profile.birthday }}</div>
[表示画面] (画質が荒く申し訳ございません。)
これを解消する方法としては2つあるかなと思いました。
上記2つの違いはバックエンドがフロントエンドかということだけです。JSONの値のフォーマットを変更するという点では共通なので、処理内容は同じになるかと思います。
まずバックエンド側で整形する方法ですが、これは個人的に思ったのですが好ましくないのかなと思いました。理由としては、本来のサーバー側でレンダリングしているフォーマットはサーバー側で保存しているフォーマットと一致しているのが一般的だと思います。(enumは話が別になりますが、、、)。ですのでサーバー側で表示する誕生日のJSONの値だけフォーマットを部分的に変更するという仕様は違和感がありました。また、フロント側で値を加工することが多いので値自体の加工はフロント側で統一した方がいいのかなとも思いました。
ではフロント側で受け取った値を加工するというのはどうでしょうか。これはvuexのgettersのように受け取った値を加工するという仕様があるため問題なさそうです。
computed: {
  doneTodosCount () {
    return this.$store.state.todos.filter(todo => todo.done).length
  }
}
しかし、javascriptに慣れていないためか処理が冗長になると感じました。上記の例とは違い、プロフィール群の全てのプロフィールの誕生日の値のフォーマットを変更するという処理はかなり文が長くなることが予想されます。もっと簡単に処理できる方法はないのかと悩んでいました。
そこで今回使用するプラグイン、moment-jsを使用することにしました。導入するとmoment-jsでYYYY年/mm月/dd日というフォーマットに変更することができました。
インストール方法
railsを使用しているのでwebpackerに任せてインストールします。個人的にmoment-jsの他の記事はそのままのvue(vue-clii)での開発のパターンが多くyarnでインストールしている記事は見当たりませんでしたが、問題なく実装できますのでご安心ください。
$ yarn add moment
yarn add v1.22.10
[1/4] 🔍  Resolving packages...
[2/4] 🚚  Fetching packages...
[3/4] 🔗  Linking dependencies...
warning " > vue-loader@15.9.6" has unmet peer dependency "css-loader@*".
warning " > vue-loader@15.9.6" has unmet peer dependency "webpack@^3.0.0 || ^4.1.0 || ^5.0.0-0".
warning " > webpack-dev-server@3.11.2" has unmet peer dependency "webpack@^4.0.0 || ^5.0.0".
warning "webpack-dev-server > webpack-dev-middleware@3.7.3" has unmet peer dependency "webpack@^4.0.0 || ^5.0.0".
[4/4] 🔨  Building fresh packages...
success Saved lockfile.
success Saved 1 new dependency.
info Direct dependencies
└─ moment@2.29.1
info All dependencies
└─ moment@2.29.1
✨  Done in 4.07s.
次にコンポーネント自体にインポートします。誕生日をフォーマットを変更して表示するページが今のところ1ページのみですので、今回はページのコンポーネントに直接インストールしました。
<script>
import moment from "moment";

export default {
};
</script>
次にexport defaulltの中にfiltersでフォーマットを指定します。
<script>
import moment from "moment";

export default {
    filters: {
      moment: function(date) {
        return moment(date).format("YYYY年/MM月/DD日");
      },
    }
};
</script>
filtersに関しては全く知らなかったのですが、どうやらmustacheなどで値のフォーマットや大文字小文字を加工する時などに使われているようです。公式にも記載がありました。
format("YYYY年/MM月/DD日")の部分で好きなフォーマットを指定します。format("YYYY/MM/DD")といった年などを削除しても可能です。
これで準備は完了です。あとは以下のように変換したい日付 | momentとmustacheの中に記載します。
[変更前]
<div>誕生日: {{ profile.birthday }}</div>
↓
[変更後]
<div>誕生日: {{ profile.birthday | moment }}</div>
これにより値のフォーマットが意図したものに加工されました。

問題点
今回はあまりフォーマットの実装自体に時間をかけたくなかったのでmoment-jsで実装しましたが、今後こちらの実装で予想される問題点もあります。
例えば、誕生日カラムだけでなく、記念日というカラムを追加しようとした時に、そのページには2箇所のmomentの記載が必要です。
<div>誕生日: {{ profile.birthday | moment }}</div>
<div>誕生日: {{ profile.memorial | moment }}</div>
さらに増えると3箇所というふうにそのページでmomentを記載しなければならない箇所がどんどん増えていきます。それはかなり冗長に思えますので、それだったらvuexのgettersで一度に加工してしまった方が処理が冗長でも管理が楽なのかもしれません。それについてわかったらこちらの記事に追記したいと思います。
以上、大ちゃんの駆け出し技術ブログでした!
【Vue】VeeValidate
はじめに
こんにちは!大ちゃんの駆け出し技術ブログです。
本日はveeValidateについてのアウトプットです。
これはフォームを入力時にフロント側でバリデーションしてくれる機能ですね。
これを使うと以下のようにリアルタイムでバリデーションのメッセージが表示されます。
今回はこれを紹介しますが、表示している画面が自分のPFの画面のため、コードを公開したくありません。そこで、サンプルコードを使用して説明します。
今回はveeValidateを導入するにあたって既に用意されているコンポーネントを2つ紹介します。基本は公式の通りに導入します。
インストール
まずインストール方法ですが、自分はrailsのアプリでwebpackerを使っていますので、yarnを使用してインストールします。
$ yarn add vee-validate
次にJSファイルを作成し、以下の3つをimportします。
- ValidationProvider
- ValidationObserver
- extend
// app/javascript/plugins/vee-validate.js
import { ValidationProvider, ValidationObserver, extend } from "vee-validate";
import { required, max } from "vee-validate/dist/rules";

export default {
  components: {
    ValidationProvider,
    ValidationObserver,
  },
};
上述しました2つのコンポーネントというのはValidationProvider、ValidationObserverのことです。
※ extendに関しては後で記載します。
これらをメインで使用しているJSファイルでimportするためにexportをしています。
ではメインで使用しているJSファイルでimportします。
import veeValidate from "../plugins/vee-validate"
Vue.mixin(veeValidate)
Vue.mixinについては公式を参照したところ下記の記述があります。
グローバルにミックスインを適用することもできます。使用に注意してください!一度、グローバルにミックスインを適用すると、それはその後に作成する全ての Vue インスタンスに影響します。適切に使用されるとき、これはカスタムオプションに対して処理ロジックを注入するために使用することができます。
グローバルミックスインという機能で、どこのVueインスタンスでも使用することができるようになります。よってveeValidateをどこのコンポーネントでも使用可能になりました。
(グローバルミックスイン自体にはVueインスタンス全体に影響があるので注意が必要ですが、今回のようなフォームへのバリデーションという複数のページで使用されると予想されるものは問題ないのかなと思っています。)
これでインストールの手順は完了です。
Validation Provider
Validation Provider | VeeValidate
Validation Providerは公式の例を使って説明します。
<template>
  <ValidationProvider rules="required" v-slot="{ errors }">
    <input v-model="value" type="text">
    <span id="error">{{ errors[0] }}</span>
  </ValidationProvider>
</template>

<script>
import { ValidationProvider } from 'vee-validate';

export default {
  components: {
    ValidationProvider
  }
};
</script>
ValidationProviderはプラグインとして用意されているコンポーネントですので、コンポーネントとして登録してあります。これはグローバルミックスインを使用しない方法ですね。グローバルミックインをした場合、scriptタグの中にコンポーネントを登録する必要はありません。
[使用例]
<ValidationProvider rules="required" v-slot="{ errors }">
  <input v-model="value" type="text">
  <span id="error">{{ errors[0] }}</span>
</ValidationProvider>
ValidationProviderのコンポーネントをフォームに対して挟むようにして設置します。コンポーネントにあるrules="required"ですが、これはrules="検証ルール"と記述することで検証ルールを指定しています。requiredは検証中のフィールドに空の値を入力できないというルールを表しています。
他にもこのルールに関してはたくさんありますが、今回は1番シンプルなrequiredのみを使用しています。他のルールについては以下のページで確認できます。
そして検証ルールに沿わない、つまりフォームが未入力となっているとv-slot="{ errors }のerrorsの値が{{ errors[0] }}の部分に表示されるという仕組みです。slotに関してはこの間記事で説明したので割愛します。
これによりフォームが未入力となっていると検証メッセージが出ます。
extend
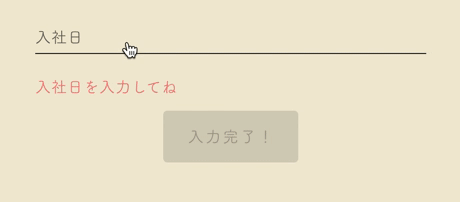
しかし、ValidationProviderデフォルトで用意されているメッセージ以外の独自メッセージも表示したいとします。例えば、自分が今回実装したメッセージのように「~してね」みたいなメッセージはデフォルトでは表示できません。
[再掲]
つまり上記のメッセージは、独自メッセージを作成したために表示できているということです。
そしてそれを可能にするのが先ほど挙げたextendになります。
import { ValidationProvider, ValidationObserver, extend } from "vee-validate";
extendをインポートすることで、カスタムメッセージを行えます。
その方法は同一ファイル内でカスタムメッセージをextendします。
import { ValidationProvider, ValidationObserver, extend } from "vee-validate";

extend("select_required", { // ルールの名前
  ...required, // 追加する検証ルールの種類
  message: "{_field_}を選択してね", // 表示するメッセージ
});
select_requiredはrulesの属性で指定する時に使用するルールの名前になります。rules="select_required"で定義するカスタムメッセージが表示できるということになります。
<ValidationProvider
  v-slot="{ errors }"
  rules="select_required"
>
2行目の...requiredですが、こちらはデフォルトの検証ルールの中でどのルールに該当するかということを示します。今回の場合は未入力時の検証ルールですので、requiredを指定します。例えばこれが「~文字以上入力してね」みたいな文字数の検証ルールの場合、requiredではなくminという検証ルールを指定します。
※ スプレッド構文(...)を使っている理由はわかりませんが、、、
最後に表示するメッセージを指定します。{_field_}の箇所はValidationProviderコンポーネントのname属性で指定することで表示できます。例えば、以下のようにname属性に「性別」を指定した場合、「性別を選択してね」という文字がエラーメッセージとして表示されます。
<ValidationProvider
  v-slot="{ errors }"
  name="性別"
  rules="select_required"
>
ValidationObserver
最後にValidationObserverです。これの役割は検証エラーが出ている時にフォームの送信の実行ができないようにします。
ValidationObserverがないと、たとえエラーメッセージが表示されていてもフォームの送信ができてしまいます。
エラーメッセージが消えるまでこのボタンを押せないようにするためにValidationObserverが必要です
。
しかし実は実装は簡単で以下のようにフォームの間をValidationObserverコンポーネントで囲ってあげるだけです。
<ValidationObserver ref="observer" v-slot="{ invalid }">
<ValidationProvider rules="required" v-slot="{ errors }">
<input v-model="value" type="text">
<span id="error">{{ errors[0] }}</span>
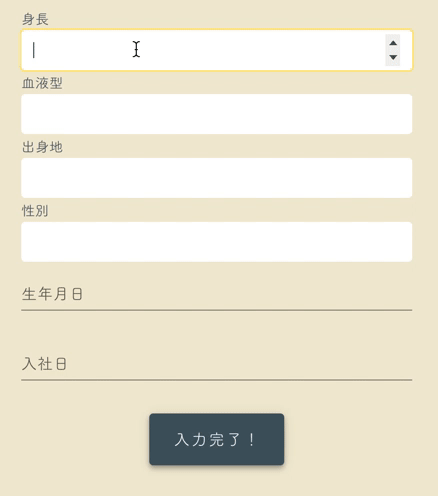
<v-btn :disabled="invalid">入力完了!</v-btn>
</ValidationProvider>
</ValidationObserver>
ref="observer" v-slot="{ invalid }"は必須です。invalidを挟み込むための箇所は、フォームの送信部分です。
v-btn :disabled="invalid">
これを行うことで、ValidationProviderで検証エラーが出ている場合、disabledが有効となり、ボタンが押せない状態になります。そして、エラーが消えたらdisabledが無効になります。
今回は以上です!
【Vue】axios - Base URLの指定方法
Base URLの必要性
こんにちは!大ちゃんの駆け出し技術ブログです。
本日のショートアウトプットはaxiosのbase URLの指定方法です。
axiosとはvue.jsでAPI通信によるJSON取得時に使われるHTTPクライアントです。
アプリケーション開発においてフロントとバックエンドを分けて開発する場合、フロントから自分のアプリケーションのAPIにアクセスします。axiosはそのサーバーへのAPI通信を実装してくれるツわけです。
例えば自分のアプリで以下のようにAPIを公開しているとします。
Api::V1::ProfilesController < ApiController
    def index
      profiles = Profile.select(:name, :email)
      render json: profiles
    end
サーバーのプロフィールテーブルからnameカラムとemailカラムを全て取り出し、それをJSONで公開しています。
これを取得するためにフロント側ではaxiosを使用します。
// app/javascript/pages/profile/index.vue
data() {
  return {
    profiles: {},
  };
},
created() {
  axios
    .get("http://localhost:3000/api/v1/profiles")
    .then((response) => (this.profiles = response.data))
    .catch((err) => console.log(err.status));
},
get("http://localhost:3000/api/v1/profiles")でJSON形式でresponseを受け取り、それをdataで定義しているprofilesに格納しています。これを行うことでサーバー側で管理しているデータをフロント側から取得することができます。
しかし、この実装で問題となってくるのがサーバー側にアクセスしているURLの箇所
get("http://localhost:3000/api/v1/profiles")
開発環境であればlocalhost:3000の箇所は基本的には変わらないかと思います。しかし、開発が終わりProductionに移行する場合、開発環境だけでしか使用できない上記のURLではうまく動作しなくなってしまいます。
ProductionのURL: http://example.com/api/v1/profiles
開発環境のURL: http://localhost:3000/api/v1/profiles
そこでBase URLという名前の通りベースとなるURLを設定することでこの問題を解決することができます。
導入方法
導入方法としては公式のものを参照しています。
どこのディレクトリでもいいのですが、以下のようなファイルを作成します。
// app/javascript/plugins/axios.js
import axios from "axios";

const axiosInstance = axios.create({
  baseURL: "/api/v1",
});

export default axiosInstance;
baseURL: "/api/v1"の部分でベースとなるURLを指定します。Productionでも開発環境でもドメインの箇所は異なりますが/api/v1の箇所は同じです。そこをベースと指定することで、それ以前のドメインの箇所が違っていても問題なくサーバーにアクセスすることができます。
注意点として、かならず/api/v1のようにルート(/)から始めてください。例えば下記のように指定した場合うまくいきません。
const axiosInstance = axios.create({
  baseURL: "api/v1",
});
あとは上記のファイルを読み込んであげるだけです。
import Vue from "vue";
import App from "../app.vue";
import axios from "../plugins/axios";
import router from "../router/index.js";
import store from "../store/index.js";

Vue.config.productionTip = false
Vue.prototype.$axios = axios;
読み込むファイルは基本的にstoreやrouterを読み込んでいる箇所がいいかと思います。
ちょっと不明な箇所があるとすれば下記の部分です。
Vue.prototype.$axios = axios;
こちらは公式でも説明しています。
こちらの例を引用すると
多くのコンポーネントで使用したい値があるが、どこからでも参照できるグローバルスコープでの定義は避けたい。そのような場合は、プロトタイプに追加することで、Vueインスタンスの中でのみグローバルな値として参照できます。
Vue.prototype.$appName = 'My App'
new Vue({
  beforeCreate: function() {
    console.log(this.$appName) // "My App"
  }
})
つまり今回の実装では、importされたBase URLを定義したaxiosがVueのインスタンスならどこからでも参照できる値として設定されたということです。
これでBase URLは定義できました。先ほどaxiosを使用していた箇所は以下のようになりました。
created() {
  this.$axios
    .get("/profiles")
    .then((response) => (this.user = response.data))
    .catch((err) => console.log(err.status));
},
変更点としてはまず目的であったURLが短くなっています。
.get("/profiles")
それよりも気になるところはaxiosの呼び出し方が違うというところだと思います。
this.$axios
しかしこれは先ほど例として使ったファイルでも同じ呼び出し方を取っています。
console.log(this.$appName)
プロトタイプに登録された値はthis.$と指定することで使用することができるのです。
今回は以上になります。
【Vue】slot
はじめに
こんにちは!大ちゃんの駆け出し技術ブログです。
今月は主なアウトプットとしてvueを題材にしたものを書きます
大体が短いアウトプットで終わると思うので、いつもみたいな長い記事ではないかなと思います。
基本的な用途
本記事ではslotについて紹介します。
slotはかなり特徴的な書き方をするのかなと個人的に思っております。
slotの機能ですが一言で言うと
「親コンポーネント側で指定した値を挟み込む」
となります!
まずは簡単なコードを見ていきましょう。
最初にコンポーネントの作成ファイルを見ていきます
slotを使用したコードサンプルが以下のようになります。
// slot/js/slot.js
Vue.component("slot-practice", {
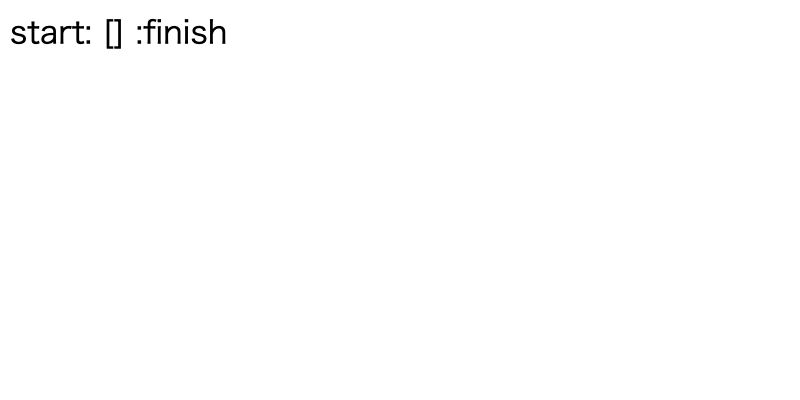
template: `<div>start: [<slot></slot>] :finish</div>`,
});
new Vue({
el: "#app",
});
slot-practiceというコンポーネントを作成しています。
templateの中は極めてシンプルな作りでdivタグの中に今回の題材であるslotタグがあるだけです。「start: [」、「] :finish」はただの文字列です。この後説明する挟み込まれていることをわかりやすくするために書いています。
htmlコードは以下のようになります。
<!DOCTYPE html>
<html lang="ja">
  <head>
    <meta charset="UTF-8" />
    <title>slot-practice</title>
  </head>
  <body>
    <div id="app">
      <slot-practice></slot-practice> <!-- 注目 -->
    </div>
    <script src="https://cdn.jsdelivr.net/npm/vue@2.6.12/dist/vue.js"></script>
    <script src="js/slot.js"></script>
  </body>
</html>
親コンポーネントを配置しただけとい感じですね。
ここで実際に表示される画面をブラウザ上で確認します。
特に何も起こっていませんね。
では冒頭で述べたslotの要約を思い出して実装します。
「親コンポーネント側で指定した値を挟み込む」
親コンポーネントのタグの間で挟み込みたい文字を記述します。どんな文字でもOKです!
<!DOCTYPE html>
<html lang="ja">
  <head>
    <meta charset="UTF-8" />
    <title>slot-practice</title>
  </head>
  <body>
    <div id="app">
      <slot-practice>挟まれた!</slot-practice>
    </div>
    <script src="https://cdn.jsdelivr.net/npm/vue@2.6.12/dist/vue.js"></script>
    <script src="js/slot.js"></script>
  </body>
</html>
もう一度ブラウザで確認しましょう。

まさに親コンポーネントで指定した値が挟み込まれたといった感じです。
このように、親コンポーネントのタグの間で記述した文字を子コンポーネントのslotタグの箇所に表示することがslotの機能です。
つまり、
- 親コンポーネントのタグ間で文字を記述
<slot-practice>挟まれた!</slot-practice>
↓
- 子コンポーネントのslotタグの箇所に挟み込まれる
<div>start:   [<slot></slot>]   :finish</div>

↓

<div>start:   [挟まれた!]   :finish</div>
このようにして<slot></slot>の箇所が置換されるのです!
名前付きスロット
少し発展して名前付きスロットという物も紹介しておきます。
挟み込みたい文字が複数あった場合とかに使用できます。
上述したコンポーネントのtemplateの中で複数箇所に挟み込みたい文字があったとします。
例えばheaderタグを用意してみます。
Vue.component("slot-practice", {
  template: `<div>
    <header>
      <slot></slot>
    </header>
    <div>start:   [<slot></slot>]   :finish</div>
  </div>`,
});

new Vue({
  el: "#app",
});
先ほどと同じhtmlファイルのままでブラウザを確認します。

2つのslotタグが両方とも同じ文字で挟み込まれました。
ここまでは先ほどのおさらいですね。
ここで、headerタグの中にあるslotと先ほどのdivタグの中のslotには違う文字を入れたいとします。
しかし、この時親コンポーネントからは複数の値を指定することができません。
その場合に使う機能が名前付きスロットです。
JSファイルに名前付きスロットを導入します。
Vue.component("slot-practice", {
  template: `<div>
    <header>
      <slot name="header"></slot>
    </header>
    <div>start:   [<slot name="middle"></slot>]   :finish</div>
  </div>`,
});

new Vue({
  el: "#app",
});
slotタグにname属性を付け加えているといった感じですね。
親コンポーネント側では記述方法を少し変えます。
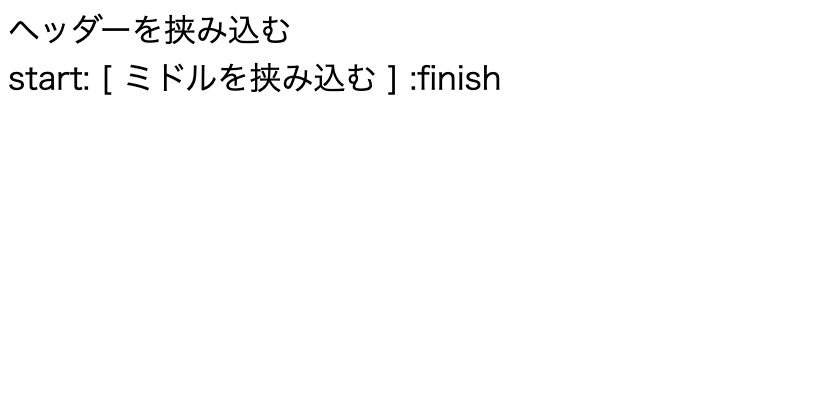
<!DOCTYPE html>
<html lang="ja">
  <head>
    <meta charset="UTF-8" />
    <title>slot-practice</title>
  </head>
  <body>
    <div id="app">
      <slot-practice>
        <template v-slot:header>
          ヘッダーを挟み込む
        </template>
        <template v-slot:middle>
          ミドルを挟み込む
        </template>
      </slot-practice>
    </div>
    <script src="https://cdn.jsdelivr.net/npm/vue@2.6.12/dist/vue.js"></script>
    <script src="js/slot.js"></script>
  </body>
</html>
slot-practiceのコンポーネントの中にtemplateタグを2度使用しています。そして、タグにはv-slot:<コンポーネントのslotのname属性>を指定しています。
<slot-practice>
  <template v-slot:header>
    ヘッダーを挟み込む
  </template>
  <template v-slot:middle>
    ミドルを挟み込む
  </template>
</slot-practice>
これにより、v-slotで指定したname属性を持つslotの場所に挟み込みたい文字が表示されます。
表示される画面は以下のとおりです。
以上のようにtemplateタグを同一コンポーネント内で分けて使用し、name属性を明示することで、表示させたいslotタグの箇所に意図した文字を挟み込むことが可能となります!
終わりに
slotはよく使われるとRUNTEQで教えられてたので上手に使えるようにしておきたいですね。
こんな感じで今月は短いアウトプットを多めにしようかなと思いますのでよろしくお願いいたします。
以上、大ちゃんの駆け出し技術ブログでした!
【Rspec】devise + slack-omniauthのテスト方法
はじめに
こんにちは!大ちゃんの駆け出し技術ブログです。
今回はPFにあたり詰まった「devise + slack-omniauthのテスト方法」を紹介します。
slackログインの正式な方法についてはQiitaにてあげる予定ですが、記憶が新しいうちに紹介しておきたく、、、!
では早速解説していきます。
テスト内容
テスト内容について触れておきます。
slackログインの認証方法としてdeviseを使用しています。なので認証時にはコールバックコントローラに返すように指定します。
# app/controllers/users/omniauth_callbacks_controller.rb
module Users
  class OmniauthCallbacksController < Devise::OmniauthCallbacksController
    skip_before_action :authenticate_user!
    def slack

      user_info = get_user_info(request.env['omniauth.strategy'])
      @user = User.from_omniauth(request.env['omniauth.auth'], user_info)

      if @user.persisted?
        sign_in_and_redirect @user, event: :authentication
      else
        redirect_to root_path
      end
    end

    def failure
      flash[:alert] = 'Slack認証に失敗しました。'
      redirect_to root_path
    end
  end
end
deviseのSNS認証はメジャーかと思いますのでコードの見た目はほぼ同じかと思います。認証成功時にはslackメソッドがリダイレクトされ、逆に認証ができなかった場合failureメソッドにリダイレクトします。
テストする内容としては下記2点のみです。
- [ ] 認証成功時に
slackメソッドにリダイレクトし、意図したページにアクセスすること - [ ] 認証失敗時に
failureメソッドに失敗し、トップページにアクセスすること
長文になりますが補足で説明します。Rspecとはあまり関係がありませんが、Rspecのテストの方法に影響があるので念のため説明させてください。
上述したように、コールバックコントローラの見た目はほぼ同じですが、1点違う箇所があります。
user_info = get_user_info(request.env['omniauth.strategy'])
@user = User.from_omniauth(request.env['omniauth.auth'], user_info)
get_user_infoでログインしたユーザー情報にアクセスし、JSON形式で返却するようにしています。
def get_user_info(request)
  request.access_token.user_token.get('/api/users.identity').parsed
end
基本的にdeviseでのSNS認証時にrequest.env['omniauth.auth']という値は使う必要がありません。
例えば、QiitaでLGMTが多い下記記事のcallbackメソッドの例は以下のようになります。
https://qiita.com/kazuooooo/items/47e7d426cbb33355590e
# common callback method
def callback_for(provider)
  @user = User.from_omniauth(request.env["omniauth.auth"])
  if @user.persisted?
    sign_in_and_redirect @user, event: :authentication #this will throw if @user is not activated
    set_flash_message(:notice, :success, kind: "#{provider}".capitalize) if is_navigational_format?
  else
    session["devise.#{provider}_data"] = request.env["omniauth.auth"].except("extra")
    redirect_to new_user_registration_url
  end
end
@user = User.from_omniauth(request.env["omniauth.auth"])とあるように、request.env["omniauth.auth"]をのみを使っています。そしてrequest.env["omniauth.auth"]の値を使って、名前だったりユーザーの画像だったりを格納します。上記の記事ではemailのみしか取得していなかったのですが、他の記事を当たると多くの情報を格納するようです。
https://qiita.com/sakakinn/items/321e6b49c92b9f02f83f
def self.from_omniauth(auth)
  where(provider: auth.provider, uid: auth.uid).first_or_create do |user|
    user.provider = auth.provider
    user.uid = auth.uid
    user.name = auth.name
    user.email = auth.info.email
    user.password = Devise.friendly_token[0, 20] # ランダムなパスワードを作成
    user.image = auth.info.image.gsub("_normal","") if user.provider == "twitter"
    user.image = auth.info.image.gsub("picture","picture?type=large") if user.provider == "facebook"
  end
end
では、なぜ自分のコードではAPIを取得して追加情報の取得が必要なのかというと、slackより返却されるrequest.env["omniauth.auth"]の値が他のSNS認証時に返却されるものとは異なるからです。というよりは返却される情報が少ないと行った方が正しいです。
実はこのことに関する記事はありません。slack-omniauthのgemのGithub上でissueでちょこっと触れられていました。
https://github.com/ginjo/omniauth-slack/issues/10#issuecomment-621560008
この記事で述べている箇所はrequest.env["omniauth.auth"]の値の例です。
{
  "enterprise" : null,
  "ok" : true,
  "team" : {
    "id" : "T0BXXXXXX"
  },
  "authed_user" : {
    "scope" : "identity.basic,identity.email,identity.avatar,identity.team",
    "id" : "U0BXXXXXX",
    "token_type" : "user",
    "access_token" : "xoxp-111111111111-22222222222-3333333333333-fa39d45841fa1daab3a98f945a133d02"
  },
  "app_id" : "A0XXXXXXXXX"
}
他のrequest.env["omniauth.auth"]の値と比べて圧倒的に少ないです。他のrequest.env["omniauth.auth"]の値にはユーザー情報として、ユーザーのアイコン、名前、メールアドレスが含まれるはずなのですが、slackの場合はそれら個人の情報が一切ないです。そのため、追加でユーザー情報を取得しないと、十分なユーザー情報を格納できないのです。
そしてこのissueの中でユーザーへのアクセスはユーザーのアクセストークンを使用して直接取得するように記載されています。
@bot_token = env['omniauth.strategy'].access_token
@user_token = @bot_token.user_token
@user_token.get("/api/users.identity", ...).parsed
# --> response data hash from Slack
これを見て自分もユーザー情報を追加で取得してアイコンなどの追加情報を取得しました。
テストの方法
先にテストコードを紹介してする前に、必要な設定を紹介します。
実はOmniauthのテストにドキュメントがあります。
https://github.com/omniauth/omniauth/wiki/Integration-Testing
必要な設定として、spec/rails_helper.rbに下記を記載して下さい。
# spec/rails_helper.rb
# Turn on "test mode" for OmniAuth
OmniAuth.config.test_mode = true
これによりどうなるのかというと、SNS認証を行う際、一度アプリケーションのブラウザからSNSのサイトの認証画面に移行する必要があります。テストでも同じように認証画面にアクセスすることはあまり好ましくないと思います。毎回テストするたびに認証画面に移行してもし万が一のことがあったら危険ですし、なにより通信超過のためにテストに時間を要します。それを防ぐために上記の設定を行うことで、認証画面への移行をスキップし、そのままコールバックコントローラにリダイレクトしてくれます。
加えて、新規ファイルでconfig/initializers/omniauth.rbを作成します。
# config/initializers/omniauth.rb
Rails.application.config.middleware.use OmniAuth::Builder do
  on_failure { |env| Users::OmniauthCallbacksController.action(:failure).call(env) }
end
この設定が必要な理由は、デフォルトの仕様ですと、認証失敗時の挙動は例外の発生となります。しかし、devise認証ではホーム画面にリダイレクトするように設定していますので例外は発生しません。それを防ぐために、上記の設定が必要となります。
※ 公式では以下のように設定していますが、自分の場合こちらの設定では反映されませんでした。のちほど調査します。
OmniAuth.config.on_failure = Proc.new { |env|
  OmniAuth::FailureEndpoint.new(env).redirect_to_failure
}
設定が終わったところでテストコードを紹介します。最初の検証が失敗時のテストで、次にテストしているのが成功時の検証です。
# spec/system/slack_login_spec.rb
require 'rails_helper'

RSpec.describe "SlackLogin", type: :system do

  before do
    Rails.application.env_config["devise.mapping"] = Devise.mappings[:user] # Devise使用時に必要な記載
    Rails.application.env_config["omniauth.auth"] = set_slack_omniauth # omniauth.authの値を代入
    allow_any_instance_of(ApplicationController).to receive(:get_user_info).and_return(set_user_info) # strategy.authの値を代入
  end

  context 'oauthがinvali_omniauthの場合' do
    before do
      Rails.application.env_config["omniauth.auth"] = set_invalid_omniauth
      visit root_path
      click_on 'Slackログイン'
    end
    it "トップページにリダイレクトされる" do
      expect(current_path).to eq(root_path), 'ルートパスにリダイレクトされていません'
      expect(page).to have_content('Slack認証に失敗しました。'), 'フラッシュメッセージが表示されていません'
    end
  end

  context '初めてアプリにログインする時' do
    before do
      visit root_path
      click_on 'Slackログイン'
    end
    it 'プロフィール新規作成画面にアクセスする' do
      expect(page).to have_content('新規登録完了しました。次にプロフィールを作成してください。'), '意図したフラッシュメッセージが表示されていません'
      expect(current_path).to eq(new_profile_path), 'プロフィール新規作成画面にアクセスしていません'
    end
  end
end
最初に下記の記述です。
Rails.application.env_config["devise.mapping"] = Devise.mappings[:user] # Devise使用時に必要な記載
これは公式の説明にも書いてあります。deviseを使用する場合は必須のようですね。
https://github.com/omniauth/omniauth/wiki/Integration-Testing
公式の記述
before do
  Rails.application.env_config["devise.mapping"] = Devise.mappings[:user] # If using Devise
  Rails.application.env_config["omniauth.auth"] = OmniAuth.config.mock_auth[:twitter]
end
次にモックを導入してテストをしています。
Rails.application.env_config["omniauth.auth"] = set_slack_omniauth # omniauth.authの値を代入
allow_any_instance_of(ApplicationController).to receive(:get_user_info).and_return(set_user_info) # get_user_infoの値を代入
これによりrequest.env["omniauth.auth"]の値とget_user_infoメソッドの返り値をモックかしています。モックファイルは下記に記載します。
# spec/support/omniauth_helper.rb
# TODO: API認証時のテストを追加(未実装)
module OmniauthHelpers
  def set_slack_omniauth
    OmniAuth.config.mock_auth[:slack] =
        OmniAuth::AuthHash.new(
            {
                'provider'  => 'slack',
                'uid'       => 'mock_uid_1234',
                'credentials' => {
                  'token' => 'mock_credentails_token_1234',
                },
            }
        )
  end

  def set_user_info
    user_info = {
      "user"=>
        {"name"=>Faker::Name.name,
        "email"=>Faker::Internet.email,
        "image_192"=>
        "https//image-XXXXXXXXXX.png",},
      "team"=>
        {"id"=>rand(10 ** 19).to_s,
        "name"=>"XXXXXXXXXX",
        "image_34"=>"https//image-XXXXXXXXXX.jpg",
        }
    }
    user_info
  end

  def set_invalid_omniauth
    OmniAuth.config.mock_auth[:slack] = :invalid_credentials
  end
end
ここが他の記事とは異なる点です!
他の記事では追加でユーザー情報を取得することがないために、set_slack_omniauth(つまりrequest.env["omniauth.auth"]の値)の箇所だけしか書いておりません。今回の自分の実装の場合、追加情報でAPIにアクセスしないといけないため、その返却値のJSONをモック化しなければいけなかったのです。モックをよく知らなかった自分にとってはかなり難しかったです、、。
allow_any_instance_of(ApplicationController).to receive(:get_user_info).and_return(set_user_info) # get_user_infoの値を代入
テスト箇所ですが、認証成功時の箇所は極めてシンプルです。
context '初めてアプリにログインする時' do
  before do
    visit root_path
    click_on 'Slackログイン'
  end
  it 'プロフィール新規作成画面にアクセスする' do
    expect(page).to have_content('新規登録完了しました。次にプロフィールを作成してください。'), '意図したフラッシュメッセージが表示されていません'
    expect(current_path).to eq(new_profile_path), 'プロフィール新規作成画面にアクセスしていません'
  end
end
当然アプリによってリダイレクト先は異なりますが、それに合わせてテストを設計するだけです。
失敗時のテストですが、これについては説明させてください。
context 'oauthがinvali_omniauthの場合' do
  before do
    Rails.application.env_config["omniauth.auth"] = set_invalid_omniauth
    visit root_path
    click_on 'Slackログイン'
  end
  it "トップページにリダイレクトされる" do
    expect(current_path).to eq(root_path), 'ルートパスにリダイレクトされていません'
    expect(page).to have_content('Slack認証に失敗しました。'), 'フラッシュメッセージが表示されていません'
  end
end
といっても注目箇所はこちらの部分のみです。
Rails.application.env_config["omniauth.auth"] = set_invalid_omniauth
これはモックファイルで定義していた値を格納します。
def set_invalid_omniauth
  OmniAuth.config.mock_auth[:slack] = :invalid_credentials
end
これを使うことで認証失敗時の挙動をテストしてくれます。公式のomniauthのテスト方法のドキュメントでも同じように紹介しています。
OmniAuth.config.mock_auth[:twitter] = :invalid_credentials
重要なのは認証失敗時のテストでは必ずset_invalid_omniauthを使わないといけないということです。例えば、他の記事では代わりにnilを代入していましたが、それでは意図したものとは異なる挙動を見せます。
実際にnilを代入して試してみました。
Rails.application.env_config["omniauth.auth"] = nil
するとなんとfailureメソッドにリダイレクトされず、成功時と同じようにプロフィール作成画面にリダイレクトしました。これはどういうことかというと、先に代入されているset_slack_omniauthの値が既に格納されており、Rails.application.env_config["omniauth.auth"]にnilは反映されないためです。
では、set_slack_omniauthの箇所をコメントアウトしてみると失敗するのではと思い、コメントアウトしてnilの代入箇所のみテストしてみました。するとまた別の挙動を見せました。
failureメソッドにはリダイレクトされずslackメソッドにリダイレクトされましたが、request.env['omniauth.auth']の値に全く設定していない値が格納されていたのです。
> request.env['omniauth.auth']
=> {"provider"=>"default", "uid"=>"1234", "info"=>{"name"=>"Example User"}}
これはどうやらデフォルトのOmniauthのモックの値のようです。
つまり、nilを格納しようとしてもnilは反映されず、デフォルト値が代わりに反映される仕様になっているようです。なのでどうやってもnilは格納できない仕様となっています。他の記事ではnilを代入しているところもありますが、おそらくOmniauthのアップデートのせいで使用できなくなったのではないかと思っています。
以上で、本記事を終わりとします。ありがとうございました!
【Devise】Rememberable
はじめに
こんにちは!大ちゃんの駆け出し技術ブログです。
deviseのモデル設定に関する記事も連続投稿3投目!
今回はRememberableについてざっくり理解していきたいと思います!
しかし、連続投稿としては今回で最後にします。理由としてはポートフォリオ制作を進めるために他の記事も書きたいためです。なので、別の機会にdeviseについてまた書きたいと思います!(特に、外部認証であるOmniauthableについてはポートフォリオ制作で使っているため、必ず記事にしたいです!)
概要
Rememberableもマイグレーションファイルやモデルにデフォルトで追加されるモデルの設定になります。
[モデル]
devise :database_authenticatable, :registerable,
         :recoverable, :rememberable, :trackable, :validatable
[マイグレーションファイル]
## Rememberable
t.datetime :remember_created_at
rememberableで使用するカラムは一つのみです。remember_created_atとあるように
何かの日付を記録するためのカラムを設定しています。何の日付を記憶するのかモジュールを見て推察しましょう。
今回もまたまた長いモジュールとなっています。
# frozen_string_literal: true

require 'devise/strategies/rememberable'
require 'devise/hooks/rememberable'
require 'devise/hooks/forgetable'

module Devise
  module Models
    # Rememberable manages generating and clearing token for remembering the user
    # from a saved cookie. Rememberable also has utility methods for dealing
    # with serializing the user into the cookie and back from the cookie, trying
    # to lookup the record based on the saved information.
    # You probably wouldn't use rememberable methods directly, they are used
    # mostly internally for handling the remember token.
    #
    # == Options
    #
    # Rememberable adds the following options in devise_for:
    #
    #   * +remember_for+: the time you want the user will be remembered without
    #     asking for credentials. After this time the user will be blocked and
    #     will have to enter their credentials again. This configuration is also
    #     used to calculate the expires time for the cookie created to remember
    #     the user. By default remember_for is 2.weeks.
    #
    #   * +extend_remember_period+: if true, extends the user's remember period
    #     when remembered via cookie. False by default.
    #
    #   * +rememberable_options+: configuration options passed to the created cookie.
    #
    # == Examples
    #
    #   User.find(1).remember_me!  # regenerating the token
    #   User.find(1).forget_me!    # clearing the token
    #
    #   # generating info to put into cookies
    #   User.serialize_into_cookie(user)
    #
    #   # lookup the user based on the incoming cookie information
    #   User.serialize_from_cookie(cookie_string)
    module Rememberable
      extend ActiveSupport::Concern

      attr_accessor :remember_me

      def self.required_fields(klass)
        [:remember_created_at]
      end

      def remember_me!
        self.remember_token ||= self.class.remember_token if respond_to?(:remember_token)
        self.remember_created_at ||= Time.now.utc
        save(validate: false) if self.changed?
      end

      # If the record is persisted, remove the remember token (but only if
      # it exists), and save the record without validations.
      def forget_me!
        return unless persisted?
        self.remember_token = nil if respond_to?(:remember_token)
        self.remember_created_at = nil if self.class.expire_all_remember_me_on_sign_out
        save(validate: false)
      end

      def remember_expires_at
        self.class.remember_for.from_now
      end

      def extend_remember_period
        self.class.extend_remember_period
      end

      def rememberable_value
        if respond_to?(:remember_token)
          remember_token
        elsif respond_to?(:authenticatable_salt) && (salt = authenticatable_salt.presence)
          salt
        else
          raise "authenticatable_salt returned nil for the #{self.class.name} model. " \
            "In order to use rememberable, you must ensure a password is always set " \
            "or have a remember_token column in your model or implement your own " \
            "rememberable_value in the model with custom logic."
        end
      end

      def rememberable_options
        self.class.rememberable_options
      end

      # A callback initiated after successfully being remembered. This can be
      # used to insert your own logic that is only run after the user is
      # remembered.
      #
      # Example:
      #
      #   def after_remembered
      #     self.update_attribute(:invite_code, nil)
      #   end
      #
      def after_remembered
      end

      def remember_me?(token, generated_at)
        # TODO: Normalize the JSON type coercion along with the Timeoutable hook
        # in a single place https://github.com/heartcombo/devise/blob/ffe9d6d406e79108cf32a2c6a1d0b3828849c40b/lib/devise/hooks/timeoutable.rb#L14-L18
        if generated_at.is_a?(String)
          generated_at = time_from_json(generated_at)
        end

        # The token is only valid if:
        # 1. we have a date
        # 2. the current time does not pass the expiry period
        # 3. the record has a remember_created_at date
        # 4. the token date is bigger than the remember_created_at
        # 5. the token matches
        generated_at.is_a?(Time) &&
         (self.class.remember_for.ago < generated_at) &&
         (generated_at > (remember_created_at || Time.now).utc) &&
         Devise.secure_compare(rememberable_value, token)
      end

      private

      def time_from_json(value)
        if value =~ /\A\d+\.\d+\Z/
          Time.at(value.to_f)
        else
          Time.parse(value) rescue nil
        end
      end

      module ClassMethods
        # Create the cookie key using the record id and remember_token
        def serialize_into_cookie(record)
          [record.to_key, record.rememberable_value, Time.now.utc.to_f.to_s]
        end

        # Recreate the user based on the stored cookie
        def serialize_from_cookie(*args)
          id, token, generated_at = *args

          record = to_adapter.get(id)
          record if record && record.remember_me?(token, generated_at)
        end

        # Generate a token checking if one does not already exist in the database.
        def remember_token #:nodoc:
          loop do
            token = Devise.friendly_token
            break token unless to_adapter.find_first({ remember_token: token })
          end
        end

        Devise::Models.config(self, :remember_for, :extend_remember_period, :rememberable_options, :expire_all_remember_me_on_sign_out)
      end
    end
  end
end
まず前回までの記事同様に英語の説明部分を見てみます。
Rememberable manages generating and clearing token for remembering the user from a saved cookie. Rememberable also has utility methods for dealing with serializing the user into the cookie and back from the cookie, trying to lookup the record based on the saved information. You probably wouldn't use rememberable methods directly, they are used mostly internally for handling the remember token.
訳:
Rememberableは、保存されたcookieからユーザを記憶するためのトークンの生成とクリアを管理する機能です。ユーザーをcookieにシリアライズしたり、cookieから戻したり、保存された情報に基づいてレコードを検索したりするためのメソッドもあります。
これらのメソッドは、主に内部で記憶トークンの処理に使用されます。
cookieを使用してユーザーを記憶するためのトークンを生成するとあるようにセッション管理に該当するのかなと思います。つまり、Rememberableはログインしたユーザーの情報を管理している機能ということです。しかし、具体的な機能が少し予想しづらいですね。
モジュールのメソッドを見てその機能を予想していきましょう。
3つのオプション
昨日のRecoverableと同じようにRememberableにも同じように3つのオプションがあるようです。
# Rememberable adds the following options in devise_for:
#
#   * +remember_for+: the time you want the user will be remembered without
#     asking for credentials. After this time the user will be blocked and
#     will have to enter their credentials again. This configuration is also
#     used to calculate the expires time for the cookie created to remember
#     the user. By default remember_for is 2.weeks.
#
#   * +extend_remember_period+: if true, extends the user's remember period
#     when remembered via cookie. False by default.
#
#   * +rememberable_options+: configuration options passed to the created cookie.
英語の説明をざっくり訳すと以下のような感じ
remember_for(ユーザーの認証情報の記憶時間の長さ)extend_remember_period(cookieから記憶されているユーザー情報の記憶時間の延長するかどうか)rememberable_options(cookieに渡されるオプションの設定)
ここで2つの疑問があるかと思います。
remember_forとextend_remember_periodは依存関係ではないか。rememberable_optionsでできるオプションの設定とは何か。
まず1についてですが、これは2つの設定は依存関係にあるのかなと思います。remember_forで設定したことを反映させるためにはextend_remember_periodが必要になると思うので、どちらか片方が設定されるということはないと思います。extend_remember_periodをtrueに変更することで記憶期間の延長を許可し、remember_forでその記憶期間を設定するという感じですね。
※ cookieを使用した時のみextend_remember_periodは適応されるということなので、cookieを使わない場合は適応されないのだと思います。ここの違いはあまり理解できませんでした、、
2についてあまり説明している記事が見当たらなかったのですが、下記記事を見つけました。個人の記事なので信頼性はわかりません。
rememberable_optionsは記事の中で以下のように定義されています。
config.rememberable_options = {:secure => true, :same_site => :none}
cookieの有効を同じサイトにするか、secureなものにするかなどの設定のようです。しかし、これを設定しているGithubの公開リポジトリはあまり見受けられなかったので、そこまで重要な設定ではないのでしょうか。自分はそう感じました。
これもまたdevise.rbで設定するようです。
config.remember_for = 1.week

config.extend_remember_period = false

config.rememberable_options = {}
3つのオプションの設定自体はそこまで重要ではないようですが、ログイン情報を保存する長さの設定など、ログイン情報の記憶に関する機能ということは間違いなさそうです。
モジュールのメソッド
今回もモジュールが長いので使用例の中からメソッドを見ていきましょう。
# == Examples
#
#   User.find(1).remember_me!  # regenerating the token
#   User.find(1).forget_me!    # clearing the token
remember_me!
まずはremember_me!メソッドです。
remember_me!
def remember_me!
  self.remember_token ||= self.class.remember_token if respond_to?(:remember_token)
  self.remember_created_at ||= Time.now.utc
  save(validate: false) if self.changed?
end
regenerating the tokenとあるように記憶トークンを再度生成しているのだと思われます。
||=を使っているのでremember_tokenがnilの時self.class.remember_tokenのメソッドで返却される値をremember_tokenに格納しています。
self.classとあるように、モジュールの中にあるモジュールのメソッドを使っているようです。ClassMethodsモジュールがRememberableの中に定義されていました。
module Rememberable
・
・
    module ClassMethods
        # Generate a token checking if one does not already exist in the database.
        def remember_token #:nodoc:
          loop do
            token = Devise.friendly_token
            break token unless to_adapter.find_first({ remember_token: token })
          end
        end
      end
    end
Devise.friendly_tokenでトークンを生成しているようです。unless to_adapter.find_first({ remember_token: token })でトークンの値が重複しないように制御している感じですね。
そしてremember_created_atカラムを更新しています。
self.remember_created_at ||= Time.now.utc
forget_me!
forget_me!メソッドについてはremember_me!の逆の挙動をします。
# If the record is persisted, remove the remember token (but only if
# it exists), and save the record without validations.
def forget_me!
  return unless persisted?
  self.remember_token = nil if respond_to?(:remember_token)
  self.remember_created_at = nil if self.class.expire_all_remember_me_on_sign_out
  save(validate: false)
end
remember_tokenとremember_created_atにnilを格納していますね。ログイン情報の記憶トークンのリセットをしています。
ある程度これで把握できたかなと思います!
【Devise】Recoverable
はじめに
こんにちは!大ちゃんの駆け出し技術ブログです。
今回も一つ前の投稿と同じようにdeviseのモデル設定についての記事となります。
今回はRecoverableについてざっくりとgemの中身を見ながら理解していきます。
概要
モデルやモデルに対応するテーブルでのdeviseの記述は以下のようになります。
- モデル
# app/models/user.rb
class User < ApplicationRecord
  # Include default devise modules. Others available are:
  # :confirmable, :lockable, :timeoutable, :trackable and :omniauthable
  devise :database_authenticatable, :registerable,
         :recoverable, :rememberable, :validatable
end
- マイグレーションファイル
class AddDeviseToUsers < ActiveRecord::Migration[5.2]
  def self.up
    change_table :users do |t|
・
・
      ## Recoverable
      t.string   :reset_password_token
      t.datetime :reset_password_sent_at
・
・
デフォルトの設定で有効になっていますね。ですので機能説明したデータベース認証を行うdatabase_authenticatable同様に重要な役割を担っていそうです。
マイグレーションファイルをよく見てみましょう。実はRecoverableの機能を推測できます。
      ## Recoverable
      t.string   :reset_password_token
      t.datetime :reset_password_sent_at
reset_passwordとありますね。
そうです。まさにパスワードをリセットする機能を持っています。
ここでモジュールの中身を見ていきましょう。 Recoverableも重要な機能のせいかモジュールの中身がとても長いです。
一番上にある説明ですが、こちらは上述したことと同様の内容を説明しています。
Recoverable takes care of resetting the user password and send reset instructions
訳: Recoverableはユーザーパスワードの再設定を行い、再設定手順を送信します。
概要については以上です。
3つのオプション
概要については理解できたかと思いますが、モジュールの以下の記述はどうでしょう。
    # ==Options
    #
    # Recoverable adds the following options to devise_for:
    #
    #   * +reset_password_keys+: the keys you want to use when recovering the password for an account
    #   * +reset_password_within+: the time period within which the password must be reset or the token expires.
    #   * +sign_in_after_reset_password+: whether or not to sign in the user automatically after a password reset.
オプションとあるように追加で設定を加えることができるようですね。 そして、オプションの数は以下の3つです。
reset_password_keys(パスワードをリセットする際に使用するキー)reset_password_within(パスワードのリセットの有効期限や、リセットトークンが失効する期限を設定)sign_in_after_reset_password(パスワードリセット後に自動的にサインインするかどうか)
少し理解がしづらいのはreset_password_keysの説明かと思います。
こちらはパスワードをリセットする際に使用するモデルのカラムを指定します。 例えば、リセット時に案内のメールを送信するときに、メールアドレスが必要ですね。 そんなときにキーを指定してあげることでモデルのメールアドレスに
オプションの設定方法としてはdevise_for:とあることから、モデルで設定ができるようですが、多くの記事を見るとinitializerは以下に作成されるdevise.rbに記述するようです。
# devise.rb

# パスワードをリセットする際に使用するキーをemailに設定
config.reset_password_keys = [:email]

# リセットの有効期限や、リセットトークンが失効する期限を10時間に設定
config.reset_password_within = 10.hours

# パスワードリセット後に自動的にサインインすることを許可
config.sign_in_after_reset_password = true
モジュール内
モジュール内で定義されているパスワードのリセットに関するメソッドなどを見ていきましょう。
モジュールの記述の概要を説明している箇所でこのモジュールの機能のExamplesの項目があります。
# == Examples
    #
    #   # resets the user password and save the record, true if valid passwords are given, otherwise false
    #   User.find(1).reset_password('password123', 'password123')
    #
    #   # creates a new token and send it with instructions about how to reset the password
    #   User.find(1).
reset_password
1つ目の例はこのモジュールの根幹となるreset_passwordメソッドです。
      # Update password saving the record and clearing token. Returns true if
      # the passwords are valid and the record was saved, false otherwise.
      def reset_password(new_password, new_password_confirmation)
        if new_password.present?
          self.password = new_password
          self.password_confirmation = new_password_confirmation
          save
        else
          errors.add(:password, :blank)
          false
        end
      end
役割が英語で説明されていますね。
Update password saving the record and clearing token. Returns true if the passwords are valid and the record was saved, false otherwise.
訳:
パスワードを更新しレコードを保存、トークンをクリアします。パスワードが有効でレコードが無事に保存された場合はtrueを、そうでない場合はfalseを返します。
第一引数にnew_password、第二引数にnew_password_confirmationとあります。これはパスワードを別のパスワードに更新する際に、一度の入力だけでなく確認のためにもう一度入力するという仕様を明示しています。例でも同じパスワードを入力しています。
User.find(1).reset_password('password123', 'password123')
[パスワードリセット画面の例]
new_passwordが入力されているのであれば、モデルのpasswordカラムとpassword_confirmationカラムに、それぞれnew_passwordとnew_password_confirmationを代入し、saveメソッドで保存しています。
if new_password.present?
  self.password = new_password
  self.password_confirmation = new_password_confirmation
  save
send_reset_password_instructions
2つ目はsend_reset_password_instructionsメソッドです。
これもメソッド名から何をしているのかがすぐにわかります。パスワードをリセットする際に自分宛てにメールが送られリセットのフローを説明してくれる機能ですね。
※ 本当に公式のモジュールのメソッドは引数やメソッド名から機能を予測できるようにうまく記載されていて勉強になります!

定義されている箇所は以下になります。
      # Resets reset password token and send reset password instructions by email.
      # Returns the token sent in the e-mail.
      def send_reset_password_instructions
        token = set_reset_password_token
        send_reset_password_instructions_notification(token)

        token
      end
Resets reset password token and send reset password instructions by email.
訳: リセットパスワードのトークンと指示メールをリセットします。
まず、set_reset_password_tokenメソッドを使用して新しいリセットパスワードのトークンを生成しています。
def set_reset_password_token
  raw, enc = Devise.token_generator.generate(self.class, :reset_password_token)

  self.reset_password_token   = enc
  self.reset_password_sent_at = Time.now.utc
  save(validate: false)
  raw
end
Devise.token_generatorとあるようにトークンを生成してくれる機能があるようです。そしてreset_password_tokenカラムに生成したトークンを代入しreset_password_sent_atカラムには現在時刻を協定世界時 (UTC)で代入します。
Time.now.utc
=> 2021-03-27 00:06:00 UTC
そして、send_reset_password_instructions_notificationメソッドによってメールを送信していると思われます。下記が定義されている箇所です。
def send_reset_password_instructions_notification(token)
  send_devise_notification(:reset_password_instructions, token, {})
end
send_devise_notificationメソッドに関しては別のモジュールであるAuthenticatableで定義されているようです。
def send_devise_notification(notification, *args)
  message = devise_mailer.send(notification, self, *args)
  # Remove once we move to Rails 4.2+ only.
  if message.respond_to?(:deliver_now)
    message.deliver_now
  else
    message.deliver
  end
end
message.deliver_nowとあるようまさにメールを送信している箇所ですね。*argsの中にtokenが入っているのでtokenもメールに添付されて送られるのだと思います。これによりパスワードをリセットされるメールがユーザーに届くというわけですね!
【Devise】Database authenticatable
Deviseによるモデル設定
こんにちは!大ちゃんの駆け出し技術ブログです。
最近deviseをなんとなくで使い始めましたが、本当に多機能で理解が追いついていません。なので、何回かに分けて記事にしようと思います。
今回はDeviseのモデル設定についてです。公式でいうところのConfiguring Modelsの項目です。
Deviseを使ってUserモデルを作成しようとすると、モデルとマイグレーションファイルに複数の見たことのない文字が出ると思います。
- モデル
# app/models/user.rb
class User < ApplicationRecord
  # Include default devise modules. Others available are:
  # :confirmable, :lockable, :timeoutable, :trackable and :omniauthable
  devise :database_authenticatable, :registerable,
         :recoverable, :rememberable, :validatable
end
- マイグレーションファイル
class AddDeviseToUsers < ActiveRecord::Migration[5.2]
  def self.up
    change_table :users do |t|
      ## Database authenticatable
      t.string :email,              null: false, default: ""
      t.string :encrypted_password, null: false, default: ""

      ## Recoverable
      t.string   :reset_password_token
      t.datetime :reset_password_sent_at

      ## Rememberable
      t.datetime :remember_created_at

      ## Trackable
      # t.integer  :sign_in_count, default: 0, null: false
      # t.datetime :current_sign_in_at
      # t.datetime :last_sign_in_at
      # t.inet     :current_sign_in_ip
      # t.inet     :last_sign_in_ip

      ## Confirmable
      # t.string   :confirmation_token
      # t.datetime :confirmed_at
      # t.datetime :confirmation_sent_at
      # t.string   :unconfirmed_email # Only if using reconfirmable

      ## Lockable
      # t.integer  :failed_attempts, default: 0, null: false # Only if lock strategy is :failed_attempts
      # t.string   :unlock_token # Only if unlock strategy is :email or :both
      # t.datetime :locked_at
・
・
~ableの文字がたくさんあります。これらはいったいどのような設定をUserモデルに追加しているのでしょうか。
Qiitaで1000LGTM以上のdeviseに関する記事でが以下のような表で説明しています。
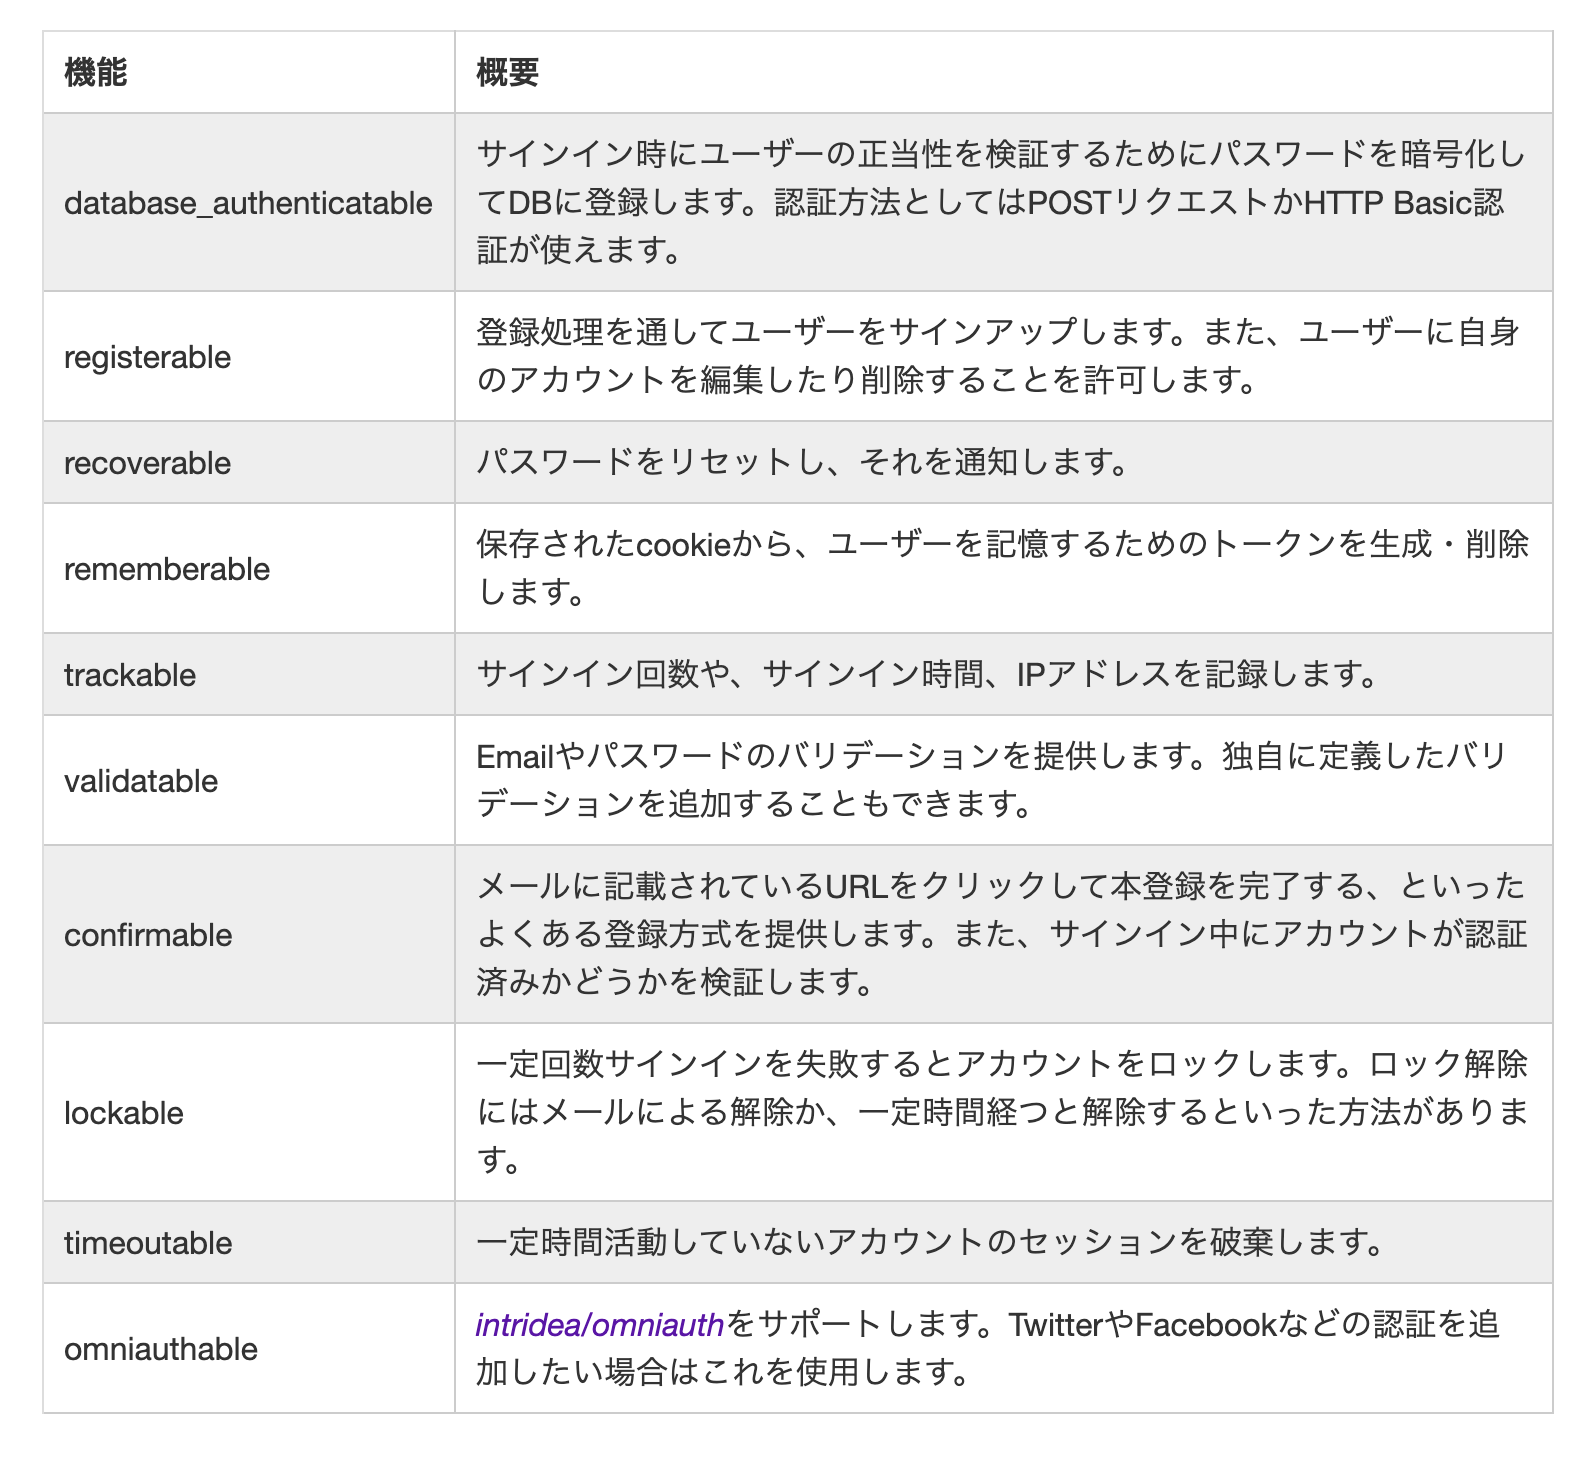
確かに簡潔にまとめられていますが詳しい仕組みなどがありません。ですので、これから複数の記事に渡って、deviseのモデル設定の仕組みを自分なりに解説していこうと思います。
Database authenticatable(データベースの認証)
公式ページがありましたのでそちらを見ていきます。
# frozen_string_literal: true

require 'devise/strategies/database_authenticatable'

module Devise
  module Models
    # Authenticatable Module, responsible for hashing the password and
    # validating the authenticity of a user while signing in.
    #
    # This module defines a `password=` method. This method will hash the argument
    # and store it in the `encrypted_password` column, bypassing any pre-existing
    # `password` column if it exists.
    #
    # == Options
    #
    # DatabaseAuthenticatable adds the following options to devise_for:
    #
    #   * +pepper+: a random string used to provide a more secure hash. Use
    #     `rails secret` to generate new keys.
    #
    #   * +stretches+: the cost given to bcrypt.
    #
    #   * +send_email_changed_notification+: notify original email when it changes.
    #
    #   * +send_password_change_notification+: notify email when password changes.
    #
    # == Examples
    #
    #    User.find(1).valid_password?('password123')         # returns true/false
    #
    module DatabaseAuthenticatable
      extend ActiveSupport::Concern

      included do
        after_update :send_email_changed_notification, if: :send_email_changed_notification?
        after_update :send_password_change_notification, if: :send_password_change_notification?

        attr_reader :password, :current_password
        attr_accessor :password_confirmation
      end

      def initialize(*args, &block)
        @skip_email_changed_notification = false
        @skip_password_change_notification = false
        super
      end

      # Skips sending the email changed notification after_update
      def skip_email_changed_notification!
        @skip_email_changed_notification = true
      end

      # Skips sending the password change notification after_update
      def skip_password_change_notification!
        @skip_password_change_notification = true
      end

      def self.required_fields(klass)
        [:encrypted_password] + klass.authentication_keys
      end

      # Generates a hashed password based on the given value.
      # For legacy reasons, we use `encrypted_password` to store
      # the hashed password.
      def password=(new_password)
        @password = new_password
        self.encrypted_password = password_digest(@password) if @password.present?
      end

      # Verifies whether a password (ie from sign in) is the user password.
      def valid_password?(password)
        Devise::Encryptor.compare(self.class, encrypted_password, password)
      end

      # Set password and password confirmation to nil
      def clean_up_passwords
        self.password = self.password_confirmation = nil
      end

      # Update record attributes when :current_password matches, otherwise
      # returns error on :current_password.
      #
      # This method also rejects the password field if it is blank (allowing
      # users to change relevant information like the e-mail without changing
      # their password). In case the password field is rejected, the confirmation
      # is also rejected as long as it is also blank.
      def update_with_password(params, *options)
        if options.present?
          ActiveSupport::Deprecation.warn <<-DEPRECATION.strip_heredoc
            [Devise] The second argument of `DatabaseAuthenticatable#update_with_password`
            (`options`) is deprecated and it will be removed in the next major version.
            It was added to support a feature deprecated in Rails 4, so you can safely remove it
            from your code.
          DEPRECATION
        end

        current_password = params.delete(:current_password)

        if params[:password].blank?
          params.delete(:password)
          params.delete(:password_confirmation) if params[:password_confirmation].blank?
        end

        result = if valid_password?(current_password)
          update(params, *options)
        else
          assign_attributes(params, *options)
          valid?
          errors.add(:current_password, current_password.blank? ? :blank : :invalid)
          false
        end

        clean_up_passwords
        result
      end

      # Updates record attributes without asking for the current password.
      # Never allows a change to the current password. If you are using this
      # method, you should probably override this method to protect other
      # attributes you would not like to be updated without a password.
      #
      # Example:
      #
      #   def update_without_password(params, *options)
      #     params.delete(:email)
      #     super(params)
      #   end
      #
      def update_without_password(params, *options)
        if options.present?
          ActiveSupport::Deprecation.warn <<-DEPRECATION.strip_heredoc
            [Devise] The second argument of `DatabaseAuthenticatable#update_without_password`
            (`options`) is deprecated and it will be removed in the next major version.
            It was added to support a feature deprecated in Rails 4, so you can safely remove it
            from your code.
          DEPRECATION
        end

        params.delete(:password)
        params.delete(:password_confirmation)

        result = update(params, *options)
        clean_up_passwords
        result
      end

      # Destroy record when :current_password matches, otherwise returns
      # error on :current_password. It also automatically rejects
      # :current_password if it is blank.
      def destroy_with_password(current_password)
        result = if valid_password?(current_password)
          destroy
        else
          valid?
          errors.add(:current_password, current_password.blank? ? :blank : :invalid)
          false
        end

        result
      end

      # A callback initiated after successfully authenticating. This can be
      # used to insert your own logic that is only run after the user successfully
      # authenticates.
      #
      # Example:
      #
      #   def after_database_authentication
      #     self.update_attribute(:invite_code, nil)
      #   end
      #
      def after_database_authentication
      end

      # A reliable way to expose the salt regardless of the implementation.
      def authenticatable_salt
        encrypted_password[0,29] if encrypted_password
      end

      if Devise.activerecord51?
        # Send notification to user when email changes.
        def send_email_changed_notification
          send_devise_notification(:email_changed, to: email_before_last_save)
        end
      else
        # Send notification to user when email changes.
        def send_email_changed_notification
          send_devise_notification(:email_changed, to: email_was)
        end
      end

      # Send notification to user when password changes.
      def send_password_change_notification
        send_devise_notification(:password_change)
      end

    protected

      # Hashes the password using bcrypt. Custom hash functions should override
      # this method to apply their own algorithm.
      #
      # See https://github.com/heartcombo/devise-encryptable for examples
      # of other hashing engines.
      def password_digest(password)
        Devise::Encryptor.digest(self.class, password)
      end

      if Devise.activerecord51?
        def send_email_changed_notification?
          self.class.send_email_changed_notification && saved_change_to_email? && !@skip_email_changed_notification
        end
      else
        def send_email_changed_notification?
          self.class.send_email_changed_notification && email_changed? && !@skip_email_changed_notification
        end
      end

      if Devise.activerecord51?
        def send_password_change_notification?
          self.class.send_password_change_notification && saved_change_to_encrypted_password? && !@skip_password_change_notification
        end
      else
        def send_password_change_notification?
          self.class.send_password_change_notification && encrypted_password_changed? && !@skip_password_change_notification
        end
      end

      module ClassMethods
        Devise::Models.config(self, :pepper, :stretches, :send_email_changed_notification, :send_password_change_notification)

        # We assume this method already gets the sanitized values from the
        # DatabaseAuthenticatable strategy. If you are using this method on
        # your own, be sure to sanitize the conditions hash to only include
        # the proper fields.
        def find_for_database_authentication(conditions)
          find_for_authentication(conditions)
        end
      end
    end
  end
end
めちゃくちゃに長いですね、、、
重要そうなところだけピックアップして解説します。
まず、いちばん上にコメントアウトでざっくりと概要が書かれています。
Authenticatable Module, responsible for hashing the password and validating the authenticity of a user while signing in.
訳としては、「サインイン時にパスワードのハッシュ化とユーザーの真正性の検証を行う」でしょうか。
ログイン機能としてとても重要なユーザーの真正性を行ってくれるようです。
上記の記載のすぐ下に以下の文があります。
This module defines a
password=method. This method will hash the argument and store it in theencrypted_passwordcolumn, bypassing any pre-existingpasswordcolumn if it exists.
訳:
このモジュールは password= メソッドを定義しています。このメソッドは引数をハッシュ化して encrypted_password カラムに格納し、既存の password カラムがある場合はそれをバイパスします。
このpassword=メソッドはモジュールの中に定義されていました。
def password=(new_password)
  @password = new_password
  self.encrypted_password = password_digest(@password) if @password.present?
end
引数であるnew_passwordを@passwordに格納し、@passwordが空でなければ、password_digestメソッドによりハッシュ化される仕組みのようです。password_digestについても同じmodule内にあるので見てみます。
# Hashes the password using bcrypt. Custom hash functions should override
# this method to apply their own algorithm.
#
#
def password_digest(password)
  Devise::Encryptor.digest(self.class, password)
end
引数であるpasswordは先ほどの@passwordですね。第一引数であるself.classはこのdeviseで定義しているモデルです。Deviseでモデル作成時にUserとすれば、self.classはUserとなります。Devise::Encryptor.digest(self.class, password)はいったい何をしているのでしょうか。
Devise::EncryptorとあるようにDeviseのmoduleの中で定義されているEncryptorというmoduleに記載がありました。
# frozen_string_literal: true

require 'bcrypt'

module Devise
  module Encryptor
    def self.digest(klass, password) # <= この部分!!
      if klass.pepper.present?
        password = "#{password}#{klass.pepper}"
      end
      ::BCrypt::Password.create(password, cost: klass.stretches).to_s
    end

    def self.compare(klass, hashed_password, password)
      return false if hashed_password.blank?
      bcrypt   = ::BCrypt::Password.new(hashed_password)
      if klass.pepper.present?
        password = "#{password}#{klass.pepper}"
      end
      password = ::BCrypt::Engine.hash_secret(password, bcrypt.salt)
      Devise.secure_compare(password, hashed_password)
    end
  end
end
self.digest(klass, password)のklassはself.classが入っています。なぜclassとしないのかはわかりません笑
この部分については下記記事で説明されていました。
"#{password}#{klass.pepper}"については、平文パスワードにあらかじめ設定されている文字列(pepper)をくっつけ、結合された文字列をハッシュ化を行います。pepperは平文パスワードにあらかじめ設定されている文字列とあることから、登録済みのpasswordでないと設定されていないということでしょう。ですのでklass.pepper.present?とすることで、既に登録済みのパスワードがあるモデル場合trueを返すようにしています。
逆にこの分岐でfalseになるということはこのモデルはパスワード登録を行なっていないということになるので、パスワードのハッシュ化moduleであるBCryptを使用しているということですね。このようにモデルのカラムにパスワードをハッシュ化してデータベースに保存する仕組みができています。
次に検証部分ですが、それは以下のメソッドになるかなと思います。(最初に記載した長いmoduleの中で定義されています。)
# Verifies whether a password (ie from sign in) is the user password.
def valid_password?(password)
  Devise::Encryptor.compare(self.class, encrypted_password, password)
end
「パスワード(サインイン時のもの)がユーザーパスワードであるかどうかを検証」とあるように、渡されたパスワードを検証するメソッドです。内部にあるこちらのメソッド(Devise::Encryptor.compare)は先ほど参照したEncryptorモジュールの中にあります。
  def self.compare(klass, hashed_password, password)
    return false if hashed_password.blank?
    bcrypt   = ::BCrypt::Password.new(hashed_password)
    if klass.pepper.present?
      password = "#{password}#{klass.pepper}"
    end
    password = ::BCrypt::Engine.hash_secret(password, bcrypt.salt)
    Devise.secure_compare(password, hashed_password)
  end
hashed_password.blank?で渡されたハッシュ化されたパスワードが空値ならすぐにreturnを返して処理を終了させますね。それ以降の処理についてはこのモジュール内からだとわかりにくいのですが、Devise.secure_compare(password, hashed_password)で引数として渡されたハッシュ化されたパスワード(hashed_password)と既に登録済みのパスワードと平文パスワードにあらかじめ設定されている文字列を結合したもの(password)を比較しているものと思います。
このようにして、データベースを用いてユーザーのパスワード検証を行っているのがDatabase authenticatableだと言えます。