【Gem】Administrate
はじめに
こんにちは!大ちゃんの駆け出し技術ブログです。
管理画面の実装をずっとサボってたのですが、今更実装してみたところ思いの外簡単に実装できて、ここに記録しておきます。 gemって偉大だな。
実装手順
# Gemfile
gem "administrate"

$ bundle install
Fetching momentjs-rails 2.20.1
Installing momentjs-rails 2.20.1
Fetching datetime_picker_rails 0.0.7
Installing datetime_picker_rails 0.0.7
Fetching jquery-rails 4.4.0
Installing jquery-rails 4.4.0
Fetching kaminari-core 1.2.1
Installing kaminari-core 1.2.1
Fetching kaminari-actionview 1.2.1
Installing kaminari-actionview 1.2.1
Fetching kaminari-activerecord 1.2.1
Installing kaminari-activerecord 1.2.1
Fetching kaminari 1.2.1
Installing kaminari 1.2.1
コマンドを実行すると既に作成したモデルに合わせて管理画面のルーティングやそのコントローラを自動で作成してくれます。
$ rails generate administrate:install

route  namespace :admin do
    resources :users
    resources :ranking_block_likes
    resources :text_block_likes
    resources :profile_blocks
    resources :favorite_block_likes
    resources :yes_or_no_blocks
    resources :ranking_blocks
        ・
        ・
        ・

    root to: "users#index"
  end

create  app/controllers/admin/application_controller.rb
      create  app/dashboards/user_dashboard.rb
      create  app/controllers/admin/users_controller.rb
      create  app/dashboards/ranking_block_like_dashboard.rb
      create  app/controllers/admin/ranking_block_likes_controller.rb
      create  app/dashboards/text_block_like_dashboard.rb
      create  app/controllers/admin/text_block_likes_controller.rb
      create  app/dashboards/profile_block_dashboard.rb
      create  app/controllers/admin/profile_blocks_controller.rb
      create  app/dashboards/favorite_block_like_dashboard.rb
      create  app/controllers/admin/favorite_block_likes_controller.rb
      create  app/dashboards/yes_or_no_block_dashboard.rb
      create  app/controllers/admin/yes_or_no_blocks_controller.rb
      create  app/dashboards/ranking_block_dashboard.rb
      create  app/controllers/admin/ranking_blocks_controller.rb
            ・
            ・
            ・
モデル一つに対し、1つのコントローラ + 専用のdashbord.rbを生成しています。
app/controllers/admin/foos_controller.rb
app/dashboards/foo_dashboard.rb
ちなみに、Adminisitrateを導入後にモデルを追加したあとは下記コマンドを実行すれば同様に自動作成を行ってくれるようです。
$ rails generate administrate:dashboard <追加したモデル名>
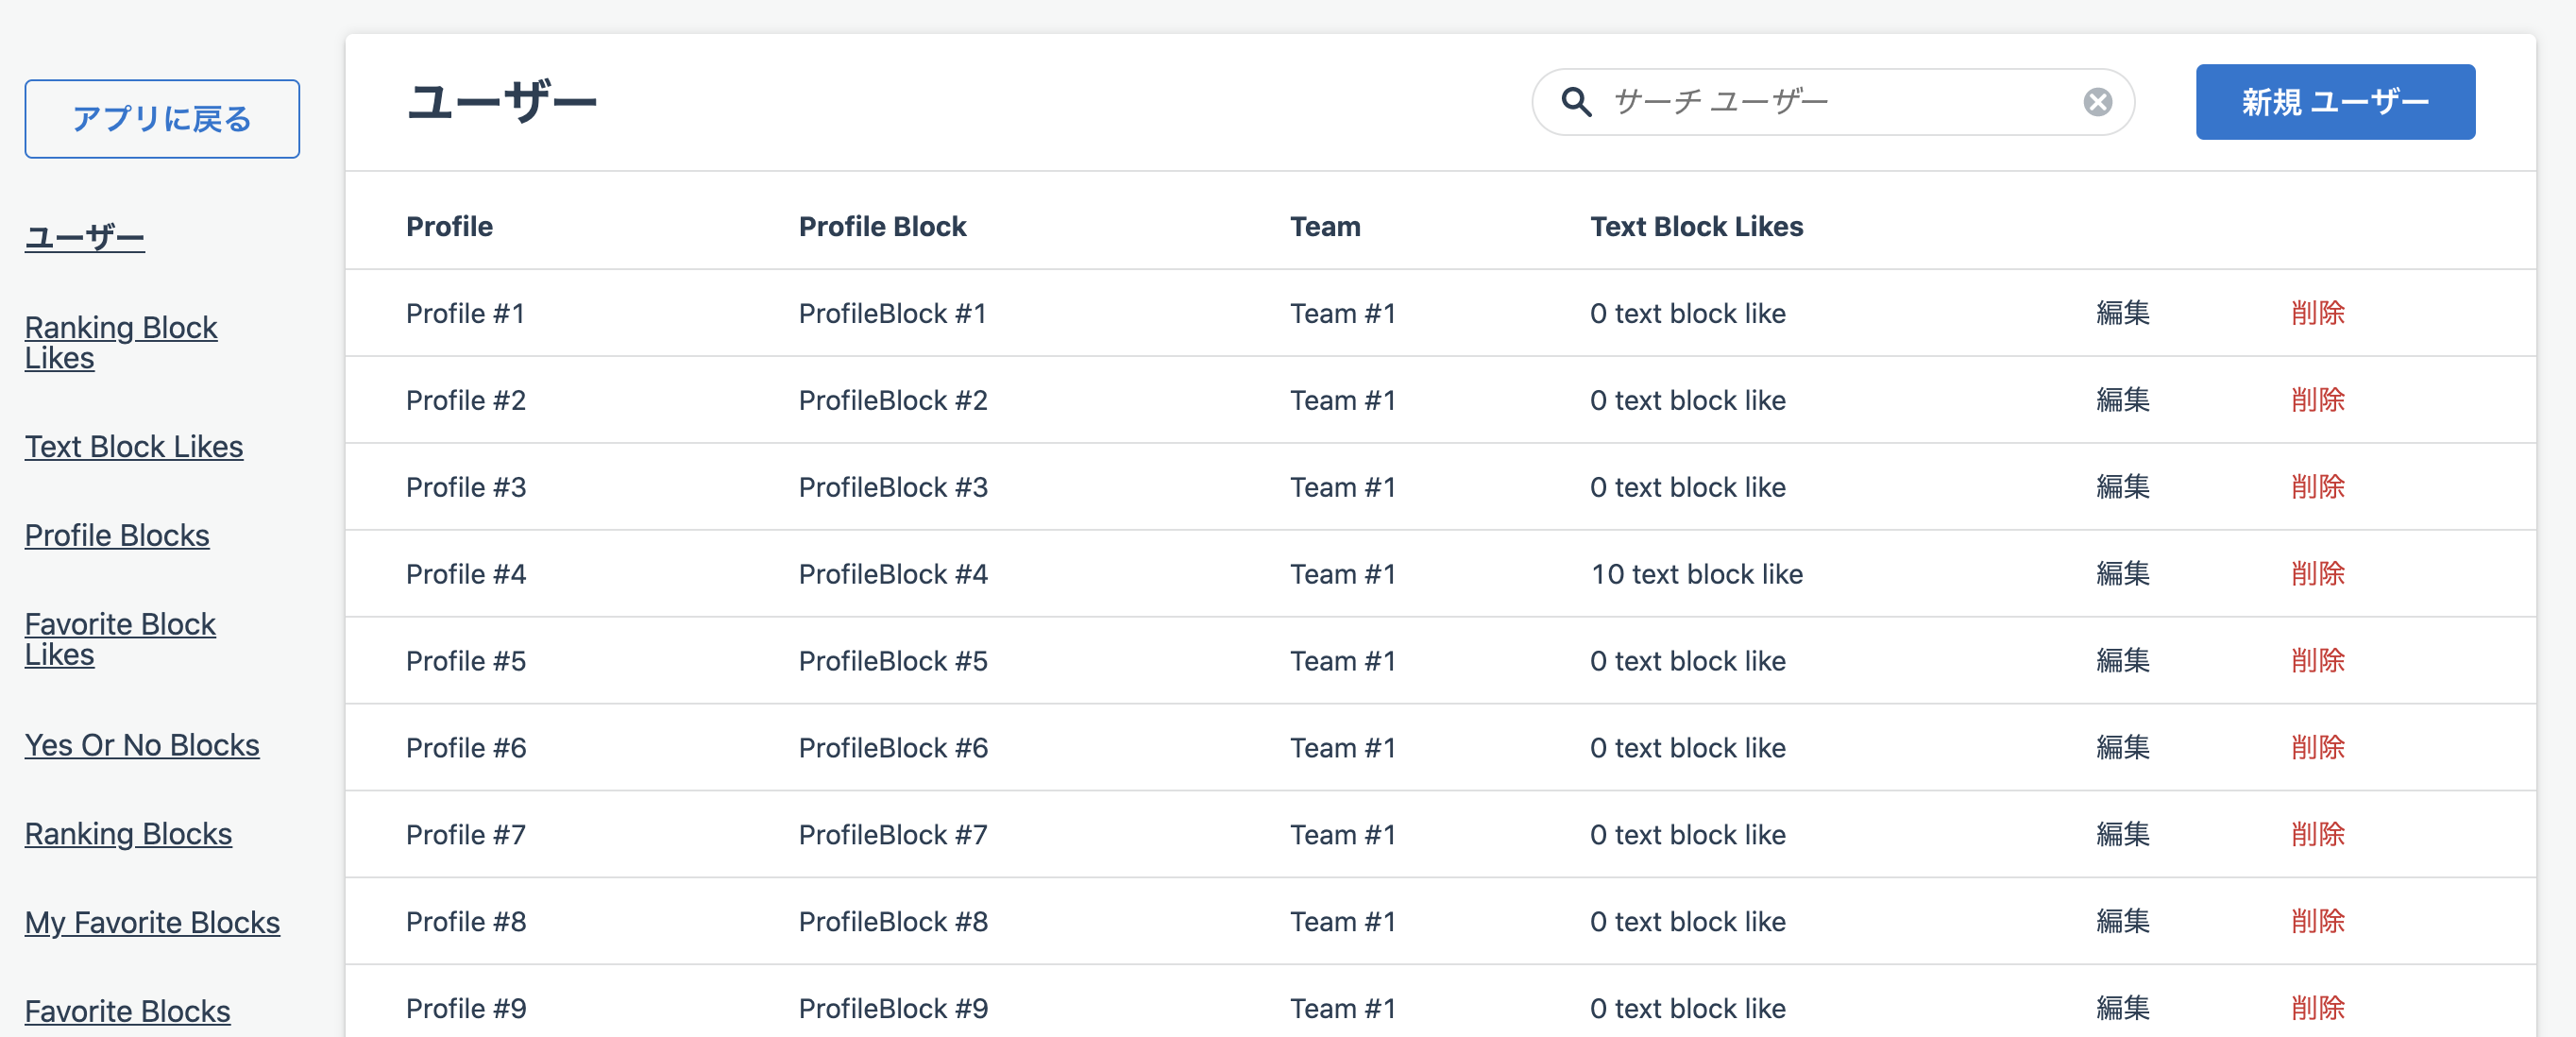
これだけでなんと管理画面がもう既にできています!!
http://localhost:3000/adminにアクセスしてみましょう。
他の管理gemもこれぐらい簡単に実装できるのでしょうか、、。gemの偉大さに改めて気づかされました。
しかし、今はなんの認証もなしにアクセスできてしまいます。そのため認証機能をつけてみましょう。有名ログインのgemであるPunditで認証機能を付けてみたいと思います。
マイグレーションを戻してroleカラムをuserに追加
t.integer :role, null: false, default: 1
enum型でuser.rbに定義しましょう。
enum role: { admin: 0, general: 1 }
Punditを使用してAdmin用のPolicyを作成します。
class Admin::ApplicationPolicy < ApplicationPolicy
  def initialize(current_user)
    @current_user = current_user
  end

  def authenticate_admin?
    current_user.admin?
  end

  private

  attr_reader :current_user
end
あとは先ほど自動作成されたAdmin::ApplicationControllerに対して管理者でないユーザーがアクセスしようとした時にルートパスにリダイレクトするようにします。authenticate_user!はおなじみのdeviseのメソッドです。ログインしていないユーザーもアクセスできないようにしています。
module Admin
  class ApplicationController < Administrate::ApplicationController
    before_action :authenticate_user!
    before_action :authenticate_admin

    def authenticate_admin
      redirect_to root_path unless Admin::ApplicationPolicy.new(current_user).authenticate_admin?
    end

    # Override this value to specify the number of elements to display at a time
    # on index pages. Defaults to 20.
    # def records_per_page
    #   params[:per_page] || 20
    # end
  end
end
これでadminの権限を持ったユーザーのみがnameスペースのadmin配下のリソースにアクセスすることができるようになりました。
他のgemとの互換性
他のgemとの互換性でいくつか自分で修正する必要がある箇所があったのでそこも紹介しておきます。
public uid
私は別でpublic_uidというgemを使用していたため、まずはコントローラのカスタマイズが必要でした。
Admin::ProfilesControllerに渡されるparams配下の通り。プロフィールを検索する方法はparamsのidが698c654b62のようにuidの値を参照して渡されていました。
params
=> <ActionController::Parameters {"controller"=>"admin/profiles", "action"=>"show", "id"=>"698c654b62"} permitted: false>
そのため、idが見つからないというエラーが返却されます。
Completed 404 Not Found in 6ms (ActiveRecord: 0.6ms | Allocations: 4279)
ActiveRecord::RecordNotFound - Couldn't find Profile with 'id'=698c654b62:
よってコントローラ をカスタマイズする必要ががありました。 幸いにもリソースを検索するメソッド(find_by)をオーバーライドする方法が各Admin::HogeControllerの中にコメントアウトで記載されていました。
# Override this method to specify custom lookup behavior.
# This will be used to set the resource for the `show`, `edit`, and `update`
# actions.
#
# def find_resource(param)
#   Foo.find_by!(slug: param)
# end
showアクション、editアクション、updateアクションでのリソースの検索に使われる方法をオーバーライドするためにはfind_resourceをオーバーライドすればいいとのことでした。ですので実際にidから検索するのではなくuidからリソースを検索するようにします。
def find_resource(param)
  Profile.find_by!(public_uid: param)
end
これでActiveRecord::RecordNotFoundのエラーは出なくなりました。
active_hash
しかしながら次に更なるエラーが表示されました。
NameError - uninitialized constant PrefectureDashboard
NameErrorと表示されました。「PrefectureDashboardがないよ」
このprefectureは実際にはモデルとしてテーブル登録していません。active_hashを使用してクラスのみ定義しています。
# prefecture.rb
class Prefecture < ActiveHash::Base
  self.data = [
    { id: 1, name: '北海道' }, { id: 2, name: '青森県' }, { id: 3, name: '岩手県' },
    { id: 4, name: '宮城県' }, { id: 5, name: '秋田県' }, { id: 6, name: '山形県' },
    { id: 7, name: '福島県' }, { id: 8, name: '茨城県' }, { id: 9, name: '栃木県' },
    { id: 10, name: '群馬県' }, { id: 11, name: '埼玉県' }, { id: 12, name: '千葉県' },
    { id: 13, name: '東京都' }, { id: 14, name: '神奈川県' }, { id: 15, name: '新潟県' },
    { id: 16, name: '富山県' }, { id: 17, name: '石川県' }, { id: 18, name: '福井県' },
    { id: 19, name: '山梨県' }, { id: 20, name: '長野県' }, { id: 21, name: '岐阜県' },
    { id: 22, name: '静岡県' }, { id: 23, name: '愛知県' }, { id: 24, name: '三重県' },
    { id: 25, name: '滋賀県' }, { id: 26, name: '京都府' }, { id: 27, name: '大阪府' },
    { id: 28, name: '兵庫県' }, { id: 29, name: '奈良県' }, { id: 30, name: '和歌山県' },
    { id: 31, name: '鳥取県' }, { id: 32, name: '島根県' }, { id: 33, name: '岡山県' },
    { id: 34, name: '広島県' }, { id: 35, name: '山口県' }, { id: 36, name: '徳島県' },
    { id: 37, name: '香川県' }, { id: 38, name: '愛媛県' }, { id: 39, name: '高知県' },
    { id: 40, name: '福岡県' }, { id: 41, name: '佐賀県' }, { id: 42, name: '長崎県' },
    { id: 43, name: '熊本県' }, { id: 44, name: '大分県' }, { id: 45, name: '宮崎県' },
    { id: 46, name: '鹿児島県' }, { id: 47, name: '沖縄県' }
  ]
end
モデルではactive_hashのメソッドを用いてbelongs_to_active_hashとなっており、prefectureに属していることが明示されています。
# profile.rb
# active hash =============
  extend ActiveHash::Associations::ActiveRecordExtensions
  belongs_to_active_hash :prefecture
そのため、dashbord.rbではprefecture: Field::BelongsTo,と明示されており、これによりPrefectureDashboardがないとおかしいというエラーが返ってきてるというわけですね。
ATTRIBUTE_TYPES = {
  user: Field::BelongsTo,
  prefecture: Field::BelongsTo,
  id: Field::Number,
  height: Field::Number,
  gender: Field::Select.with_options(searchable: false, collection: ->(field) { field.resource.class.send(field.attribute.to_s.pluralize).keys }),
  blood_type: Field::Select.with_options(searchable: false, collection: ->(field) { field.resource.class.send(field.attribute.to_s.pluralize).keys }),
  birthday: Field::DateTime,
  day_of_joinning: Field::DateTime,
  public_uid: Field::String,
  created_at: Field::DateTime,
  updated_at: Field::DateTime,
}.freeze
しかし、原因がわかったとしても、「administrate active hash」などと検索しても何も出てきません。
しかし、登録していないモデルに対してカスタムでダッシュボードを作成する方法があるようです。(公式ドキュメントを参照したところ、自作でdashboardを作レル項目がありました。)
bundle exec rails g administrate:dashboard Prefecture
config/routes.rbに追記します。
namespace :admin do
    resources :users
    resources :prefectures

    root to: "users#index"
  end
とりあえずPrefectureDashboardで定義してみました。中のロジックは全く書いていません。
require "administrate/base_dashboard"

class PrefectureDashboard < Administrate::BaseDashboard

end
これでエラーになったプロフィール詳細画面に遷移すると、エラーにならずに詳細ページを表示できるようになりました!
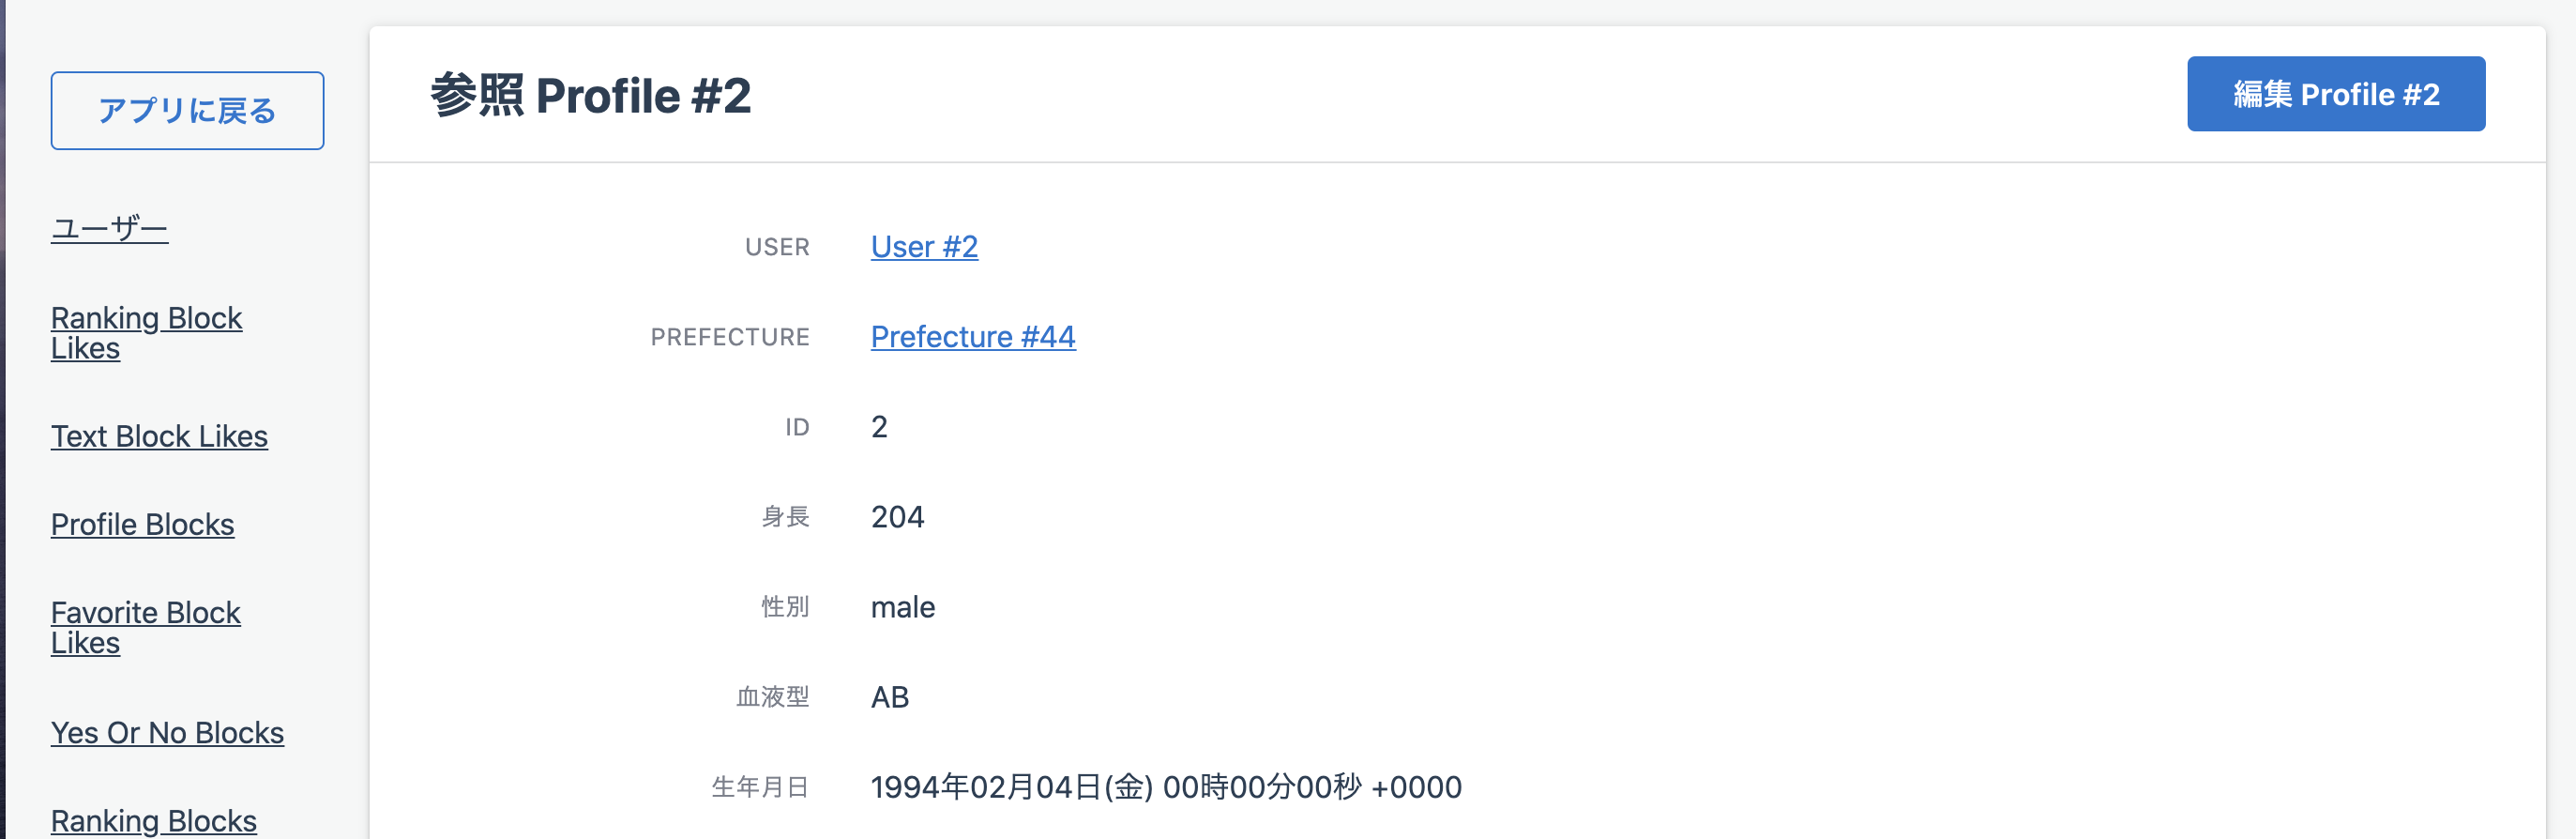
しかし、カスタムクラスに何も書いていないので当然prefectureの値はなく、画像の中のPrefecture #44をクリックするとエラーになります。
しかしPrefectureの値自体はactive_hashで静的なため、少し気持ち悪いですが一度ここまでにします。
実装方法が分かり次第改めて後述します。