【Rspec】devise + slack-omniauthのテスト方法
はじめに
こんにちは!大ちゃんの駆け出し技術ブログです。
今回はPFにあたり詰まった「devise + slack-omniauthのテスト方法」を紹介します。
slackログインの正式な方法についてはQiitaにてあげる予定ですが、記憶が新しいうちに紹介しておきたく、、、!
では早速解説していきます。
テスト内容
テスト内容について触れておきます。
slackログインの認証方法としてdeviseを使用しています。なので認証時にはコールバックコントローラに返すように指定します。
# app/controllers/users/omniauth_callbacks_controller.rb
module Users
  class OmniauthCallbacksController < Devise::OmniauthCallbacksController
    skip_before_action :authenticate_user!
    def slack

      user_info = get_user_info(request.env['omniauth.strategy'])
      @user = User.from_omniauth(request.env['omniauth.auth'], user_info)

      if @user.persisted?
        sign_in_and_redirect @user, event: :authentication
      else
        redirect_to root_path
      end
    end

    def failure
      flash[:alert] = 'Slack認証に失敗しました。'
      redirect_to root_path
    end
  end
end
deviseのSNS認証はメジャーかと思いますのでコードの見た目はほぼ同じかと思います。認証成功時にはslackメソッドがリダイレクトされ、逆に認証ができなかった場合failureメソッドにリダイレクトします。
テストする内容としては下記2点のみです。
- [ ] 認証成功時に
slackメソッドにリダイレクトし、意図したページにアクセスすること - [ ] 認証失敗時に
failureメソッドに失敗し、トップページにアクセスすること
長文になりますが補足で説明します。Rspecとはあまり関係がありませんが、Rspecのテストの方法に影響があるので念のため説明させてください。
上述したように、コールバックコントローラの見た目はほぼ同じですが、1点違う箇所があります。
user_info = get_user_info(request.env['omniauth.strategy'])
@user = User.from_omniauth(request.env['omniauth.auth'], user_info)
get_user_infoでログインしたユーザー情報にアクセスし、JSON形式で返却するようにしています。
def get_user_info(request)
  request.access_token.user_token.get('/api/users.identity').parsed
end
基本的にdeviseでのSNS認証時にrequest.env['omniauth.auth']という値は使う必要がありません。
例えば、QiitaでLGMTが多い下記記事のcallbackメソッドの例は以下のようになります。
https://qiita.com/kazuooooo/items/47e7d426cbb33355590e
# common callback method
def callback_for(provider)
  @user = User.from_omniauth(request.env["omniauth.auth"])
  if @user.persisted?
    sign_in_and_redirect @user, event: :authentication #this will throw if @user is not activated
    set_flash_message(:notice, :success, kind: "#{provider}".capitalize) if is_navigational_format?
  else
    session["devise.#{provider}_data"] = request.env["omniauth.auth"].except("extra")
    redirect_to new_user_registration_url
  end
end
@user = User.from_omniauth(request.env["omniauth.auth"])とあるように、request.env["omniauth.auth"]をのみを使っています。そしてrequest.env["omniauth.auth"]の値を使って、名前だったりユーザーの画像だったりを格納します。上記の記事ではemailのみしか取得していなかったのですが、他の記事を当たると多くの情報を格納するようです。
https://qiita.com/sakakinn/items/321e6b49c92b9f02f83f
def self.from_omniauth(auth)
  where(provider: auth.provider, uid: auth.uid).first_or_create do |user|
    user.provider = auth.provider
    user.uid = auth.uid
    user.name = auth.name
    user.email = auth.info.email
    user.password = Devise.friendly_token[0, 20] # ランダムなパスワードを作成
    user.image = auth.info.image.gsub("_normal","") if user.provider == "twitter"
    user.image = auth.info.image.gsub("picture","picture?type=large") if user.provider == "facebook"
  end
end
では、なぜ自分のコードではAPIを取得して追加情報の取得が必要なのかというと、slackより返却されるrequest.env["omniauth.auth"]の値が他のSNS認証時に返却されるものとは異なるからです。というよりは返却される情報が少ないと行った方が正しいです。
実はこのことに関する記事はありません。slack-omniauthのgemのGithub上でissueでちょこっと触れられていました。
https://github.com/ginjo/omniauth-slack/issues/10#issuecomment-621560008
この記事で述べている箇所はrequest.env["omniauth.auth"]の値の例です。
{
  "enterprise" : null,
  "ok" : true,
  "team" : {
    "id" : "T0BXXXXXX"
  },
  "authed_user" : {
    "scope" : "identity.basic,identity.email,identity.avatar,identity.team",
    "id" : "U0BXXXXXX",
    "token_type" : "user",
    "access_token" : "xoxp-111111111111-22222222222-3333333333333-fa39d45841fa1daab3a98f945a133d02"
  },
  "app_id" : "A0XXXXXXXXX"
}
他のrequest.env["omniauth.auth"]の値と比べて圧倒的に少ないです。他のrequest.env["omniauth.auth"]の値にはユーザー情報として、ユーザーのアイコン、名前、メールアドレスが含まれるはずなのですが、slackの場合はそれら個人の情報が一切ないです。そのため、追加でユーザー情報を取得しないと、十分なユーザー情報を格納できないのです。
そしてこのissueの中でユーザーへのアクセスはユーザーのアクセストークンを使用して直接取得するように記載されています。
@bot_token = env['omniauth.strategy'].access_token
@user_token = @bot_token.user_token
@user_token.get("/api/users.identity", ...).parsed
# --> response data hash from Slack
これを見て自分もユーザー情報を追加で取得してアイコンなどの追加情報を取得しました。
テストの方法
先にテストコードを紹介してする前に、必要な設定を紹介します。
実はOmniauthのテストにドキュメントがあります。
https://github.com/omniauth/omniauth/wiki/Integration-Testing
必要な設定として、spec/rails_helper.rbに下記を記載して下さい。
# spec/rails_helper.rb
# Turn on "test mode" for OmniAuth
OmniAuth.config.test_mode = true
これによりどうなるのかというと、SNS認証を行う際、一度アプリケーションのブラウザからSNSのサイトの認証画面に移行する必要があります。テストでも同じように認証画面にアクセスすることはあまり好ましくないと思います。毎回テストするたびに認証画面に移行してもし万が一のことがあったら危険ですし、なにより通信超過のためにテストに時間を要します。それを防ぐために上記の設定を行うことで、認証画面への移行をスキップし、そのままコールバックコントローラにリダイレクトしてくれます。
加えて、新規ファイルでconfig/initializers/omniauth.rbを作成します。
# config/initializers/omniauth.rb
Rails.application.config.middleware.use OmniAuth::Builder do
  on_failure { |env| Users::OmniauthCallbacksController.action(:failure).call(env) }
end
この設定が必要な理由は、デフォルトの仕様ですと、認証失敗時の挙動は例外の発生となります。しかし、devise認証ではホーム画面にリダイレクトするように設定していますので例外は発生しません。それを防ぐために、上記の設定が必要となります。
※ 公式では以下のように設定していますが、自分の場合こちらの設定では反映されませんでした。のちほど調査します。
OmniAuth.config.on_failure = Proc.new { |env|
  OmniAuth::FailureEndpoint.new(env).redirect_to_failure
}
設定が終わったところでテストコードを紹介します。最初の検証が失敗時のテストで、次にテストしているのが成功時の検証です。
# spec/system/slack_login_spec.rb
require 'rails_helper'

RSpec.describe "SlackLogin", type: :system do

  before do
    Rails.application.env_config["devise.mapping"] = Devise.mappings[:user] # Devise使用時に必要な記載
    Rails.application.env_config["omniauth.auth"] = set_slack_omniauth # omniauth.authの値を代入
    allow_any_instance_of(ApplicationController).to receive(:get_user_info).and_return(set_user_info) # strategy.authの値を代入
  end

  context 'oauthがinvali_omniauthの場合' do
    before do
      Rails.application.env_config["omniauth.auth"] = set_invalid_omniauth
      visit root_path
      click_on 'Slackログイン'
    end
    it "トップページにリダイレクトされる" do
      expect(current_path).to eq(root_path), 'ルートパスにリダイレクトされていません'
      expect(page).to have_content('Slack認証に失敗しました。'), 'フラッシュメッセージが表示されていません'
    end
  end

  context '初めてアプリにログインする時' do
    before do
      visit root_path
      click_on 'Slackログイン'
    end
    it 'プロフィール新規作成画面にアクセスする' do
      expect(page).to have_content('新規登録完了しました。次にプロフィールを作成してください。'), '意図したフラッシュメッセージが表示されていません'
      expect(current_path).to eq(new_profile_path), 'プロフィール新規作成画面にアクセスしていません'
    end
  end
end
最初に下記の記述です。
Rails.application.env_config["devise.mapping"] = Devise.mappings[:user] # Devise使用時に必要な記載
これは公式の説明にも書いてあります。deviseを使用する場合は必須のようですね。
https://github.com/omniauth/omniauth/wiki/Integration-Testing
公式の記述
before do
  Rails.application.env_config["devise.mapping"] = Devise.mappings[:user] # If using Devise
  Rails.application.env_config["omniauth.auth"] = OmniAuth.config.mock_auth[:twitter]
end
次にモックを導入してテストをしています。
Rails.application.env_config["omniauth.auth"] = set_slack_omniauth # omniauth.authの値を代入
allow_any_instance_of(ApplicationController).to receive(:get_user_info).and_return(set_user_info) # get_user_infoの値を代入
これによりrequest.env["omniauth.auth"]の値とget_user_infoメソッドの返り値をモックかしています。モックファイルは下記に記載します。
# spec/support/omniauth_helper.rb
# TODO: API認証時のテストを追加(未実装)
module OmniauthHelpers
  def set_slack_omniauth
    OmniAuth.config.mock_auth[:slack] =
        OmniAuth::AuthHash.new(
            {
                'provider'  => 'slack',
                'uid'       => 'mock_uid_1234',
                'credentials' => {
                  'token' => 'mock_credentails_token_1234',
                },
            }
        )
  end

  def set_user_info
    user_info = {
      "user"=>
        {"name"=>Faker::Name.name,
        "email"=>Faker::Internet.email,
        "image_192"=>
        "https//image-XXXXXXXXXX.png",},
      "team"=>
        {"id"=>rand(10 ** 19).to_s,
        "name"=>"XXXXXXXXXX",
        "image_34"=>"https//image-XXXXXXXXXX.jpg",
        }
    }
    user_info
  end

  def set_invalid_omniauth
    OmniAuth.config.mock_auth[:slack] = :invalid_credentials
  end
end
ここが他の記事とは異なる点です!
他の記事では追加でユーザー情報を取得することがないために、set_slack_omniauth(つまりrequest.env["omniauth.auth"]の値)の箇所だけしか書いておりません。今回の自分の実装の場合、追加情報でAPIにアクセスしないといけないため、その返却値のJSONをモック化しなければいけなかったのです。モックをよく知らなかった自分にとってはかなり難しかったです、、。
allow_any_instance_of(ApplicationController).to receive(:get_user_info).and_return(set_user_info) # get_user_infoの値を代入
テスト箇所ですが、認証成功時の箇所は極めてシンプルです。
context '初めてアプリにログインする時' do
  before do
    visit root_path
    click_on 'Slackログイン'
  end
  it 'プロフィール新規作成画面にアクセスする' do
    expect(page).to have_content('新規登録完了しました。次にプロフィールを作成してください。'), '意図したフラッシュメッセージが表示されていません'
    expect(current_path).to eq(new_profile_path), 'プロフィール新規作成画面にアクセスしていません'
  end
end
当然アプリによってリダイレクト先は異なりますが、それに合わせてテストを設計するだけです。
失敗時のテストですが、これについては説明させてください。
context 'oauthがinvali_omniauthの場合' do
  before do
    Rails.application.env_config["omniauth.auth"] = set_invalid_omniauth
    visit root_path
    click_on 'Slackログイン'
  end
  it "トップページにリダイレクトされる" do
    expect(current_path).to eq(root_path), 'ルートパスにリダイレクトされていません'
    expect(page).to have_content('Slack認証に失敗しました。'), 'フラッシュメッセージが表示されていません'
  end
end
といっても注目箇所はこちらの部分のみです。
Rails.application.env_config["omniauth.auth"] = set_invalid_omniauth
これはモックファイルで定義していた値を格納します。
def set_invalid_omniauth
  OmniAuth.config.mock_auth[:slack] = :invalid_credentials
end
これを使うことで認証失敗時の挙動をテストしてくれます。公式のomniauthのテスト方法のドキュメントでも同じように紹介しています。
OmniAuth.config.mock_auth[:twitter] = :invalid_credentials
重要なのは認証失敗時のテストでは必ずset_invalid_omniauthを使わないといけないということです。例えば、他の記事では代わりにnilを代入していましたが、それでは意図したものとは異なる挙動を見せます。
実際にnilを代入して試してみました。
Rails.application.env_config["omniauth.auth"] = nil
するとなんとfailureメソッドにリダイレクトされず、成功時と同じようにプロフィール作成画面にリダイレクトしました。これはどういうことかというと、先に代入されているset_slack_omniauthの値が既に格納されており、Rails.application.env_config["omniauth.auth"]にnilは反映されないためです。
では、set_slack_omniauthの箇所をコメントアウトしてみると失敗するのではと思い、コメントアウトしてnilの代入箇所のみテストしてみました。するとまた別の挙動を見せました。
failureメソッドにはリダイレクトされずslackメソッドにリダイレクトされましたが、request.env['omniauth.auth']の値に全く設定していない値が格納されていたのです。
> request.env['omniauth.auth']
=> {"provider"=>"default", "uid"=>"1234", "info"=>{"name"=>"Example User"}}
これはどうやらデフォルトのOmniauthのモックの値のようです。
つまり、nilを格納しようとしてもnilは反映されず、デフォルト値が代わりに反映される仕様になっているようです。なのでどうやってもnilは格納できない仕様となっています。他の記事ではnilを代入しているところもありますが、おそらくOmniauthのアップデートのせいで使用できなくなったのではないかと思っています。
以上で、本記事を終わりとします。ありがとうございました!
【Devise】Rememberable
はじめに
こんにちは!大ちゃんの駆け出し技術ブログです。
deviseのモデル設定に関する記事も連続投稿3投目!
今回はRememberableについてざっくり理解していきたいと思います!
しかし、連続投稿としては今回で最後にします。理由としてはポートフォリオ制作を進めるために他の記事も書きたいためです。なので、別の機会にdeviseについてまた書きたいと思います!(特に、外部認証であるOmniauthableについてはポートフォリオ制作で使っているため、必ず記事にしたいです!)
概要
Rememberableもマイグレーションファイルやモデルにデフォルトで追加されるモデルの設定になります。
[モデル]
devise :database_authenticatable, :registerable,
         :recoverable, :rememberable, :trackable, :validatable
[マイグレーションファイル]
## Rememberable
t.datetime :remember_created_at
rememberableで使用するカラムは一つのみです。remember_created_atとあるように
何かの日付を記録するためのカラムを設定しています。何の日付を記憶するのかモジュールを見て推察しましょう。
今回もまたまた長いモジュールとなっています。
# frozen_string_literal: true

require 'devise/strategies/rememberable'
require 'devise/hooks/rememberable'
require 'devise/hooks/forgetable'

module Devise
  module Models
    # Rememberable manages generating and clearing token for remembering the user
    # from a saved cookie. Rememberable also has utility methods for dealing
    # with serializing the user into the cookie and back from the cookie, trying
    # to lookup the record based on the saved information.
    # You probably wouldn't use rememberable methods directly, they are used
    # mostly internally for handling the remember token.
    #
    # == Options
    #
    # Rememberable adds the following options in devise_for:
    #
    #   * +remember_for+: the time you want the user will be remembered without
    #     asking for credentials. After this time the user will be blocked and
    #     will have to enter their credentials again. This configuration is also
    #     used to calculate the expires time for the cookie created to remember
    #     the user. By default remember_for is 2.weeks.
    #
    #   * +extend_remember_period+: if true, extends the user's remember period
    #     when remembered via cookie. False by default.
    #
    #   * +rememberable_options+: configuration options passed to the created cookie.
    #
    # == Examples
    #
    #   User.find(1).remember_me!  # regenerating the token
    #   User.find(1).forget_me!    # clearing the token
    #
    #   # generating info to put into cookies
    #   User.serialize_into_cookie(user)
    #
    #   # lookup the user based on the incoming cookie information
    #   User.serialize_from_cookie(cookie_string)
    module Rememberable
      extend ActiveSupport::Concern

      attr_accessor :remember_me

      def self.required_fields(klass)
        [:remember_created_at]
      end

      def remember_me!
        self.remember_token ||= self.class.remember_token if respond_to?(:remember_token)
        self.remember_created_at ||= Time.now.utc
        save(validate: false) if self.changed?
      end

      # If the record is persisted, remove the remember token (but only if
      # it exists), and save the record without validations.
      def forget_me!
        return unless persisted?
        self.remember_token = nil if respond_to?(:remember_token)
        self.remember_created_at = nil if self.class.expire_all_remember_me_on_sign_out
        save(validate: false)
      end

      def remember_expires_at
        self.class.remember_for.from_now
      end

      def extend_remember_period
        self.class.extend_remember_period
      end

      def rememberable_value
        if respond_to?(:remember_token)
          remember_token
        elsif respond_to?(:authenticatable_salt) && (salt = authenticatable_salt.presence)
          salt
        else
          raise "authenticatable_salt returned nil for the #{self.class.name} model. " \
            "In order to use rememberable, you must ensure a password is always set " \
            "or have a remember_token column in your model or implement your own " \
            "rememberable_value in the model with custom logic."
        end
      end

      def rememberable_options
        self.class.rememberable_options
      end

      # A callback initiated after successfully being remembered. This can be
      # used to insert your own logic that is only run after the user is
      # remembered.
      #
      # Example:
      #
      #   def after_remembered
      #     self.update_attribute(:invite_code, nil)
      #   end
      #
      def after_remembered
      end

      def remember_me?(token, generated_at)
        # TODO: Normalize the JSON type coercion along with the Timeoutable hook
        # in a single place https://github.com/heartcombo/devise/blob/ffe9d6d406e79108cf32a2c6a1d0b3828849c40b/lib/devise/hooks/timeoutable.rb#L14-L18
        if generated_at.is_a?(String)
          generated_at = time_from_json(generated_at)
        end

        # The token is only valid if:
        # 1. we have a date
        # 2. the current time does not pass the expiry period
        # 3. the record has a remember_created_at date
        # 4. the token date is bigger than the remember_created_at
        # 5. the token matches
        generated_at.is_a?(Time) &&
         (self.class.remember_for.ago < generated_at) &&
         (generated_at > (remember_created_at || Time.now).utc) &&
         Devise.secure_compare(rememberable_value, token)
      end

      private

      def time_from_json(value)
        if value =~ /\A\d+\.\d+\Z/
          Time.at(value.to_f)
        else
          Time.parse(value) rescue nil
        end
      end

      module ClassMethods
        # Create the cookie key using the record id and remember_token
        def serialize_into_cookie(record)
          [record.to_key, record.rememberable_value, Time.now.utc.to_f.to_s]
        end

        # Recreate the user based on the stored cookie
        def serialize_from_cookie(*args)
          id, token, generated_at = *args

          record = to_adapter.get(id)
          record if record && record.remember_me?(token, generated_at)
        end

        # Generate a token checking if one does not already exist in the database.
        def remember_token #:nodoc:
          loop do
            token = Devise.friendly_token
            break token unless to_adapter.find_first({ remember_token: token })
          end
        end

        Devise::Models.config(self, :remember_for, :extend_remember_period, :rememberable_options, :expire_all_remember_me_on_sign_out)
      end
    end
  end
end
まず前回までの記事同様に英語の説明部分を見てみます。
Rememberable manages generating and clearing token for remembering the user from a saved cookie. Rememberable also has utility methods for dealing with serializing the user into the cookie and back from the cookie, trying to lookup the record based on the saved information. You probably wouldn't use rememberable methods directly, they are used mostly internally for handling the remember token.
訳:
Rememberableは、保存されたcookieからユーザを記憶するためのトークンの生成とクリアを管理する機能です。ユーザーをcookieにシリアライズしたり、cookieから戻したり、保存された情報に基づいてレコードを検索したりするためのメソッドもあります。
これらのメソッドは、主に内部で記憶トークンの処理に使用されます。
cookieを使用してユーザーを記憶するためのトークンを生成するとあるようにセッション管理に該当するのかなと思います。つまり、Rememberableはログインしたユーザーの情報を管理している機能ということです。しかし、具体的な機能が少し予想しづらいですね。
モジュールのメソッドを見てその機能を予想していきましょう。
3つのオプション
昨日のRecoverableと同じようにRememberableにも同じように3つのオプションがあるようです。
# Rememberable adds the following options in devise_for:
#
#   * +remember_for+: the time you want the user will be remembered without
#     asking for credentials. After this time the user will be blocked and
#     will have to enter their credentials again. This configuration is also
#     used to calculate the expires time for the cookie created to remember
#     the user. By default remember_for is 2.weeks.
#
#   * +extend_remember_period+: if true, extends the user's remember period
#     when remembered via cookie. False by default.
#
#   * +rememberable_options+: configuration options passed to the created cookie.
英語の説明をざっくり訳すと以下のような感じ
remember_for(ユーザーの認証情報の記憶時間の長さ)extend_remember_period(cookieから記憶されているユーザー情報の記憶時間の延長するかどうか)rememberable_options(cookieに渡されるオプションの設定)
ここで2つの疑問があるかと思います。
remember_forとextend_remember_periodは依存関係ではないか。rememberable_optionsでできるオプションの設定とは何か。
まず1についてですが、これは2つの設定は依存関係にあるのかなと思います。remember_forで設定したことを反映させるためにはextend_remember_periodが必要になると思うので、どちらか片方が設定されるということはないと思います。extend_remember_periodをtrueに変更することで記憶期間の延長を許可し、remember_forでその記憶期間を設定するという感じですね。
※ cookieを使用した時のみextend_remember_periodは適応されるということなので、cookieを使わない場合は適応されないのだと思います。ここの違いはあまり理解できませんでした、、
2についてあまり説明している記事が見当たらなかったのですが、下記記事を見つけました。個人の記事なので信頼性はわかりません。
rememberable_optionsは記事の中で以下のように定義されています。
config.rememberable_options = {:secure => true, :same_site => :none}
cookieの有効を同じサイトにするか、secureなものにするかなどの設定のようです。しかし、これを設定しているGithubの公開リポジトリはあまり見受けられなかったので、そこまで重要な設定ではないのでしょうか。自分はそう感じました。
これもまたdevise.rbで設定するようです。
config.remember_for = 1.week

config.extend_remember_period = false

config.rememberable_options = {}
3つのオプションの設定自体はそこまで重要ではないようですが、ログイン情報を保存する長さの設定など、ログイン情報の記憶に関する機能ということは間違いなさそうです。
モジュールのメソッド
今回もモジュールが長いので使用例の中からメソッドを見ていきましょう。
# == Examples
#
#   User.find(1).remember_me!  # regenerating the token
#   User.find(1).forget_me!    # clearing the token
remember_me!
まずはremember_me!メソッドです。
remember_me!
def remember_me!
  self.remember_token ||= self.class.remember_token if respond_to?(:remember_token)
  self.remember_created_at ||= Time.now.utc
  save(validate: false) if self.changed?
end
regenerating the tokenとあるように記憶トークンを再度生成しているのだと思われます。
||=を使っているのでremember_tokenがnilの時self.class.remember_tokenのメソッドで返却される値をremember_tokenに格納しています。
self.classとあるように、モジュールの中にあるモジュールのメソッドを使っているようです。ClassMethodsモジュールがRememberableの中に定義されていました。
module Rememberable
・
・
    module ClassMethods
        # Generate a token checking if one does not already exist in the database.
        def remember_token #:nodoc:
          loop do
            token = Devise.friendly_token
            break token unless to_adapter.find_first({ remember_token: token })
          end
        end
      end
    end
Devise.friendly_tokenでトークンを生成しているようです。unless to_adapter.find_first({ remember_token: token })でトークンの値が重複しないように制御している感じですね。
そしてremember_created_atカラムを更新しています。
self.remember_created_at ||= Time.now.utc
forget_me!
forget_me!メソッドについてはremember_me!の逆の挙動をします。
# If the record is persisted, remove the remember token (but only if
# it exists), and save the record without validations.
def forget_me!
  return unless persisted?
  self.remember_token = nil if respond_to?(:remember_token)
  self.remember_created_at = nil if self.class.expire_all_remember_me_on_sign_out
  save(validate: false)
end
remember_tokenとremember_created_atにnilを格納していますね。ログイン情報の記憶トークンのリセットをしています。
ある程度これで把握できたかなと思います!
【Devise】Recoverable
はじめに
こんにちは!大ちゃんの駆け出し技術ブログです。
今回も一つ前の投稿と同じようにdeviseのモデル設定についての記事となります。
今回はRecoverableについてざっくりとgemの中身を見ながら理解していきます。
概要
モデルやモデルに対応するテーブルでのdeviseの記述は以下のようになります。
- モデル
# app/models/user.rb
class User < ApplicationRecord
  # Include default devise modules. Others available are:
  # :confirmable, :lockable, :timeoutable, :trackable and :omniauthable
  devise :database_authenticatable, :registerable,
         :recoverable, :rememberable, :validatable
end
- マイグレーションファイル
class AddDeviseToUsers < ActiveRecord::Migration[5.2]
  def self.up
    change_table :users do |t|
・
・
      ## Recoverable
      t.string   :reset_password_token
      t.datetime :reset_password_sent_at
・
・
デフォルトの設定で有効になっていますね。ですので機能説明したデータベース認証を行うdatabase_authenticatable同様に重要な役割を担っていそうです。
マイグレーションファイルをよく見てみましょう。実はRecoverableの機能を推測できます。
      ## Recoverable
      t.string   :reset_password_token
      t.datetime :reset_password_sent_at
reset_passwordとありますね。
そうです。まさにパスワードをリセットする機能を持っています。
ここでモジュールの中身を見ていきましょう。 Recoverableも重要な機能のせいかモジュールの中身がとても長いです。
一番上にある説明ですが、こちらは上述したことと同様の内容を説明しています。
Recoverable takes care of resetting the user password and send reset instructions
訳: Recoverableはユーザーパスワードの再設定を行い、再設定手順を送信します。
概要については以上です。
3つのオプション
概要については理解できたかと思いますが、モジュールの以下の記述はどうでしょう。
    # ==Options
    #
    # Recoverable adds the following options to devise_for:
    #
    #   * +reset_password_keys+: the keys you want to use when recovering the password for an account
    #   * +reset_password_within+: the time period within which the password must be reset or the token expires.
    #   * +sign_in_after_reset_password+: whether or not to sign in the user automatically after a password reset.
オプションとあるように追加で設定を加えることができるようですね。 そして、オプションの数は以下の3つです。
reset_password_keys(パスワードをリセットする際に使用するキー)reset_password_within(パスワードのリセットの有効期限や、リセットトークンが失効する期限を設定)sign_in_after_reset_password(パスワードリセット後に自動的にサインインするかどうか)
少し理解がしづらいのはreset_password_keysの説明かと思います。
こちらはパスワードをリセットする際に使用するモデルのカラムを指定します。 例えば、リセット時に案内のメールを送信するときに、メールアドレスが必要ですね。 そんなときにキーを指定してあげることでモデルのメールアドレスに
オプションの設定方法としてはdevise_for:とあることから、モデルで設定ができるようですが、多くの記事を見るとinitializerは以下に作成されるdevise.rbに記述するようです。
# devise.rb

# パスワードをリセットする際に使用するキーをemailに設定
config.reset_password_keys = [:email]

# リセットの有効期限や、リセットトークンが失効する期限を10時間に設定
config.reset_password_within = 10.hours

# パスワードリセット後に自動的にサインインすることを許可
config.sign_in_after_reset_password = true
モジュール内
モジュール内で定義されているパスワードのリセットに関するメソッドなどを見ていきましょう。
モジュールの記述の概要を説明している箇所でこのモジュールの機能のExamplesの項目があります。
# == Examples
    #
    #   # resets the user password and save the record, true if valid passwords are given, otherwise false
    #   User.find(1).reset_password('password123', 'password123')
    #
    #   # creates a new token and send it with instructions about how to reset the password
    #   User.find(1).
reset_password
1つ目の例はこのモジュールの根幹となるreset_passwordメソッドです。
      # Update password saving the record and clearing token. Returns true if
      # the passwords are valid and the record was saved, false otherwise.
      def reset_password(new_password, new_password_confirmation)
        if new_password.present?
          self.password = new_password
          self.password_confirmation = new_password_confirmation
          save
        else
          errors.add(:password, :blank)
          false
        end
      end
役割が英語で説明されていますね。
Update password saving the record and clearing token. Returns true if the passwords are valid and the record was saved, false otherwise.
訳:
パスワードを更新しレコードを保存、トークンをクリアします。パスワードが有効でレコードが無事に保存された場合はtrueを、そうでない場合はfalseを返します。
第一引数にnew_password、第二引数にnew_password_confirmationとあります。これはパスワードを別のパスワードに更新する際に、一度の入力だけでなく確認のためにもう一度入力するという仕様を明示しています。例でも同じパスワードを入力しています。
User.find(1).reset_password('password123', 'password123')
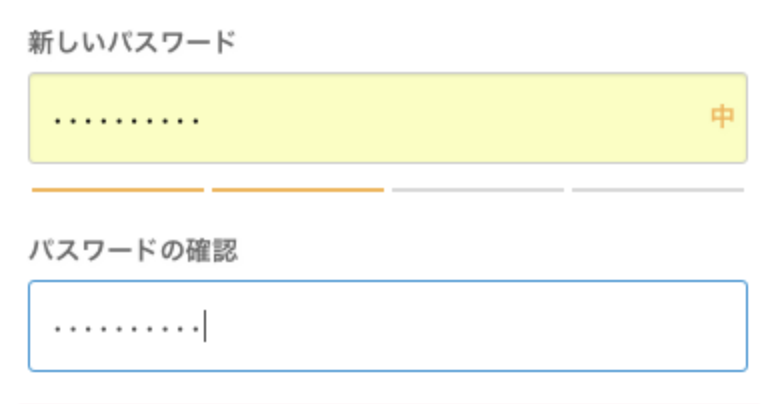
[パスワードリセット画面の例]
new_passwordが入力されているのであれば、モデルのpasswordカラムとpassword_confirmationカラムに、それぞれnew_passwordとnew_password_confirmationを代入し、saveメソッドで保存しています。
if new_password.present?
  self.password = new_password
  self.password_confirmation = new_password_confirmation
  save
send_reset_password_instructions
2つ目はsend_reset_password_instructionsメソッドです。
これもメソッド名から何をしているのかがすぐにわかります。パスワードをリセットする際に自分宛てにメールが送られリセットのフローを説明してくれる機能ですね。
※ 本当に公式のモジュールのメソッドは引数やメソッド名から機能を予測できるようにうまく記載されていて勉強になります!

定義されている箇所は以下になります。
      # Resets reset password token and send reset password instructions by email.
      # Returns the token sent in the e-mail.
      def send_reset_password_instructions
        token = set_reset_password_token
        send_reset_password_instructions_notification(token)

        token
      end
Resets reset password token and send reset password instructions by email.
訳: リセットパスワードのトークンと指示メールをリセットします。
まず、set_reset_password_tokenメソッドを使用して新しいリセットパスワードのトークンを生成しています。
def set_reset_password_token
  raw, enc = Devise.token_generator.generate(self.class, :reset_password_token)

  self.reset_password_token   = enc
  self.reset_password_sent_at = Time.now.utc
  save(validate: false)
  raw
end
Devise.token_generatorとあるようにトークンを生成してくれる機能があるようです。そしてreset_password_tokenカラムに生成したトークンを代入しreset_password_sent_atカラムには現在時刻を協定世界時 (UTC)で代入します。
Time.now.utc
=> 2021-03-27 00:06:00 UTC
そして、send_reset_password_instructions_notificationメソッドによってメールを送信していると思われます。下記が定義されている箇所です。
def send_reset_password_instructions_notification(token)
  send_devise_notification(:reset_password_instructions, token, {})
end
send_devise_notificationメソッドに関しては別のモジュールであるAuthenticatableで定義されているようです。
def send_devise_notification(notification, *args)
  message = devise_mailer.send(notification, self, *args)
  # Remove once we move to Rails 4.2+ only.
  if message.respond_to?(:deliver_now)
    message.deliver_now
  else
    message.deliver
  end
end
message.deliver_nowとあるようまさにメールを送信している箇所ですね。*argsの中にtokenが入っているのでtokenもメールに添付されて送られるのだと思います。これによりパスワードをリセットされるメールがユーザーに届くというわけですね!
【Devise】Database authenticatable
Deviseによるモデル設定
こんにちは!大ちゃんの駆け出し技術ブログです。
最近deviseをなんとなくで使い始めましたが、本当に多機能で理解が追いついていません。なので、何回かに分けて記事にしようと思います。
今回はDeviseのモデル設定についてです。公式でいうところのConfiguring Modelsの項目です。
Deviseを使ってUserモデルを作成しようとすると、モデルとマイグレーションファイルに複数の見たことのない文字が出ると思います。
- モデル
# app/models/user.rb
class User < ApplicationRecord
  # Include default devise modules. Others available are:
  # :confirmable, :lockable, :timeoutable, :trackable and :omniauthable
  devise :database_authenticatable, :registerable,
         :recoverable, :rememberable, :validatable
end
- マイグレーションファイル
class AddDeviseToUsers < ActiveRecord::Migration[5.2]
  def self.up
    change_table :users do |t|
      ## Database authenticatable
      t.string :email,              null: false, default: ""
      t.string :encrypted_password, null: false, default: ""

      ## Recoverable
      t.string   :reset_password_token
      t.datetime :reset_password_sent_at

      ## Rememberable
      t.datetime :remember_created_at

      ## Trackable
      # t.integer  :sign_in_count, default: 0, null: false
      # t.datetime :current_sign_in_at
      # t.datetime :last_sign_in_at
      # t.inet     :current_sign_in_ip
      # t.inet     :last_sign_in_ip

      ## Confirmable
      # t.string   :confirmation_token
      # t.datetime :confirmed_at
      # t.datetime :confirmation_sent_at
      # t.string   :unconfirmed_email # Only if using reconfirmable

      ## Lockable
      # t.integer  :failed_attempts, default: 0, null: false # Only if lock strategy is :failed_attempts
      # t.string   :unlock_token # Only if unlock strategy is :email or :both
      # t.datetime :locked_at
・
・
~ableの文字がたくさんあります。これらはいったいどのような設定をUserモデルに追加しているのでしょうか。
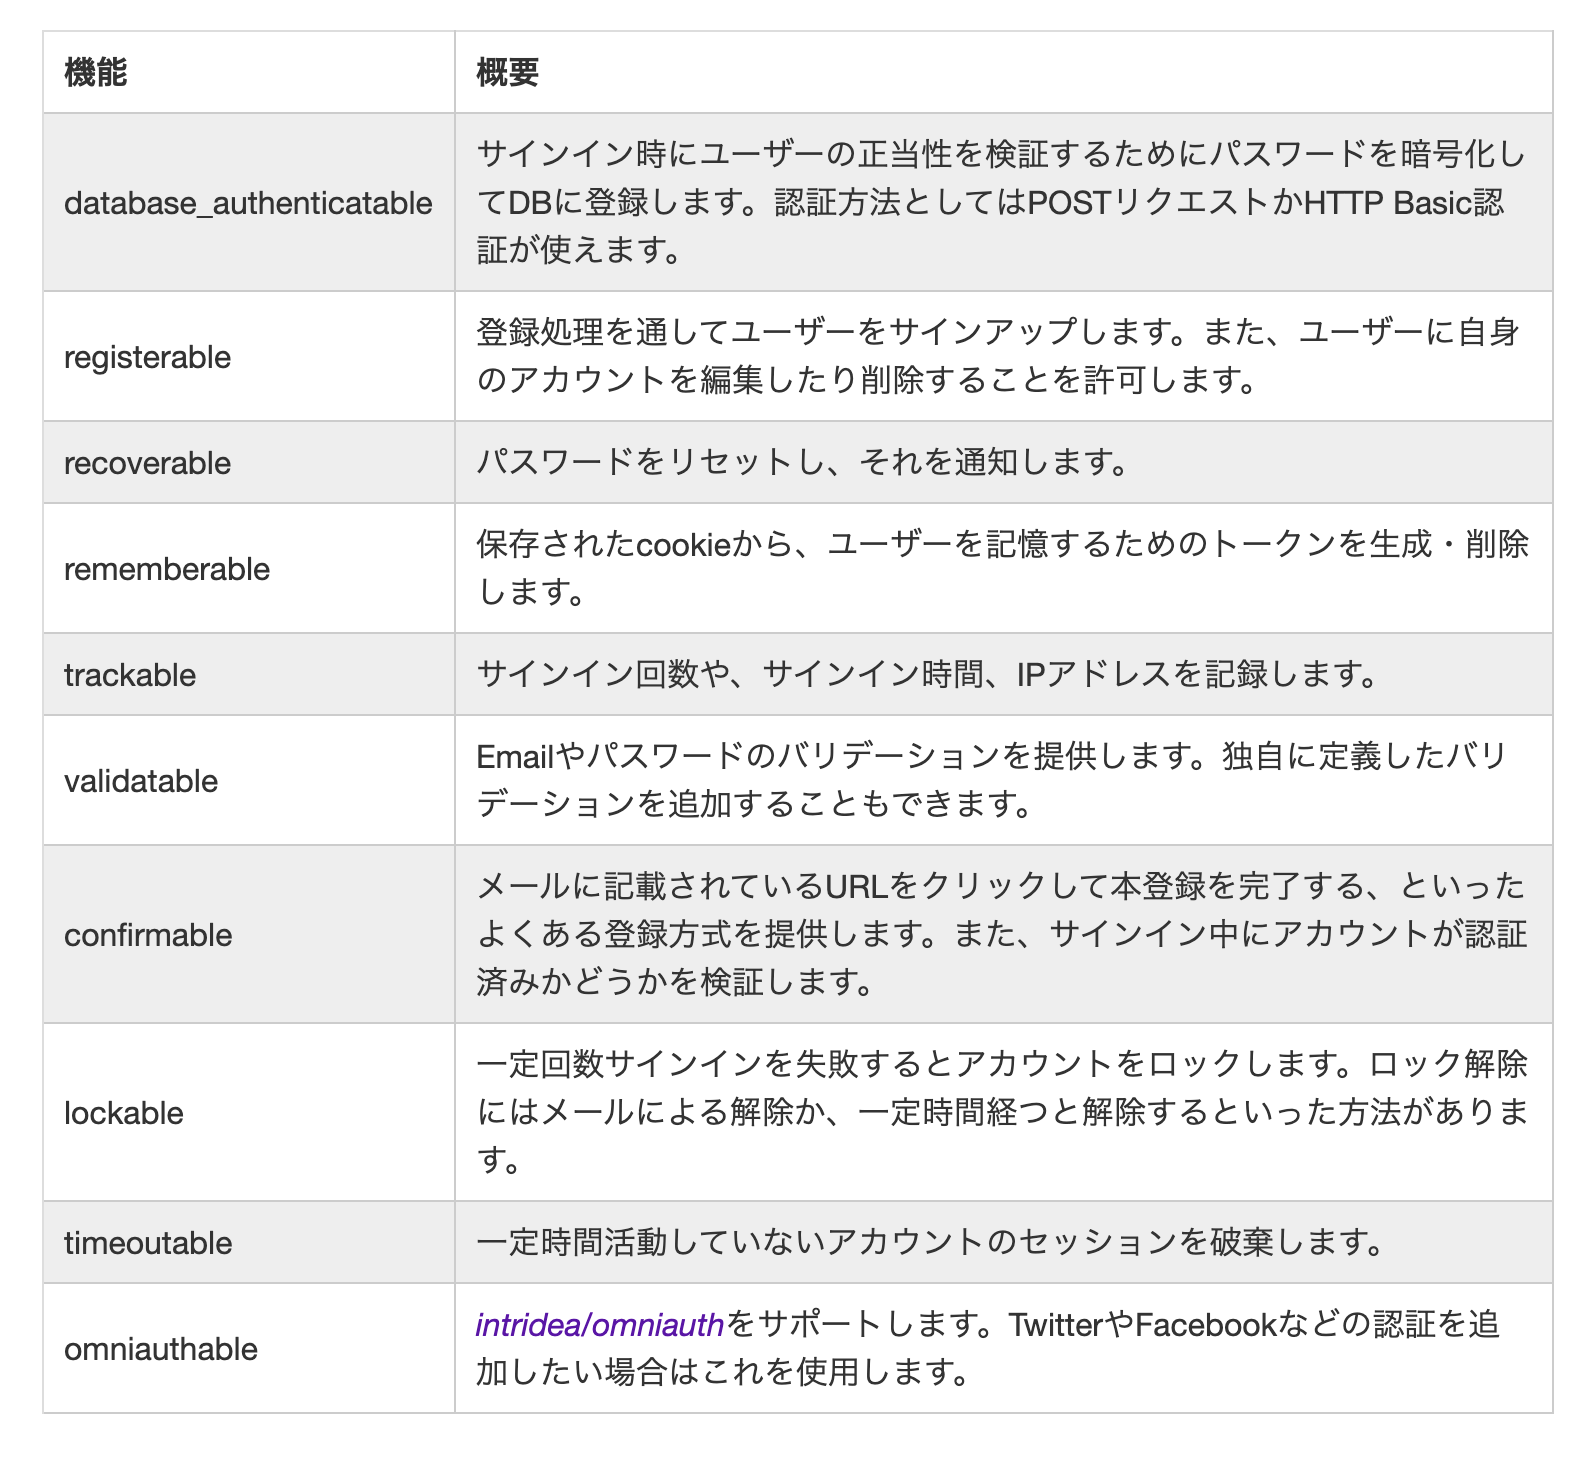
Qiitaで1000LGTM以上のdeviseに関する記事でが以下のような表で説明しています。
確かに簡潔にまとめられていますが詳しい仕組みなどがありません。ですので、これから複数の記事に渡って、deviseのモデル設定の仕組みを自分なりに解説していこうと思います。
Database authenticatable(データベースの認証)
公式ページがありましたのでそちらを見ていきます。
# frozen_string_literal: true

require 'devise/strategies/database_authenticatable'

module Devise
  module Models
    # Authenticatable Module, responsible for hashing the password and
    # validating the authenticity of a user while signing in.
    #
    # This module defines a `password=` method. This method will hash the argument
    # and store it in the `encrypted_password` column, bypassing any pre-existing
    # `password` column if it exists.
    #
    # == Options
    #
    # DatabaseAuthenticatable adds the following options to devise_for:
    #
    #   * +pepper+: a random string used to provide a more secure hash. Use
    #     `rails secret` to generate new keys.
    #
    #   * +stretches+: the cost given to bcrypt.
    #
    #   * +send_email_changed_notification+: notify original email when it changes.
    #
    #   * +send_password_change_notification+: notify email when password changes.
    #
    # == Examples
    #
    #    User.find(1).valid_password?('password123')         # returns true/false
    #
    module DatabaseAuthenticatable
      extend ActiveSupport::Concern

      included do
        after_update :send_email_changed_notification, if: :send_email_changed_notification?
        after_update :send_password_change_notification, if: :send_password_change_notification?

        attr_reader :password, :current_password
        attr_accessor :password_confirmation
      end

      def initialize(*args, &block)
        @skip_email_changed_notification = false
        @skip_password_change_notification = false
        super
      end

      # Skips sending the email changed notification after_update
      def skip_email_changed_notification!
        @skip_email_changed_notification = true
      end

      # Skips sending the password change notification after_update
      def skip_password_change_notification!
        @skip_password_change_notification = true
      end

      def self.required_fields(klass)
        [:encrypted_password] + klass.authentication_keys
      end

      # Generates a hashed password based on the given value.
      # For legacy reasons, we use `encrypted_password` to store
      # the hashed password.
      def password=(new_password)
        @password = new_password
        self.encrypted_password = password_digest(@password) if @password.present?
      end

      # Verifies whether a password (ie from sign in) is the user password.
      def valid_password?(password)
        Devise::Encryptor.compare(self.class, encrypted_password, password)
      end

      # Set password and password confirmation to nil
      def clean_up_passwords
        self.password = self.password_confirmation = nil
      end

      # Update record attributes when :current_password matches, otherwise
      # returns error on :current_password.
      #
      # This method also rejects the password field if it is blank (allowing
      # users to change relevant information like the e-mail without changing
      # their password). In case the password field is rejected, the confirmation
      # is also rejected as long as it is also blank.
      def update_with_password(params, *options)
        if options.present?
          ActiveSupport::Deprecation.warn <<-DEPRECATION.strip_heredoc
            [Devise] The second argument of `DatabaseAuthenticatable#update_with_password`
            (`options`) is deprecated and it will be removed in the next major version.
            It was added to support a feature deprecated in Rails 4, so you can safely remove it
            from your code.
          DEPRECATION
        end

        current_password = params.delete(:current_password)

        if params[:password].blank?
          params.delete(:password)
          params.delete(:password_confirmation) if params[:password_confirmation].blank?
        end

        result = if valid_password?(current_password)
          update(params, *options)
        else
          assign_attributes(params, *options)
          valid?
          errors.add(:current_password, current_password.blank? ? :blank : :invalid)
          false
        end

        clean_up_passwords
        result
      end

      # Updates record attributes without asking for the current password.
      # Never allows a change to the current password. If you are using this
      # method, you should probably override this method to protect other
      # attributes you would not like to be updated without a password.
      #
      # Example:
      #
      #   def update_without_password(params, *options)
      #     params.delete(:email)
      #     super(params)
      #   end
      #
      def update_without_password(params, *options)
        if options.present?
          ActiveSupport::Deprecation.warn <<-DEPRECATION.strip_heredoc
            [Devise] The second argument of `DatabaseAuthenticatable#update_without_password`
            (`options`) is deprecated and it will be removed in the next major version.
            It was added to support a feature deprecated in Rails 4, so you can safely remove it
            from your code.
          DEPRECATION
        end

        params.delete(:password)
        params.delete(:password_confirmation)

        result = update(params, *options)
        clean_up_passwords
        result
      end

      # Destroy record when :current_password matches, otherwise returns
      # error on :current_password. It also automatically rejects
      # :current_password if it is blank.
      def destroy_with_password(current_password)
        result = if valid_password?(current_password)
          destroy
        else
          valid?
          errors.add(:current_password, current_password.blank? ? :blank : :invalid)
          false
        end

        result
      end

      # A callback initiated after successfully authenticating. This can be
      # used to insert your own logic that is only run after the user successfully
      # authenticates.
      #
      # Example:
      #
      #   def after_database_authentication
      #     self.update_attribute(:invite_code, nil)
      #   end
      #
      def after_database_authentication
      end

      # A reliable way to expose the salt regardless of the implementation.
      def authenticatable_salt
        encrypted_password[0,29] if encrypted_password
      end

      if Devise.activerecord51?
        # Send notification to user when email changes.
        def send_email_changed_notification
          send_devise_notification(:email_changed, to: email_before_last_save)
        end
      else
        # Send notification to user when email changes.
        def send_email_changed_notification
          send_devise_notification(:email_changed, to: email_was)
        end
      end

      # Send notification to user when password changes.
      def send_password_change_notification
        send_devise_notification(:password_change)
      end

    protected

      # Hashes the password using bcrypt. Custom hash functions should override
      # this method to apply their own algorithm.
      #
      # See https://github.com/heartcombo/devise-encryptable for examples
      # of other hashing engines.
      def password_digest(password)
        Devise::Encryptor.digest(self.class, password)
      end

      if Devise.activerecord51?
        def send_email_changed_notification?
          self.class.send_email_changed_notification && saved_change_to_email? && !@skip_email_changed_notification
        end
      else
        def send_email_changed_notification?
          self.class.send_email_changed_notification && email_changed? && !@skip_email_changed_notification
        end
      end

      if Devise.activerecord51?
        def send_password_change_notification?
          self.class.send_password_change_notification && saved_change_to_encrypted_password? && !@skip_password_change_notification
        end
      else
        def send_password_change_notification?
          self.class.send_password_change_notification && encrypted_password_changed? && !@skip_password_change_notification
        end
      end

      module ClassMethods
        Devise::Models.config(self, :pepper, :stretches, :send_email_changed_notification, :send_password_change_notification)

        # We assume this method already gets the sanitized values from the
        # DatabaseAuthenticatable strategy. If you are using this method on
        # your own, be sure to sanitize the conditions hash to only include
        # the proper fields.
        def find_for_database_authentication(conditions)
          find_for_authentication(conditions)
        end
      end
    end
  end
end
めちゃくちゃに長いですね、、、
重要そうなところだけピックアップして解説します。
まず、いちばん上にコメントアウトでざっくりと概要が書かれています。
Authenticatable Module, responsible for hashing the password and validating the authenticity of a user while signing in.
訳としては、「サインイン時にパスワードのハッシュ化とユーザーの真正性の検証を行う」でしょうか。
ログイン機能としてとても重要なユーザーの真正性を行ってくれるようです。
上記の記載のすぐ下に以下の文があります。
This module defines a
password=method. This method will hash the argument and store it in theencrypted_passwordcolumn, bypassing any pre-existingpasswordcolumn if it exists.
訳:
このモジュールは password= メソッドを定義しています。このメソッドは引数をハッシュ化して encrypted_password カラムに格納し、既存の password カラムがある場合はそれをバイパスします。
このpassword=メソッドはモジュールの中に定義されていました。
def password=(new_password)
  @password = new_password
  self.encrypted_password = password_digest(@password) if @password.present?
end
引数であるnew_passwordを@passwordに格納し、@passwordが空でなければ、password_digestメソッドによりハッシュ化される仕組みのようです。password_digestについても同じmodule内にあるので見てみます。
# Hashes the password using bcrypt. Custom hash functions should override
# this method to apply their own algorithm.
#
#
def password_digest(password)
  Devise::Encryptor.digest(self.class, password)
end
引数であるpasswordは先ほどの@passwordですね。第一引数であるself.classはこのdeviseで定義しているモデルです。Deviseでモデル作成時にUserとすれば、self.classはUserとなります。Devise::Encryptor.digest(self.class, password)はいったい何をしているのでしょうか。
Devise::EncryptorとあるようにDeviseのmoduleの中で定義されているEncryptorというmoduleに記載がありました。
# frozen_string_literal: true

require 'bcrypt'

module Devise
  module Encryptor
    def self.digest(klass, password) # <= この部分!!
      if klass.pepper.present?
        password = "#{password}#{klass.pepper}"
      end
      ::BCrypt::Password.create(password, cost: klass.stretches).to_s
    end

    def self.compare(klass, hashed_password, password)
      return false if hashed_password.blank?
      bcrypt   = ::BCrypt::Password.new(hashed_password)
      if klass.pepper.present?
        password = "#{password}#{klass.pepper}"
      end
      password = ::BCrypt::Engine.hash_secret(password, bcrypt.salt)
      Devise.secure_compare(password, hashed_password)
    end
  end
end
self.digest(klass, password)のklassはself.classが入っています。なぜclassとしないのかはわかりません笑
この部分については下記記事で説明されていました。
"#{password}#{klass.pepper}"については、平文パスワードにあらかじめ設定されている文字列(pepper)をくっつけ、結合された文字列をハッシュ化を行います。pepperは平文パスワードにあらかじめ設定されている文字列とあることから、登録済みのpasswordでないと設定されていないということでしょう。ですのでklass.pepper.present?とすることで、既に登録済みのパスワードがあるモデル場合trueを返すようにしています。
逆にこの分岐でfalseになるということはこのモデルはパスワード登録を行なっていないということになるので、パスワードのハッシュ化moduleであるBCryptを使用しているということですね。このようにモデルのカラムにパスワードをハッシュ化してデータベースに保存する仕組みができています。
次に検証部分ですが、それは以下のメソッドになるかなと思います。(最初に記載した長いmoduleの中で定義されています。)
# Verifies whether a password (ie from sign in) is the user password.
def valid_password?(password)
  Devise::Encryptor.compare(self.class, encrypted_password, password)
end
「パスワード(サインイン時のもの)がユーザーパスワードであるかどうかを検証」とあるように、渡されたパスワードを検証するメソッドです。内部にあるこちらのメソッド(Devise::Encryptor.compare)は先ほど参照したEncryptorモジュールの中にあります。
  def self.compare(klass, hashed_password, password)
    return false if hashed_password.blank?
    bcrypt   = ::BCrypt::Password.new(hashed_password)
    if klass.pepper.present?
      password = "#{password}#{klass.pepper}"
    end
    password = ::BCrypt::Engine.hash_secret(password, bcrypt.salt)
    Devise.secure_compare(password, hashed_password)
  end
hashed_password.blank?で渡されたハッシュ化されたパスワードが空値ならすぐにreturnを返して処理を終了させますね。それ以降の処理についてはこのモジュール内からだとわかりにくいのですが、Devise.secure_compare(password, hashed_password)で引数として渡されたハッシュ化されたパスワード(hashed_password)と既に登録済みのパスワードと平文パスワードにあらかじめ設定されている文字列を結合したもの(password)を比較しているものと思います。
このようにして、データベースを用いてユーザーのパスワード検証を行っているのがDatabase authenticatableだと言えます。
【Gem】taskleafに無理やりdeviseを導入
はじめに
こんにちは!大ちゃんの駆け出し技術ブログです!
今回は有名なログインgemであるdeviseについて解説します。
RUNTEQでは基本的にdeviseではなくsorceryというgemを使ってログイン機能を学びます。しかし、今回自分のPFにはdeviseを使うことにしました。
※理由は別記事にて説明予定
導入
今回も例にしたがってtaskleafに実装していきます。基本的には公式の流れに沿って導入します。
念のためこの間Railsのバージョンに合わないgemを見つけたので、念のためgemがtaskleafで使用可能かどうか確認します。
Devise 4.0 works with Rails 4.1 onwards
「Devise 4.0はRails 4.1以降で動作します。」とあります。taskleafのRailsのバージョンは5.2.4.4ですので大丈夫そうですね。
$ rails -v
Rails 5.2.4.4
ではさっそく実装していきましょう
ダウンロード
# Gemfile
gem 'devise
$ bundle install
Fetching devise 4.7.3
Installing devise 4.7.3
次に以下のコマンドを実行してみます。
$ rails generate devise:install
すると2つのファイルが作成され、多くの指示が書かれるかなと思います。
$ rails generate devise:install
Running via Spring preloader in process 8284
      create  config/initializers/devise.rb
      create  config/locales/devise.en.yml
===============================================================================

Depending on your application's configuration some manual setup may be required:

  1. Ensure you have defined default url options in your environments files. Here
     is an example of default_url_options appropriate for a development environment
     in config/environments/development.rb:

       config.action_mailer.default_url_options = { host: 'localhost', port: 3000 }

     In production, :host should be set to the actual host of your application.

     * Required for all applications. *

  2. Ensure you have defined root_url to *something* in your config/routes.rb.
     For example:

       root to: "home#index"

     * Not required for API-only Applications *

  3. Ensure you have flash messages in app/views/layouts/application.html.erb.
     For example:

       <p class="notice"><%= notice %></p>
       <p class="alert"><%= alert %></p>

     * Not required for API-only Applications *

  4. You can copy Devise views (for customization) to your app by running:

       rails g devise:views
4つの指示
① デフォルトURLオプションを定義
公式でもこちらの設定は必要と書かれています。
At this point, a number of instructions will appear in the console. Among these instructions, you'll need to set up the default URL options for the Devise mailer in each environment.
訳: コンソールにいくつかの指示が表示されます。これらの指示のうち、DeviseメーラーのデフォルトURLオプションを各環境で設定する必要があります。
なぜする必要があるかについては古い記事ですが下記記事を参照しました。
deviseがpasswordの再設定のときなどにurlを取得するメソッドを使っていて、その際にhostを指定する必要があったということです。この記載がないままアプリ開発を続けるとエラーが発生するかなと思います。
指示に従いconfig/environments/development.rb配下に以下の記載をしましょう。
# config/environments/development.rb
# defined default url options for gem "devise"
  config.action_mailer.default_url_options = { host: 'localhost', port: 3000 }
② ルートパスを指定
deviseだと自動で作成されるコントローラのリダイレクト先がルートパスになっているため、あらかじめconfig/routes.rbでルートを設定する必要があります。現在のtaskleafのアプリでは以下のように設定されているのでこの指示は既に満たしています。
root to: 'tasks#index'
ちなみにこれは記載しなくてもいいかなと思います。コントローラ内のリダイレクト先を変えれば済む話かなと思いますので。
③ フラッシュメッセージ用のタグを埋め込む
これはdeviseのフラッシュメッセージを表示させるためのものです。記載しておいてもいいかなと思います。
// app/views/layouts/application.html.slim
p.notice
  = notice
p.alert
  = alert
④ deviseのビューをカスタマイズする時は下記のコマンドを実行
これを実行するとdevise用のたくさんのビューファイルが作成されます。今回は使用してもいいかなと思いますので実行します。
$ rails g devise:views
invoke  Devise::Generators::SharedViewsGenerator
      create    app/views/devise/shared
      create    app/views/devise/shared/_error_messages.html.erb
      create    app/views/devise/shared/_links.html.erb
      invoke  form_for
      create    app/views/devise/confirmations
      create    app/views/devise/confirmations/new.html.erb
      create    app/views/devise/passwords
      create    app/views/devise/passwords/edit.html.erb
      create    app/views/devise/passwords/new.html.erb
      create    app/views/devise/registrations
      create    app/views/devise/registrations/edit.html.erb
      create    app/views/devise/registrations/new.html.erb
      create    app/views/devise/sessions
      create    app/views/devise/sessions/new.html.erb
      create    app/views/devise/unlocks
      create    app/views/devise/unlocks/new.html.erb
      invoke  erb
      create    app/views/devise/mailer
      create    app/views/devise/mailer/confirmation_instructions.html.erb
      create    app/views/devise/mailer/email_changed.html.erb
      create    app/views/devise/mailer/password_change.html.erb
      create    app/views/devise/mailer/reset_password_instructions.html.erb
      create    app/views/devise/mailer/unlock_instructions.html.erb
Userモデルへのカラムの追加
既にUserモデルは作成されていますが下記コマンドを実行しUserモデルのマイグレーションファイルを作ります。
$ rails g devise user
create    db/migrate/20210321134849_add_devise_to_users.rb
      insert    app/models/user.rb
       route  devise_for :users
まずマイグレーションファイルですが、たくさんの記載がされていると思います。
# frozen_string_literal: true

class AddDeviseToUsers < ActiveRecord::Migration[5.2]
  def self.up
    change_table :users do |t|
      ## Database authenticatable
      t.string :email,              null: false, default: ""
      t.string :encrypted_password, null: false, default: ""

      ## Recoverable
      t.string   :reset_password_token
      t.datetime :reset_password_sent_at

      ## Rememberable
      t.datetime :remember_created_at

      ## Trackable
      # t.integer  :sign_in_count, default: 0, null: false
      # t.datetime :current_sign_in_at
      # t.datetime :last_sign_in_at
      # t.inet     :current_sign_in_ip
      # t.inet     :last_sign_in_ip

      ## Confirmable
      # t.string   :confirmation_token
      # t.datetime :confirmed_at
      # t.datetime :confirmation_sent_at
      # t.string   :unconfirmed_email # Only if using reconfirmable

      ## Lockable
      # t.integer  :failed_attempts, default: 0, null: false # Only if lock strategy is :failed_attempts
      # t.string   :unlock_token # Only if unlock strategy is :email or :both
      # t.datetime :locked_at

      # Uncomment below if timestamps were not included in your original model.
      # t.timestamps null: false
    end

    add_index :users, :email,                unique: true
    add_index :users, :reset_password_token, unique: true
    # add_index :users, :confirmation_token,   unique: true
    # add_index :users, :unlock_token,         unique: true
  end

  def self.down
    # By default, we don't want to make any assumption about how to roll back a migration when your
    # model already existed. Please edit below which fields you would like to remove in this migration.
    raise ActiveRecord::IrreversibleMigration
  end
end
Recoverable、Lockableなどの記載がされていますが、こちらについては次回の記事で説明します。
まずマイグレーションファイル自体の挙動ですが、change_tableと記載されていますね。Railsガイドにも詳しく説明が書かれていました。
普段テーブルを作成する時に使うcreate_tableとほぼ変わらないようですが、カラム名を変更したりもできるのでより利便性があるのかなと思います
それでは作成されたマイグレーションファイルをrails db:migrateで反映させます。しかし、このままではマイグレーションファイルをDBに反映できません。理由は既にemailカラムがUserモデルに作られているからです。このままマイグレーションファイルを反映しようとすると下記エラーが出てしまいます。
PG::DuplicateColumn: ERROR: column "email" of relation "users" already exists
ですのでemaiカラム に関する記述はコメントアウトしておきましょう。二箇所コメントアウトする必要があります。
# frozen_string_literal: true

class AddDeviseToUsers < ActiveRecord::Migration[5.2]
  def self.up
    change_table :users do |t|
      ## Database authenticatable
      # t.string :email,              null: false, default: "" # <= コメントアウト
      t.string :encrypted_password, null: false, default: ""

      ## Recoverable
      t.string   :reset_password_token
      t.datetime :reset_password_sent_at

      ## Rememberable
      t.datetime :remember_created_at

      ## Trackable
      # t.integer  :sign_in_count, default: 0, null: false
      # t.datetime :current_sign_in_at
      # t.datetime :last_sign_in_at
      # t.inet     :current_sign_in_ip
      # t.inet     :last_sign_in_ip

      ## Confirmable
      # t.string   :confirmation_token
      # t.datetime :confirmed_at
      # t.datetime :confirmation_sent_at
      # t.string   :unconfirmed_email # Only if using reconfirmable

      ## Lockable
      # t.integer  :failed_attempts, default: 0, null: false # Only if lock strategy is :failed_attempts
      # t.string   :unlock_token # Only if unlock strategy is :email or :both
      # t.datetime :locked_at

      # Uncomment below if timestamps were not included in your original model.
      # t.timestamps null: false
    end

    # add_index :users, :email,                unique: true # <= コメントアウト
    add_index :users, :reset_password_token, unique: true
    # add_index :users, :confirmation_token,   unique: true
    # add_index :users, :unlock_token,         unique: true
  end

  def self.down
    # By default, we don't want to make any assumption about how to roll back a migration when your
    # model already existed. Please edit below which fields you would like to remove in this migration.
    raise ActiveRecord::IrreversibleMigration
  end
end
これでマイグレーションを行ってみましょう。
$ bin/rails db:migrate
== 20210321134849 AddDeviseToUsers: migrating =================================
-- change_table(:users)
   -> 0.0034s
-- add_index(:users, :reset_password_token, {:unique=>true})
   -> 0.0025s
== 20210321134849 AddDeviseToUsers: migrated (0.0061s) ========================
マイグレーションファイルが無事に反映されたかと思います。
ちなみに先ほど行ったrails g devise userによって2つのファイルに対して追記されます。まずはapp/models/user.rbに追記されています。
# app/models/user.rb
class User < ApplicationRecord
  # Include default devise modules. Others available are:
  # :confirmable, :lockable, :timeoutable, :trackable and :omniauthable
  devise :database_authenticatable, :registerable,
         :recoverable, :rememberable, :validatable
  has_secure_password

  validates :name, presence: true
  validates :email, presence: true, uniqueness: true

  has_many :tasks
end
こちらの追記は先ほど説明を省いたマイグレーションファイルのRecoverable、Lockableなどに対応していることが予想できます。これは次回の記事で説明します。
次にroutes.rbに対してdevise_for :usersが追記されています。
Rails.application.routes.draw do
  devise_for :users
これはdeviseによるユーザー登録機能や認証機能などのルーティングを自動で生成してくれます。念のためルーティングを調べてみましょう。
$ rails routes
                                     Prefix Verb   URI Pattern                               Controller#Action
         new_user_session GET    /users/sign_in(.:format)                  devise/sessions#new
             user_session POST   /users/sign_in(.:format)                  devise/sessions#create
     destroy_user_session DELETE /users/sign_out(.:format)                 devise/sessions#destroy
        new_user_password GET    /users/password/new(.:format)             devise/passwords#new
       edit_user_password GET    /users/password/edit(.:format)            devise/passwords#edit
            user_password PATCH  /users/password(.:format)                 devise/passwords#update
                          PUT    /users/password(.:format)                 devise/passwords#update
                          POST   /users/password(.:format)                 devise/passwords#create
 cancel_user_registration GET    /users/cancel(.:format)                   devise/registrations#cancel
    new_user_registration GET    /users/sign_up(.:format)                  devise/registrations#new
   edit_user_registration GET    /users/edit(.:format)                     devise/registrations#edit
        user_registration PATCH  /users(.:format)                          devise/registrations#update
                          PUT    /users(.:format)                          devise/registrations#update
                          DELETE /users(.:format)                          devise/registrations#destroy
                          POST   /users(.:format)                          devise/registrations#create
本当にたくさんのルーティングが追加されていますね。これをコマンド一つで行ってくれるわけですので大変便利です。
ビューの編集
次にビューの編集を行います。現在taskleafではgemなしでログイン機能を作成しています。
該当のビューファイル
// app/views/layouts/application.html.slim
ul.navbar-nav.ml-auto
  - if current_user
    li.nav-item= link_to 'タスク一覧', tasks_path, class: 'nav-link'
    - if current_user.admin?
      li.nav-item= link_to 'ユーザー一覧', admin_users_path, class: 'nav-link'
    li.nav-item= link_to 'ログアウト', logout_path, method: :delete, class: 'nav-link'
  - else
    li.nav-item= link_to 'ログイン', login_path, class: 'nav-link'
.container
- if flash.notice.present?
  .alert.alert-success= flash.notice
ここに対してdeviseのログイン機能で置き換えます。
// app/views/layouts/application.html.slim
ul.navbar-nav.ml-auto
  - if current_user
    li.nav-item= link_to 'タスク一覧', tasks_path, class: 'nav-link'
    - if current_user.admin?
      li.nav-item= link_to 'ユーザー一覧', admin_users_path, class: 'nav-link'
    li.nav-item= link_to 'ログアウト', destroy_user_session_path, method: :delete, class: 'nav-link'
  - else
    li.nav-item= link_to 'ログイン', new_user_session_path, class: 'nav-link'
    li.nav-item= link_to "新規登録", new_user_registration_path, class: 'post' , class: 'nav-link'
.container
- if flash.notice.present?
  .alert.alert-success= flash.notice
= yield
置き換えた箇所はログインとログアウトのパスをdeviseのルーティングに置き換えたのみです。
logout_path  =>  destroy_user_session_path
login_path   =>  new_user_session_path
それに加えて新規ユーザー登録のためのパスも追記しています。
li.nav-item= link_to "新規登録", new_user_registration_path, class: 'post' , class: 'nav-link'
現状の画面は以下になります。

ここで新規登録画面に線してみましょう。しかしこのままだと新規登録画面に遷移しようとするとログイン画面に戻されてしまいます。login_requiredが適応されているのでコントローラーで記載されているlogin_requiredの中身をコメントアウトしてメソッドを無効化しましょう。
def login_required
  # redirect_to login_url unless current_user
end
それでは新規登録画面に遷移してみましょう。
Bootstrapなどは現状適用していないため不格好な画面になります。加えてこのままではユーザー新規作成ができません。nameカラムの入力が必須であるからです。
class User < ApplicationRecord
  validates :name, presence: true
end
ですので登録画面を編集しましょう。ただ、deviseで先ほど作成したファイルはerbファイルですので、これをslimに変換しましょう。
$ bundle exec erb2slim app/views/devise/ --delete
これでdeviseディレクトリ配下の全てのerbファイルがslimに切り替わりました。
しかし、新規登録画面にアクセスするとエラー画面になりました。
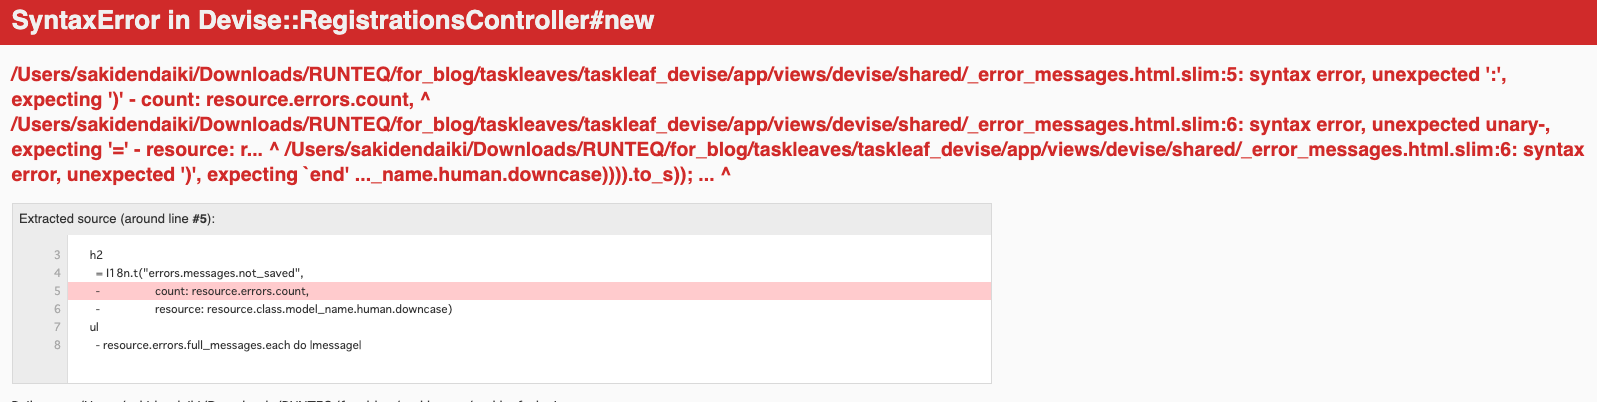
エラー該当箇所は以下のファイルです。
- if resource.errors.any?
  #error_explanation
    h2
      = I18n.t("errors.messages.not_saved",
      -                  count: resource.errors.count,
      -                  resource: resource.class.model_name.human.downcase)
    ul
      - resource.errors.full_messages.each do |message|
        li
          = message
何がおかしいのかというと、countとresourceの後ろに-があることですね。I18n.tのカッコの中にcount~とresource~があるので、-があるのはおかしいというわけです。修正しましょう。
- if resource.errors.any?
  #error_explanation
    h2
      = I18n.t("errors.messages.not_saved",
                        count: resource.errors.count,
                        resource: resource.class.model_name.human.downcase)
    ul
      - resource.errors.full_messages.each do |message|
        li
          = message
修正したら無事に新規登録画面が開けたかと思います。
余談ですがこちらのコマンドは実際よく使います。slimファイルは記法が簡潔で便利なのですが、インテンドミスなどでエラーになったり、書き方が簡潔ではあるものの少し独特で慣れるまでに時間がかかります。反対に、erbはかなり馴染みのある記法ですのでまだslimよりは書きやすいかなと。そのため、よくerbで記載してから上記のコマンドでslimに変換するということをします。ですので、上のコマンドはコピペできるようにどこかにメモしておくといいと思います。今回のようにエラーが起きるかもしれませんが、、、
それでは新規登録画面のapp/views/devise/registrations/new.html.slimを編集します。といってもnameカラムのフォームを追加するだけです。あとはフォームやボタンにBootstrapのクラスを付与しています。
h2
  | Sign up
= form_for(resource, as: resource_name, url: registration_path(resource_name)) do |f|
  = render "devise/shared/error_messages", resource: resource
  .field
    = f.label :name
    br
    = f.text_field :name, autofocus: true, autocomplete: "name", class: 'form-control'
  .field
    = f.label :email
    br
    = f.email_field :email, autofocus: true, autocomplete: "email", class: 'form-control'
  .form-check
    = f.label :admin, class: 'form_check_label' do
      = f.check_box :admin, class: 'form-check-input'
      | 管理者権限
  .field
    = f.label :password
    - if @minimum_password_length
      em
        | (
        = @minimum_password_length
        |  characters minimum)
    br
    = f.password_field :password, autocomplete: "new-password", class: 'form-control'
  .field
    = f.label :password_confirmation
    br
    = f.password_field :password_confirmation, autocomplete: "new-password", class: 'form-control'
  .actions
    = f.submit "Sign up", class: 'btn btn-primary'
= render "devise/shared/links"
新規登録画面
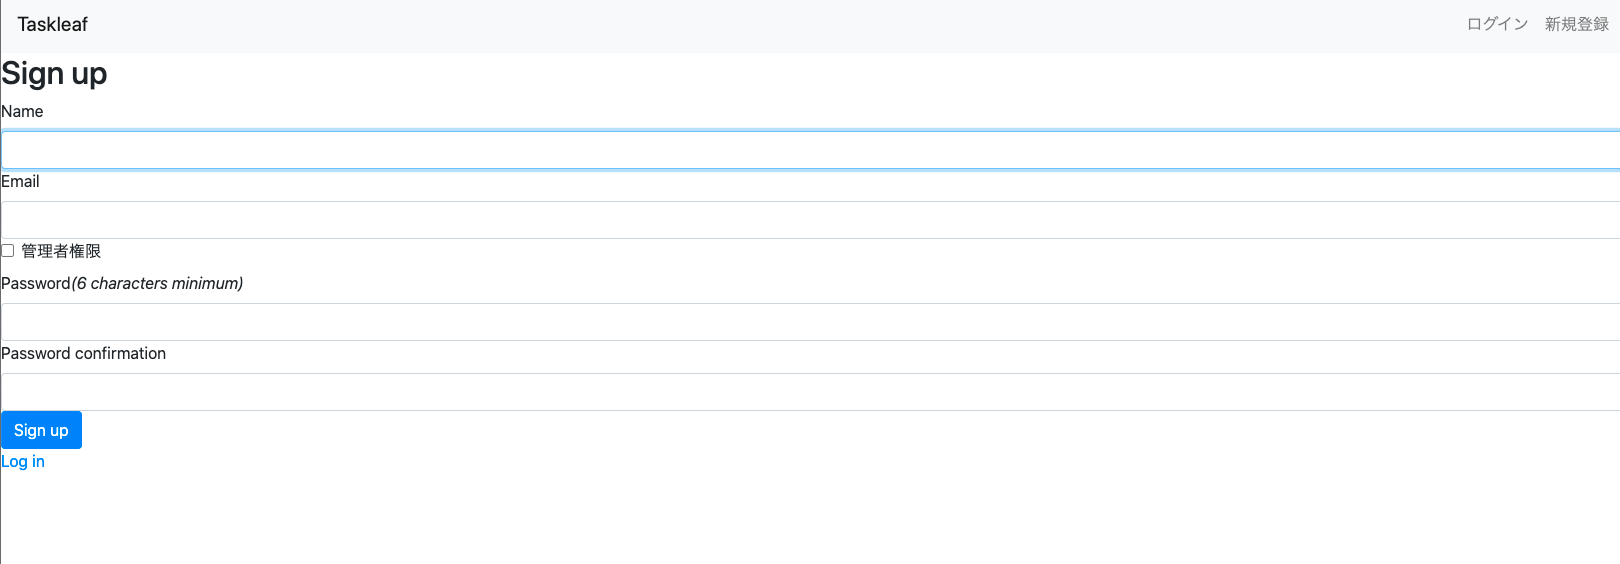
それでは実際に新規登録画面を入力しましょう。注意点として、既にtaskleafで登録しているemailは使わないようにしてください。emailカラムは一意になるようにバリデーションされているためです。
ここで実際に新規登録を行おうとしますが下記エラーが出てきてしまいますね。
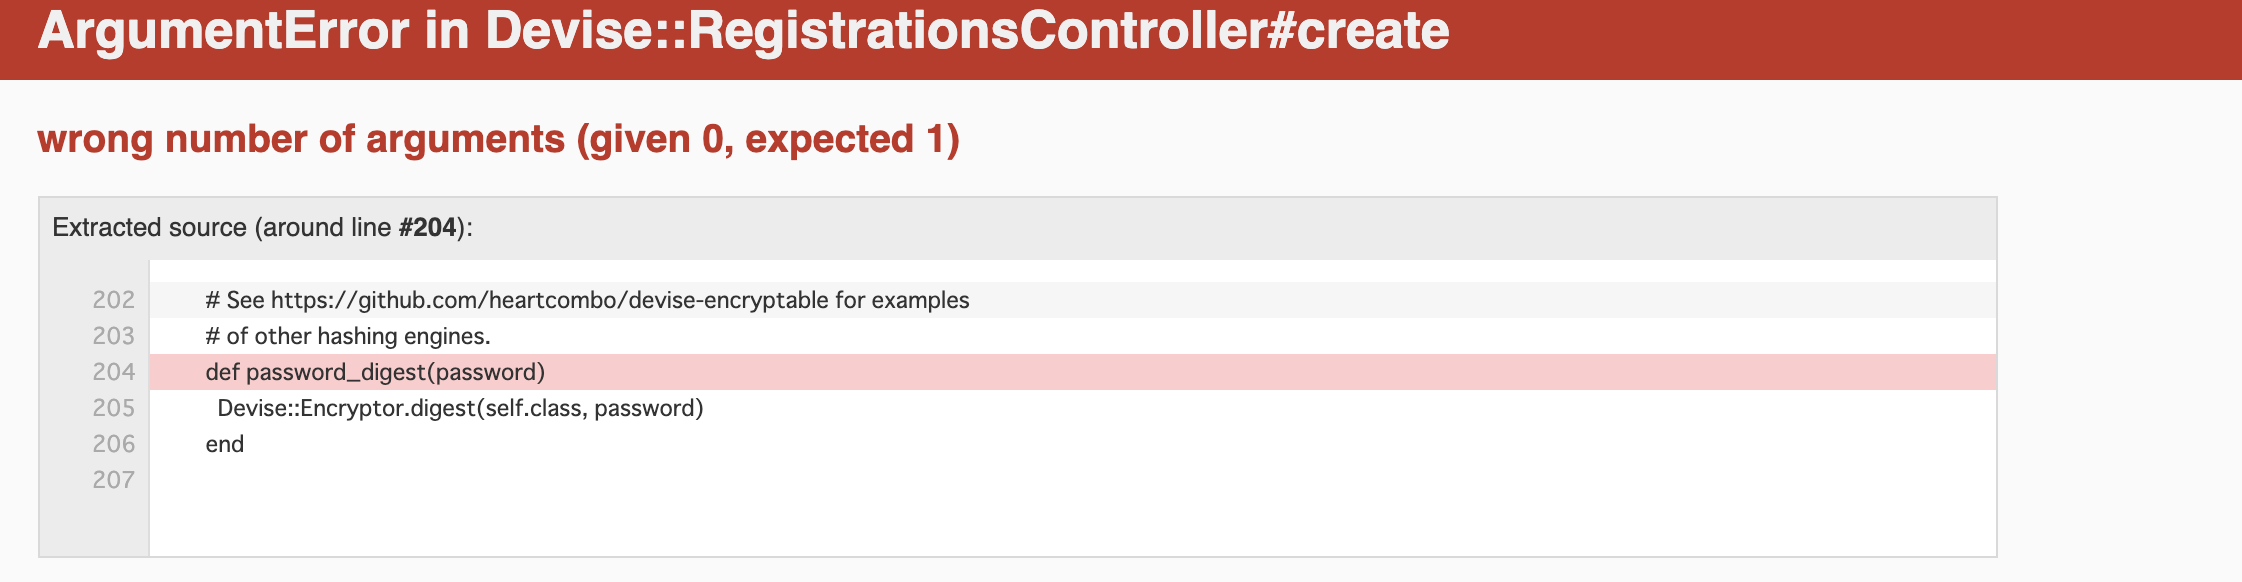
こちらについては下記記事に記載されています。
要約するとdeviseではtaskleafで使用していたセキュアパスワードを設定してくれるhas_secure_passwordが使えないということです。こちらコメントアウトしましょう。
class User < ApplicationRecord
  # has_secure_password
end
そしてパスワードで気付いたのですが、現在パスワードに関するカラムが二つ登録されている状態です。
create_table "users", force: :cascade do |t|
  t.string "password_digest", null: false
  t.string "encrypted_password", default: "", null: false
end
encrypted_passwordは上記の記事の通りdeviseで管理しています。password_digestは不要かなと思うので削除しましょう。
$ rails generate migration RemovePasswordDigestFromUsers password_digest:string
class RemovePasswordDigestFromUsers < ActiveRecord::Migration[5.2]
  def change
    remove_column :users, :password_digest, :string
  end
end
$ rails db:migrate
== 20210322140535 RemovePasswordDigestFromUsers: migrating ====================
-- remove_column(:users, :password_digest, :string)
   -> 0.0194s
== 20210322140535 RemovePasswordDigestFromUsers: migrated (0.0195s) ===========
これで無事にユーザー登録ができるようになりました。
ユーザー登録ができればそのままログインできるようになるようです。

細かい制御などについては別記事で紹介するつもりです。
deviseは思ったよりも難解なgemだと思うので複数に分けて紹介していこうと思います!
以上、大ちゃんの駆け出し技術ブログでした!
【Gem】dotenv
概要
今回はPFを作成するにあたり使用したgemであるdotenv-railsの紹介です。
用途としては以下のように説明されてます。
Storing configuration in the environment is one of the tenets of a twelve-factor app. Anything that is likely to change between deployment environments–such as resource handles for databases or credentials for external services–should be extracted from the code into environment variables. But it is not always practical to set environment variables on development machines or continuous integration servers where multiple projects are run. dotenv loads variables from a .env file into ENV when the environment is bootstrapped.
訳:
環境に設定を保存することは、アプリの12 原則の 1 つです。データベースのリソースハンドルや外部サービスの認証情報など、デプロイ環境によって変更される可能性があるものは、コードから環境変数に抽出する必要があります。
しかし、複数のプロジェクトを実行する開発マシンや継続的インテグレーションサーバに環境変数を設定することは、必ずしも現実的ではありません。 dotenvは、環境の起動時に.envファイルからENVに変数をロードします。
「環境に設定を保存すること」とはどういうことでしょうか。後ろの文にある「データベースのリソースハンドルや外部サービスの認証情報など、デプロイ環境によって変更される可能性があるもの」から推測するに、環境によって異なる値となるものを保存することと解釈できます。これを環境変数というそうです。認証情報は確かに環境によって異なる値となります。
加えて、認証情報は公開せずに管理する必要があるため、手元で保存する必要があるのです。そのため、このような設定を実行する開発マシンやサーバなどに設定するのは難しいと言っています。
そこで環境の起動時に環境変数を定義している.envファイルから変数の読み込みを自動で行うためにこのgemを使います。
まとめると
第三者に漏洩すると危険なパスワードや外部の認証情報を環境変数として管理
ちなみにアプリの12 原則についての公式サイトは以下になります。興味がある方は是非。
導入方法
いつも通りGemファイルに記載するだけですが、環境を指定してインストールを行うこともできます。
gem 'dotenv-rails', groups: [:環境名]

or

group :環境名 do
  gem 'dotenv-rails'
end
例えば、開発環境でのみdotenv-railsを使用し、製品環境では別の方法で環境変数を管理する場合に上記のような指定が可能です。
今回は環境指定で開発環境とテスト環境にのみdotenv-railsを適用させましょう。
# Gemfile
group :development, :test do
  gem 'dotenv-rails'
bundle  install
Fetching dotenv 2.7.6
Installing dotenv 2.7.6
Fetching dotenv-rails 2.7.6
Installing dotenv-rails 2.7.6
次に、環境変数を定義する.envファイルをを作成します。.envファイルは手動で作成しないといけません。作成箇所はルートディレクトリ(Gemfileなどがおいてある最上階のディレクトリ)です。
$ touch .env
以上で導入は完了です。
.envファイルへの記述
.envファイルへの記載は公式では以下のように行っています。
S3_BUCKET=YOURS3BUCKET
SECRET_KEY=YOURSECRETKEYGOESHERE
右の値(YOURS3BUCKET、YOURSECRETKEYGOESHERE)は環境変数をそのまま記載します。これが左の値(S3_BUCKET、SECRET_KEY)に代入されます。左の値は自分で好きに定義できますが、他の値との見た目の差別化のためにすべて大文字にするようですね。
それでは仮になにかのキーの値を11111111111として.envファイルに保存します.
.env
SECRET_KEY=1111111111
使用例としてはdevise認証のためのAPIキーを入れておくなどがあるかなと思います。APIキーは正しく公開しない環境変数の一例ですよね。
記載の方法は以下のようになります。
ENV['.envファイルに記載した定数']
config.omniauth ENV['SECRET_KEY']
これで値の設定は完了です。アプリケーションが起動する時にこちらの値が読み込まれるようになります。
devise - You are using an old OmniAuth version, please ensure you have 1.0.0.pr2 version or later installed. (RuntimeError)の修正
deiviseでの外部認証の導入時
現在ポートフォリオ作成でsign in with slack機能を実装しようとしています。twitterログイン等の外部リソースを用いた認証ログインのslackバージョンです。
これを導入するにあたり、deviseを使用しようと思いインストールしました。下記は一般的なインストール手順です。
deviseをインストール
# Gemfile
gem 'devise'
bundle install
・
・
Fetching responders 3.0.1
Using actionmailbox 6.0.3.5
Using rails 6.0.3.5
Using tailwindcss-rails 0.3.3
Installing orm_adapter 0.5.0
Installing warden 1.2.9
Installing responders 3.0.1
Fetching devise 4.7.3
Installing devise 4.7.3
$ bundle exec rails g devise:install
      create  config/initializers/devise.rb
      create  config/locales/devise.en.yml
===============================================================================

Depending on your application's configuration some manual setup may be required:

  1. Ensure you have defined default url options in your environments files. Here
     is an example of default_url_options appropriate for a development environment
     in config/environments/development.rb:

       config.action_mailer.default_url_options = { host: 'localhost', port: 3000 }

     In production, :host should be set to the actual host of your application.

     * Required for all applications. *

  2. Ensure you have defined root_url to *something* in your config/routes.rb.
     For example:

       root to: "home#index"

     * Not required for API-only Applications *

  3. Ensure you have flash messages in app/views/layouts/application.html.erb.
     For example:

       <p class="notice"><%= notice %></p>
       <p class="alert"><%= alert %></p>

     * Not required for API-only Applications *

  4. You can copy Devise views (for customization) to your app by running:

       rails g devise:views

     * Not required *

===============================================================================
- デフォルトURLオプションを定義
# config/environments/development.rb
  config.action_mailer.default_url_options = { host: 'localhost', port: 3000 }
- deviseでuserモデルを作成
$ rails g devise user
このコマンドでモデルを作成するとログイン認証をするためのファイルが自動で作成され、認証機能を使えるようになります。
それと同時にroutes.rbにdevise_for :usersが追記されます。
# config/routes.rb
Rails.application.routes.draw do
  devise_for :users
しかし、今回は外部認証を用いるのでルーティングは以下のようになるようです。
# config/routes.rb
Rails.application.routes.draw do
  devise_for :users, controllers: { omniauth_callbacks: 'users/omniauth_callbacks' }
ここで一旦ルーティングを確認しようとすると下記エラーが表示されました。
$ rails routes
・
・
・
You are using an old OmniAuth version, please ensure you have 1.0.0.pr2 version or later installed. (RuntimeError)
解決方法
You are using an old OmniAuth version「古いOmniAuthバージョンを使用しています」
とあるように、外部認証のgemであるOmniauthのバージョンが古いと言われています。ですのでインストールしているOmniauthのバージョンを上げるのかと最初は思いましたが、自分のインストールしているgemでは新しいバージョンを使っていたので違うのかなと思います。
gem 'oauth2', '>= 1.4.4'
gem 'omniauth-oauth2', '>= 1.4.0'
エラーメッセージで調べると下記記事にたどり着きました。
こちらを参考にすると、deviseがデフォルトだとOmniauth2に対応していないとのことです。よってbranchを指定して、Omniauth2に対応したdeviseのインストールが必要ということです。
gem 'devise', git: "https://github.com/heartcombo/devise.git", branch: "ca-omniauth-2"
こちらをインストールすると、エラーメッセージがなくなりました!
Tailwind
はじめに
こんにちは!大ちゃんの駆け出し技術ブログです!
毎日投稿をしていたので6日ぶりの投稿でもかなり久しぶりの投稿と感じてしまいます、、!
現在PFを開発中で隙間時間にVueJSを学習しています。 PF開発への集中やVueJSの楽しさにかまけてブログの投稿をさぼってしまう気持ちが強くなってしまっていますね。
いや、だめだ!!!!!!!!!!!!!!!!!!!!!
せっかく発信する習慣を2月で身につけられたのにその習慣がなくなってしまう、、、💦
ということで今回は久しぶりの発信として、現在のPF開発でお世話になっている「Tailwind」について発信していきます!
Tailwindとは
「Tailwindってなんぞや????」
そう思われる初学者は多いと思います。 半年間ほどプログラミングを学習している自分も初めて聞いた言葉でした。
一言でいうと、
【公式サイト】
Bootstrapと同様にクラスを付与することでスタイルを付けることができます。
例えば以下のような感じです。
= link_to 'ログイン', login_path, class: 'bg-green-700 py-4 px-8 rounded-lg ext-white'
[ボタンのデザイン]

このようにBootstrapと同じように指定のクラスを付与する方法でデザインを施していきます。
しかし、Bootstrapよりも付与するクラスの数はとても多いと思いませんか?
Bootstrapは使っている方も多いため共感してくれる人が多いと思いますが、1, 2つのクラスを付与するだけでスタイルが完成します。 例えばよく使われるボタン系のクラスの場合、以下のようにクラスを付けるだけで完成です。
= f.submit 'ログインする', class: 'btn btn-primary'
[ボタンのデザイン]

これはBootstrap側で用意されているコンポーネントをそのまま利用しているためです。コンポーネントとは部品という意味で、既に完成させれらたものというイメージです。そのため、開発者側がいろいろと考えてスタイルを付ける必要はなく、簡単にデザインを施すことができます。
では、なぜTailwindを使う必要があるのでしょうか。 それは、独自のオリジナルデザインの作りやすさにあります。
Bootstrapはコンポーネントの便利さの反面、スタイルが似通ってしまうというデメリットもあります。コンポーネントという特性のために開発者側がスタイルを細かく自由に定義できないため、開発者側が表現できるデザインの幅は狭くなってしまいます。そのため、他のBootstrapを使うアプリやWebサイトと似たようなデザインにどうしてもなってしまうのです。自分のアプリに合わせたデザインも制限されてしまいます。
「自分のアプリに合わせてレイアウトを整えたい!」
そんな方のためにTailwindをお勧めします!!
上記のボタンをTailwindでも表現しようとすると、以下のようなコーディングになります。
クラスをたくさん付与していますね。。。 これはつまり、クラスに対応する元々のCSSスタイルの数自体も少ないという意味です。
下記Tailwindのチートシートのリンクに遷移してみて下さい。
御覧のようにTailwindのクラスに対応するCSSのスタイルが見れるかと思います。
1つ1つのクラスに対応するスタイルの数は1つである場合がほとんどだと思います。
例えば、Flexboxのflexクラスはdisplay: flex; のスタイルのみしか適応されないんですよね。
それに対して、Bootstrapの.btn-primarのCSSスタイルは以下の3つです。
color: #fff;background-color: #007bff;border-color: #007bff;
コンポーネントの部分でも説明しましたが、すでに出来上がっているスタイルを適用するということなんですよね。
まとめると、BootstrapとTailwindの違いは
Bootstrap・・・元々完成されているCSSの組み合わせをクラスを付与することで適用する Tailwind・・・CSSの単一のスタイルを簡易的にクラスで付与することで適用する
このイメージで間違いないと思います!!
Railsへの導入
ではRailsアプリに実際にTailwindを導入していきます。 このブログでは繰り返しになりますが、使用するアプリケーションは現場Railsの「Taskleaf」を使用します。
基本的には以下の公式の導入方法に従って進行して行きます。
まずは下記コマンドを実行して行きましょう。
$ bundle add tailwindcss-rails
すると下記エラーが表示されたのではないでしょうか。
Bundler could not find compatible versions for gem "rails":
  In snapshot (Gemfile.lock):
    rails (= 5.2.4.5)

  In Gemfile:
    rails (~> 5.2.4, >= 5.2.4.4)

    tailwindcss-rails was resolved to 0.3.3, which depends on
      rails (>= 6.0.0)

Running `bundle update` will rebuild your snapshot from scratch, using only
the gems in your Gemfile, which may resolve the conflict.
これは自分も知らなかったんですけど、このtailwindcss-railsは最近追加されたもののようですね。プルリクエストのページからもわかるのですが、1番古いプルリクエストが最近です。
そのため、対応しているRailsのバージョンが>= 6.0.0以上でないと使えないようです。
解決方法として、GemfileにあるRailsのバージョンしている箇所を修正しましょう。
# Gemfile
# Bundle edge Rails instead: gem 'rails', github: 'rails/rails'
gem 'rails', '>= 6.0.0'
この状態でbundle updateをしてみましょう。
$ bundle update
これで再度下記コマンドを実行しましょう。
$ bundle add tailwindcss-rails
Fetching tailwindcss-rails 0.3.3
Installing tailwindcss-rails 0.3.3
無事インストールされたみたいですね。では下記コマンドを実行します。
$ bin/rails tailwindcss:install
✨  Done in 4.79s.
      append  app/javascript/packs/application.js
Configuring Tailwind CSS
      create  app/javascript/stylesheets
      create  app/javascript/stylesheets/application.scss
         run  npx tailwindcss init from "."
複数のファイルが作成されました。
[作成されたファイル]
// app/javascript/stylesheets/application.scss
@import "tailwindcss/base";
@import "tailwindcss/components";
@import "tailwindcss/utilities";
// app/javascript/stylesheets/tailwind.config.js
module.exports = {
  purge: [],
  darkMode: false, // or 'media' or 'class'
  theme: {
    extend: {},
  },
  variants: {
    extend: {},
  },
  plugins: [],
}
自分の場合、作成時点でslimに移行していたために以下のような警告が出ました。
insert  postcss.config.js
Default application.html.erb is missing!
Add <%= stylesheet_pack_tag "application", "data-turbo-track": "reload" %> within the <head> tag in your custom layout.
application.html.erbに追加しようとした記述があったが、application.html.slimに切り替えていたため、追記できなかったと書いてあります。
以下の記載をapplication.html.slimに追記しましょう。
/ app/views/layouts/application.html.slim
doctype html
html
  head
    title
      | ShowProfile
    = csrf_meta_tags
    = csp_meta_tag
    / = stylesheet_link_tag 'application', media: 'all', 'data-turbolinks-track': 'reload'
    = stylesheet_pack_tag "application", "data-turbo-track": "reload"
    = javascript_pack_tag 'application', 'data-turbolinks-track': 'reload'
  body
    = yield
これでインストールは完了です!!!!
Bootstrapか、Tailwindか
繰り返しますが、TailwindはCSSファイルを使わずにCSSを付与しているので、より自分にあったデザインを施すことができます。 しかし、その反面、コンポーネントを使わずに一から自分でデザインを施すのでBootstrapと比べてスタイリングの手間はかなり重いかなと思います。
便利さのBootstrapを選ぶのか、自由さのTailwindを選ぶのか。
殊PF開発においては、自分はTailwindを推したいと思っております! デザインを似通ったものにしたくないからです。
Bootstrapはいまだに多くの人が使っていると予想しています。 初学者がデザインを調整するのにかかる時間が節約できますし、デザイン自体に自信のない方が簡単にデザインを調整できるので学習コストも下げることができます。
しかし、上述したようにBootstrapは見た目が似通ってしまうというデメリットがあります。
PFを見る企業の人はこれまでに何度も未経験者のPFを見ています。目が肥えているといった方がいいでしょう。 そして、初学者でどれだけPFにポートフォリオを使っている割合は、定かではありませんが少なくはないと思っています。
自分のPFを見た企業の人が最初にあなたのPFを見たとき、第一印象が他のWebサイトで似通っているデザイン、はたまた、あなたが時間をかけて作り上げた独自のデザイン、どちらがより印象に残ると思いますか?
当然前者の方が印象に残るかと思います。
もちろんデザインは整ったものにしないと、逆にデザインのセンスなしという烙印を押される可能性がなきにしもあらずなので、しっかりとデザイン周りに気をつける必要はあります。しかし、あらかじめユーザーに使ってもらってFBを得ておくことで改善は可能だと思います。
終わりに
今回の内容はいわゆるポジショントークなやつなのかなと思っています。
Bootstrapそのままのデザインはあまり快く思われていないということからTailwindの方を使うべきだというのはまさにポジショントークなやつなのかなと、、、
なのでここまで書いておいてなんですが、Bootstrapが好きな方はそのまま使ってもいいと思います。否定はしません!
デザインの好みは人それぞれですし、Bootstrapでのデザインで十分自分好みに実装できるということであれば問題ないです!
Tailwindで実装したいという方は自分と一緒に実装頑張って行きましょう!
以上、大ちゃんの大ちゃんの駆け出し技術ブログでした!
働きながらでも技術ブログを続ける方法
はじめに
こんにちは!大ちゃんの駆け出し技術ブログです。
こちらの記事で2月中の毎日投稿終了です!!!!!!!
本当にお疲れ様!自分!!!!
正直ネタが切れたりエラーに詰まったりして書くのがすごくしんどくなり、低クオリティ記事を量産してしまったかもしれません、、、。でも、めげることなく続けてきた今、ブログを効率的に書く方法だったり、自分の考えを発信する習慣が付いたりと、1ヶ月前よりも執筆力はおそらく上がったかなと思っております!働きながら、RUNTEQのカリキュラムをしながらも行えたので、相当の自信もつきました!
2月最後の記事は締めとして、28日間働きながらもブログを続けた自分の技術ブログの続け方について紹介しようかなと思います!
Notionを使おう
これだけは断言できます。
技術ブログ(はてなブログ、Qiita)を書くのであれば、下書きの記事は全てNotionで書くようにしましょう。
こちらについては今月自分が出した記事でもまとめています!
こちらの記事でも説明していますが、技術ブログを書くことにおいてNotionで下書きを書くメリットについて説明すると、
- マークダウン記法が簡易的に書くことができる
- コード(単語)のマークダウン(⌘ + E)
例:
users、create- コード(複数行)のマークダウン(```(バッククオーテーションを3つ書く))
例:
    def create
      user = User.find_by(email: session_params[:email])

      if user&.authenticate(session_params[:password])
        session[:user_id] = user.id
        redirect_to root_url, notice: 'ログインしました'
      else
        render :new
      end
    end
- Notionで書いたマークダウン記法はコピペだけでブログ記事に反映される
正直なところ、Notionの機能は他にも様々です。ドキュメントの共有URLを発行して簡単に共有が行えたりしますし、レイアウトや仕事効率化という面ではもはやワードなどのソフトに取って変えられることも可能だと思っています。他の機能も本当はたくさん紹介したいです。
しかしながら、こと技術ブログにおいて、Notionのメリットは明らかに突出していると考えています。マークダウン記法がそのまま反映されるというだけで、マークをつける手間が格段に少なくなりますからね。
あと、勉強した内容を記事ネタとしてメモに残しておくこともできます。自分が勉強したことをあらかじめまとめておいて、隙間時間に編集することもできるので、時間がない方でもブログを書く準備ができたりもします。
ですので、技術ブログを書く上では必ずNotionを使いましょう!本当に楽なので!
明日投稿する記事は今日書こう
ある程度の文量でブログを1記事書くためには時間は最低でも1-2時間は必要です。1-2時間ってあるように見えて実は少ないです。自分も2時間を執筆時間に設定していましたが、何度も超過して焦りました。加えて、日々ネタを探さなければいけないので、ネタ探しの圧迫感もあります。しかも、人に見られるわけですから、ある程度内容が整っていないといけません。ブログを毎日投稿するということは時間、ネタ探し、記事を見る人という3つの圧迫感を感じながら投稿しないといけません。特に時間とネタ探しの圧迫感は凄まじいもので、今日終わっても明日も書かなくてはいけないというのは、かなり焦りを感じていました。

その圧迫感を少しでも軽減する方法として、明日投稿する記事は今日終わらせておくという方法があります。自分もこれを実践していなければ毎日投稿を断念していたと思います。
なぜ今日中に用意しておいた方がいいのかというと、明日の記事を執筆する時間を設けたとしても、その時間で十分足りるのかが不明であるからです。
たとえば、みなさんが自分のように働きながら技術ブログを毎日続けるとします。人によっては突然残業をしなければいけなくなったり、大幅に電車が遅延して家に着くのが遅れるということもあるかと思います。そうなった時に、ブログへの執筆時間のために他の時間を削ったり、執筆時間自体が短くなったりします。そうすると、圧迫感は増す一方です。人によっては、「今日は書かなくてもいいや」と言って、自分が立てた毎日投稿という目標を断念する人もいるかと思います。明日の予定がどうなるかはわからないので、ブログのために設けた時間がそのままフルに使えるかは前日にわからないということです。

そうならないためにも、前日に記事を書いておくことはその圧迫感から逃れる方法として最適だと思います。明日何があったとしても記事はすでにできているので、朝に投稿ボタンを押すだけでもうその日の投稿は完了です。また、突然の予定などでブログの執筆時間が少なくなっても、それに合わせたネタを選べばいいのです。例えば、もともとは2時間はかかりそうな記事ネタを選んでいたが、急な予定のために執筆時間を減らさなければならなくなったとします。そうしたら、ネタの中から時間があまりかからなそうなものや、執筆途中のものなどを選べばいいのです!
前日に記事を終わらせておくことで、ブログを継続するための心の余裕を保つことが可能になるでしょう。
初学者のために書く意識
技術ブログを書き始めた当初は、「技術ブログは自分の就活のため」としか思っていませんでした。というか毎日投稿を続けたのもそれが理由です。毎日投稿を続けた記録はブログに残るので、その実績はきっと就活でアピールできるのかなと思いました。
しかし、ブログを執筆し始めて10日ほど立った頃、始めた当初に比べてブログへのモチベーションがかなり下がっていました。どうしてモチベーションが下がったのかというと、自分のことしか考えずに技術ブログを書いていたからです。
技術ブログはどのように使っていますでしょうか?それは、自分がエラーやわからないところで詰まってしまった時に利用しているのではないでしょうか?そうです、本来技術ブログは自分と同じようにプログラミングを学ぶ人たちが見るブログです。自分の記事を読む人も少ないだろうしと考え、また、就活のためという目的で書いていたために、書くことを継続しようとしていて、他人に見せることをあまり意識していませんでした。
就活のアピールのために書くこともできますが、それはあくまで主目的であってはいけません。なぜなら、自分のために書いていれば、「自分がわかればそれでいい記事」を量産してしまうからです。他人のために書くのであれば、「他人がわかるように書いた記事」を書くことができます。
自分はそれを意識し始めてから書き方を帰ることができたと思います。まず第一に、初学者がハンズオンで実装できる内容にしました。例えば、途中から現場Railsのアプリに付け加える方法で実装をしたりしました。こうすれば、初学者の方でも自分の手元で確認して実装できると思ったからです。
[現場Railsを使用し始めた記事]
さらに、Gyazoの画像やGIFを貼り付けることで、自分の画面を見せながら初学者が確認できるようにもしました。
[Gyazoを使って画面をキャプチャした記事]
技術ブログでたまに見かけるコードだけはっつけて説明されているものがありますが、自分にはとてもわかりにくいと感じていました。筆者の画面が実際にどうなっているのかを確認できたらいいのにと思っていました。なので、自分の画面のキャプチャは実装したら必ず取ってブログに貼り付けるようにしました。
こうして、就活でアピールする目的から、初学者に見せる目的にシフトさせたことで、記事を書くのに工夫を取り入れたりすることが増え、モチベーションもかなり上がりました!
終わりに
今回は28日毎日投稿の最後の記事として、毎日投稿を続けるコツを紹介しました!
さて、28日間の毎日投稿をしたからといって終わりではありません。この28日チャレンジはあくまでもブログを書く習慣を身に付けるためのものであり、これでブログをキッパリ終えてしまったら、このチャレンジの意味が無くなってしまいます。
来月からは主にポートフォリオ制作に注力します。加えて、vue.jsの学習も取り入れるつもりですので、おそらくですが、vue.jsに関する記事を多く書くのかなと個人的に思っております。これからも定期的にブログは更新していくので何卒よろしくお願いします。
【自戒】継承関係を把握しようという話。
はじめに
こんにちは!大ちゃんの駆け出し技術ブログです。
2月の毎日投稿達成まで本記事を合わせて残すところ2つとなりました。
正直に言うと最近はPF課題で詰まってましたので、新しい知識が学べない状況でして、そろそろネタ切れ感がうっすらと伝わってないか心配ですw
今回の記事は「継承関係はしっかり意識しよう」です。これは自戒の意味を込めて記事にしようと思い至りました。継承関係なんて超初学者向けと思われますが、当然自分も継承関係自体は理解していました。しかし、継承関係は視野が狭いととても見えづらいものになります。
この記事を書こうと思った発端はまさにこの継承関係を把握してなかったことから起こりました。継承関係を把握しておらず簡単な実装ができない理由を探すのに1日以上詰まってしまったお話を自戒の念を込めてさせていただきます!
またAPIについてよく理解していない方はまずはAPIについて勉強してください!API知らないと理解できないので。。。
どのような実装をしたいのか
本記事ではRUNTEQの課題のコードを使用しますので、コード自体はあまり見せられませんがご容赦ください。テストする内容はユーザーの新規登録機能のAPIです。登録されたユーザーの情報をAPIとして取得します。
{
    "data": {
        "id": "1",
        "type": "user",
        "attributes": {
            "name": "sample_name",
            "email": "sample@example.com"
        }
    }
}
上記のJSONを取得するためにPostmanで送るパラメータは以下の画像です。
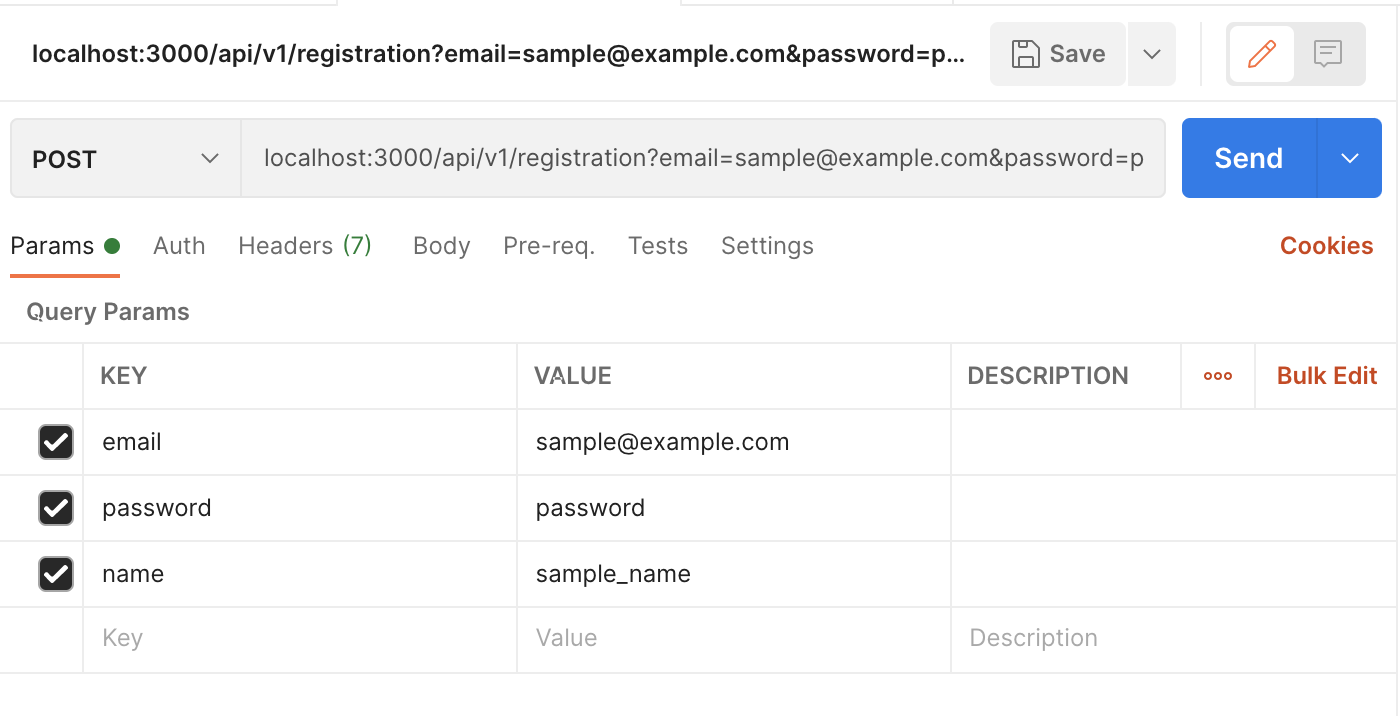
しかし、nameのパラメータを消して、emailを同じままで送ると下記のようなエラーメッセージのJSONが返ってきます。
{
    "message": "Bad Request",
    "errors": [
        "Name can't be blank",
        "Email has already been taken"
    ]
}
これはUserモデルにてバリデーションが設定されているからです。
# app/model/user.rb
class User < ApplicationRecord
・
  validates :name, presence: true
  validates :email, presence: true, uniqueness: true
・
end
今回実装方法に苦闘したのはまさにこの部分です。自分が実装したかった内容は、「JSONのerrorsにバリデーションエラーを表示させる」ことです。
現状のエラーハンドリング
実際のところ、パラメータが誤っている時下記JSONを出力するところまでは実装できました。
{
    "message": "Bad Request",
    "errors": [
        "ActionController::BadRequest"
    ]
}
このエラーはどのように表示しているのかというと、まず間違ったパラメータが渡った時にraiseメソッドで例外を明示的に起こすようにしました。@user.saveがfalseであれば例外が発生します。
# app/controllers/api/v1/registrations_controller.rb
raise ActionController::BadRequest unless @user.save
ActionController::BadRequestは別ファイルでrescue_fromでエラーハンドリングをしています。
これにより、ActionController::BadRequestのエラーが発生した時に行う処理をメソッドで設定することができます。今回のファイルでいえば、rescue400がActionController::BadRequest発生時に行う処理です。
module ApiErrorHandle
  extend ActiveSupport::Concern
  included do
    rescue_from ActionController::BadRequest, with: :rescue400
  end
・
・
・
    def rescue400(exception = nil, messages = nil)
    render_error(400, 'Bad Request', exception&.message, *messages)
  end

  private

  def render_error(code, message, *error_messages)
    response = {
      message: message,
      errors: error_messages.compact
    }

    render json: response, status: code
  end
rescue400のメソッドは基本的にprivateメソッドであるrender_errorとほぼ同じです。しかし、ActionController::BadRequestが発生しているので、引数にHTTPステータスコードである400と、エラーメッセージ'Bad Request'をそれぞれ指定しています。
第三引数について、exceptionの中身は#<ActionController::BadRequest: ActionController::BadRequest>となっておりnilではないのでexception&.messageでエラーは起きず"ActionController::BadRequest"を返しています。第四引数のmessagesはrescue400メソッドの第二引数デフォルト値nilを返しています。
[1] pry(#<Api::V1::RegistrationController>)> exception
=> #<ActionController::BadRequest: ActionController::BadRequest>
[2] pry(#<Api::V1::RegistrationController>)> exception&.message
=> "ActionController::BadRequest"
[3] pry(#<Api::V1::RegistrationController>)> messages
=> nil
そして、render400メソッドの中で実行されるrender_errorメソッドですが、上述した通り、第一引数は400で第二引数は'Bad Request'です。第三引数である*error_messagesはexception&.messageで出力された"ActionController::BadRequest"のみですので、要素数が一つの配列で["ActionController::BadRequest"]と出力されます。
[1] pry(#<Api::V1::RegistrationController>)> code
=> 400
[2] pry(#<Api::V1::RegistrationController>)> message
=> "Bad Request"
[3] pry(#<Api::V1::RegistrationController>)> error_messages
=> ["ActionController::BadRequest"]
よって変数responseの中身は以下のようになります。
[1] pry(#<Api::V1::RegistrationController>)> response
=> {:message=>"Bad Request", :errors=>["ActionController::BadRequest"]}
render json: response, status: codeでresponseがレンダーされるわけですので、現状のJSONファイルがレンダリングされるわけです。
[再掲]
{
    "message": "Bad Request",
    "errors": [
        "ActionController::BadRequest"
    ]
}
この時の自分は完全にこのエラーハンドリングのロジックを理解していました。そこまで難しいわけでもなかったですし、このエラーハンドリングの実装自体は1つ、2つ前の課題でも実装済みです。
実際、何が問題かは把握していました。現在取得しているエラーメッセージは引数で指定したものですが、これをモデルのバリデーションエラーのエラーメッセージで指定できれば、バリデーションエラーをJSON形式で表示できるはずです。
{
    "message": "Bad Request",
    "errors": [
        "Name can't be blank",
        "Email has already been taken"
    ]
}
しかしながら、それの実装方法がわからなかったのです。バリデーションエラーをどう取得していいのかがわからなかったのです。
エラーハンドリングしているモジュールはユーザー登録用のコントローラーと違うファイルにあるので、モジュール内で@user.errors.full_messagesは取得できません。ですので、コントローラー内でエラーハンドリングをする必要があるのですが、エラーハンドリングようのモジュールを設けているのでコントローラーにも別でエラーハンドリングのロジックを記述するのは汚いコードを書くことになるのでできれば避けるべきです。
この部分で完全に自分は詰まってしまいました。
継承関係を理解する
仕方なく質問したところ講師から以下の返答をもらいました。
rescue400のメソッドはこのエラーハンドラーのモジュール内だけでしか利用しない想定ですかね?直接このメソッドを利用したりできそうな気がしませんか?
ぴかーーーーーーーーーーーーーーーん!!!!!
脳に電光石火が走るぐらいピカんとしました笑
rescue400メソッドはモジュール内でしか利用できないと思い込んでいました。しかし、APIのエラーハンドリングのモジュールはBaseControllerでincluedeしてました。
module Api
  module V1
    class BaseController < ApplicationController
      include ApiErrorHandle
そして、ユーザー登録用のコントローラーはBaseControllerを継承していることがわかりました。
class RegistrationsController < BaseController
つまり、ユーザー登録用のRegistrationsControllerでもAPIのエラーハンドリングのモジュールで定義されているメソッドを使用可能ということです!!!!これがわかった時本当に気持ちよかったです!
下記のように定義していたcreateアクションを変更しました。
def create
  @user = User.new(user_params)
  raise ActionController::BadRequest unless @user.save
  json_string = UserSerializer.new(@user).serialized_json
  render json: json_string
end
↓
def create
  @user = User.new(user_params)
  if @user.save
    json_string = UserSerializer.new(@user).serialized_json
    render json: json_string
  else
    rescue400(nil, @user.errors.full_messages)
  end
end
これで再度誤ったパラメータ(nameのパラメータなし、emailを登録されたものにする)を送信すると、期待した通りのJSONが返却されました!!
{
    "message": "Bad Request",
    "errors": [
        "Name can't be blank",
        "Email can't be blank"
    ]
}
なんで解決できないかわからなかったのですが、本当に簡単に解決できましたね。
めちゃくちゃスッキリしました笑
終わりに
今回なぜこのように詰まったのかというと、親クラスがmoduleを継承していたことを完全に失念していたことにあります。本当に深く反省しています。そのためこの記事を書きましたし。
自戒の念もしっかり込めたのでこれぐらいで勘弁していただければと思いますww
さてさて、明日はいよいよ28日目の投稿!長かった毎日投稿も明日で最後です!
明日の記事ですが、技術ブログではなくブログの続け方について書いていこうと思います!
以上、大ちゃんの駆け出し技術ブログでした!